About ten years ago, fresh out of college and about to leap into a science writing program, I was home for the summer and looking around for ways to keep busy. A little sewing school had opened down the street from my folks’ place, and they were offering not only construction classes but pattern drafting. I’d been sewing for years, occasionally copying a pattern from an existing garment or making minor pattern changes like dropping a waistband or reshaping a neckline or skirt. The idea that I could instead create them from the ground up? Revolutionary.
A mere few weeks of workshop later, I was burning with newfound power. Flat drafting on paper isn’t the only way to create sewing patterns, but it clicked into my brain like a game expansion. Start by drawing up a properly fitted sloper or block, which is a pattern shaped exactly like your body that forms the foundation for anything else you might make. Learn a few basic manipulations like adding ease and transforming darts, add collar and sleeve drafts, and you can create nearly any pattern. I was unbound by trends, no longer limited by what the pattern companies thought would sell, free to rip off the designer stuff I couldn’t afford and all the steampunk gear my nerd heart could want. (Yeah, I know, but it was 2010.)
Patternmaking was also a road into good fit, which had eluded me for years. I grew up using commercial patterns, which are a bit like flattened-out ready-to-wear clothes but based on fit standards that have been frozen in time for decades (not that they were ever designed to fit square-shouldered teenage gymnasts). I attempted to make my own jeans once in high school, and was utterly thwarted by bizarre fit problems. But through trial and error, a lot of detailed measurements, and plenty of failed muslins, I gradually learned the shapes that worked for my body. Now they’re so ingrained that I can freehand a crotch curve or sleeve cap from a few reference lines.
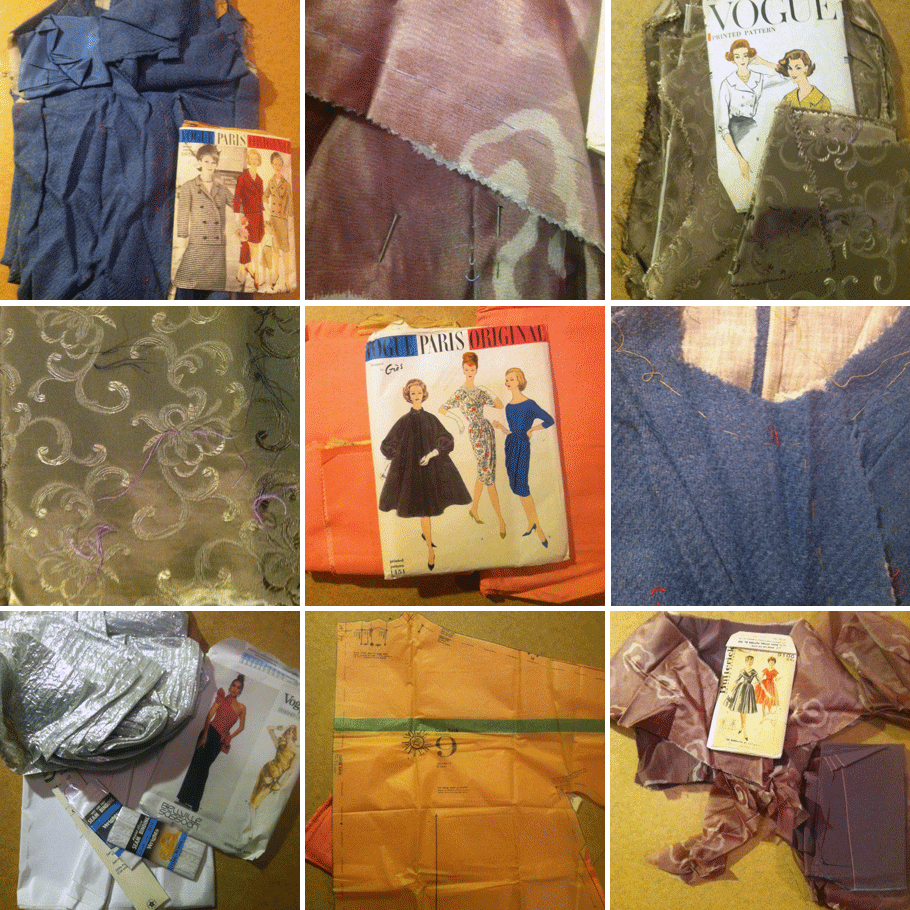
An obsession was born. I collected tools and reference books – the photo above isn’t complete, but a rough approximation of where ten years of library-building has gotten me. I bought rolls of tracing paper and started experimenting, making patterns for pants, dresses, shirts, jackets. I bought commercial patterns and international pattern magazines to study the shapes, building a whole vocabulary of style lines, silhouettes, and proportion.
But also, patterns for everyday clothes could only hold my interest for so long. Real clothing is largely designed by people who went to fashion school, who know where the seams of a garment conventionally go and how they fit together. The kind of patterns that are widely available reflect that, and the pattern pieces are predictable enough that an experienced stitcher can often leap right in without any need for instructions or even labels. Compare that to the joyful anarchy of translating garments that sprang whole from the brain of an artist who’s barely heard of zippers, and you can see how cosplay changes the game for a patternmaking enthusiast. There was something deeply satisfying about puzzling out Ezio’s hood from Assassin’s Creed 2, or Garnet’s weird jumpsuit from FF9.
So, where to start? Assuming you have a basic idea of how to put garments together, nearly any patternmaking textbook will do the job. (If not, a basic sewing book or commercial pattern is a great place to start!) Many of the books I learned from are now out of print, but there are so many others out there that it doesn’t matter much. As long as you find one with a communication style you like, that shows how to draw up a basic block, fit it to your body, and transform it with dart rotations, ease, and detail variations, it should do the job just fine. Most pattern books also contain some number of basic garment drafts, but while they’re useful examples you shouldn’t feel limited to what’s shown in the book. The basic principles are what you’re really after, and the rest is up to practice, experimentation, and learning the proportions that work for your body and your preferences.
Flat drafting systems are always going to be an approximation of a 3D body, and in order to achieve that approximation they’re always going to have some assumptions baked in. Depending on how your personal dimensions interact with these, you may end up with some weirdness in the initial block. A good fitting book should be your next stop, as you troubleshoot the draft and make any alterations necessary to customize it. Really take the time and make the block fit as perfect as you can get it, because any patterns you make from it in the future should inherit this same fit.
Very few patternmaking books also discuss construction (the Bunka Garment Design Textbook series in the picture above are some of the only ones I’ve found) so you need to be able to puzzle out assembly order on your own. This is where it helps to have made garments before, or at least have a good general sewing book at hand. For figuring out the finer points – this needs to be finished before that piece goes on, etc. – nothing beats making a mock-up before you move on to your real fabric. This is a good practice anyway, because sometimes a proportion that looks good on paper lands badly on a 3D body, and sometimes a mistaken measurement or other error leads to a non-obvious flaw in the draft. Any problems or construction challenges you can discover in this test run will save you lots of grief in the final garment, so even a very bad mock-up can be a worthwhile experience. Additionally, you should expect a bit of tinkering on any new pattern to accommodate the specific properties of the fabric you plan to use. Is it a thick, stiff material that makes everything feel tighter than it would in muslin? Is it something floppy and fluid, that wants to sag away from the shape you put it in? In the end, fit is a three-way conversation between the pattern, fabric, and the body inside, and even more so when you get into making patterns for stretch fabrics.
For cosplayers especially, I recommend learning the basics and then checking out some of the patternmaking books that deal with more unusual ideas and transformations, like the Pattern Magic series by Tomoko Nakamichi, Antonio Donnanno’s books on patternmaking for haute couture and accessories, and Stuart Anderson’s Pattern School page for stretch pattern drafting. Since cosplay is so full of odd silhouettes and unusual materials, you want a broad and varied pattern vocabulary in able to accommodate this variety.
Much more recently, I decided I needed to add draping to the repertoire. Lots of people start with this method, and I’d done enough reading to grasp the basic idea, but I didn’t have a dress form that really matched my shape until the end of 2018. Since the entire point of draping is to create patterns directly on a body, it wasn’t very practical before that. When I acquire a new tool though, I go looking for a way to use it.
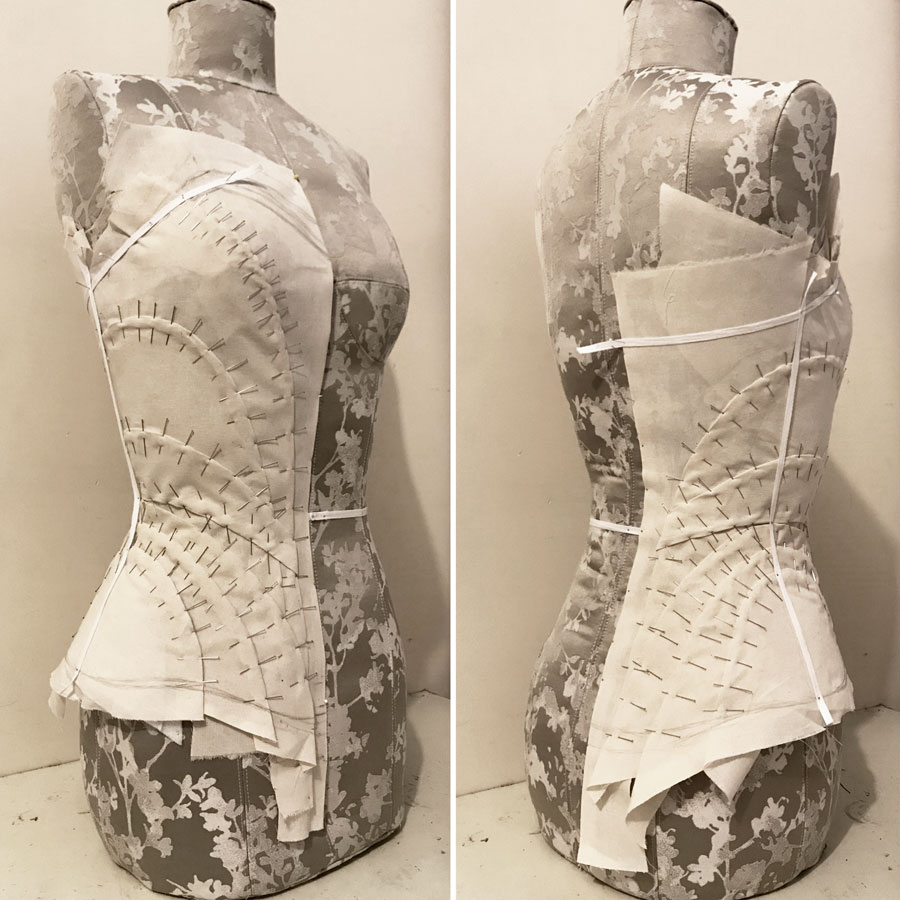
My longest-term project is the Shaman Empress from Monstress. Basically none of whatever the Empress wears under her robes is visible in the reference materials we’ve seen so far, so I’m making something up based on the available information. Most importantly, the full-length embroidered panel at center front needs to hang from something that isn’t the floaty gathered blouse – ideally a structured bodice or corset with lots of boning to prevent distortion and sagging from the weight. I drew up this paneled bodice with lots of seams wrapping around at weird angles, strongly influenced by Maika’s armor from the Monstress issue 13 cover, which I built back in early 2018 and still love. The neckline is shaped to match the upper edge of the embroidery panel, and will be refined in mockups to play nicely with the blouse underneath as well.
I spent a couple days trying to do the pattern flat, but a major weakness of paper drafting is that every time you change one piece, you need to trace the effects across all the other pieces it touches to ensure that they’ll still match up. I’ve mostly been a flat patterning partisan thus far, but trying to lay out all these curvy seams while preserving fit was not a fun time and after a deeply mediocre first muslin I needed to try something different.
This bodice has been on extreme slow cook (that post was fully a year and a half ago, with only intermittent progress since) but I’m happy with where it’s going, and it’s a nice reminder that if one tool isn’t doing the job, there’s usually something out there that will work better. Learning new skills is always worth it.
]]> I see a lot of people trying to scare beginners off sergers. Suggestions that they’re too tricky to thread, the stitching is hard to unpick, the tension finicky, the blade choppy and intimidating, etc. Generally it’s meant kindly—to spare people frustration, and maybe let them off the hook if they don’t have budget or confidence to invest in a second machine and are afraid they need one for x or y reason. Okay, fine! You don’t need a serger to sew knits, or finish seams, or anything else really, and people do fabulous work on knits and otherwise without ever coming near one. But I really like them!
I spent almost ten years in gymnastics, so leotard sewing was a pretty big deal in my early days. A serger is nice for that kind of thing because the seams have more give than a standard straight stitch, so they’re less likely to pop when stretched. As a result, I was whirring away on the family serger by my early teens. By high school my grandma was calling me over to rethread and fix the tension so she didn’t have to dig out a magnifying glass. I don’t mean this as a boast—I was just fortunate enough to have learned the basic operation and troubleshooting bits before anyone told me it was supposed to be difficult. If my slapdash teenage self could handle it with a manual and a reference book or two, I am certain that serger operation is well within the capacities of the average adult with internet access.
The majority of my sewing projects in those days were knits—leotards, t-shirts, knit dresses. I still have a couple pairs of jersey lounge pants from that era, though most of my ventures into jeans and woven tops encountered insurmountable fitting issues and are long gone. I’m boggled by the people who think beginners should stick to wovens; to my mind a t-shirt in a hefty cotton-spandex knit is much easier and more practical than a woven dress. And with a serger, you can whip up a top that’s basically indistinguishable from RTW in the span of an afternoon. That’s pretty satisfying, especially for a beginner! Certainly it was a good fit for my impatient sewing habits of that time.
After college, when I moved into my first apartment and got my very own sewing machine, it was a couple years before I worked up to adding a serger. (a freelancer at the time, I was very good at talking myself out of large purchases.) I made a handful of knit tops on the regular sewing machine, using zigzag stitches and stretch stitches and all the other workarounds that are commonly recommended, and found it intensely frustrating. It was slow, especially when using the stretch stitch, and it always felt like a half-baked approximation compared to the neat, efficient finishes I’d enjoyed at home. I actually felt quite a bit less confident about my knit sewing than I’d felt as a teenager, even though my technical knowledge had improved, and I found myself buying mostly wovens as a result.
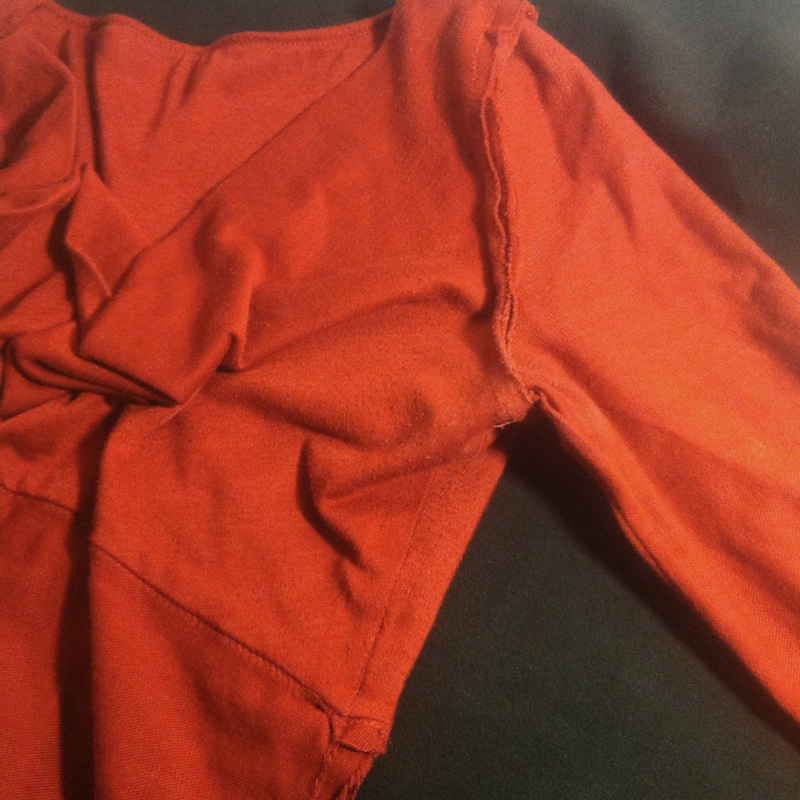
A top from the long grim sergerless era. I still wear it sometimes, but those seams annoy me every time I put it on.
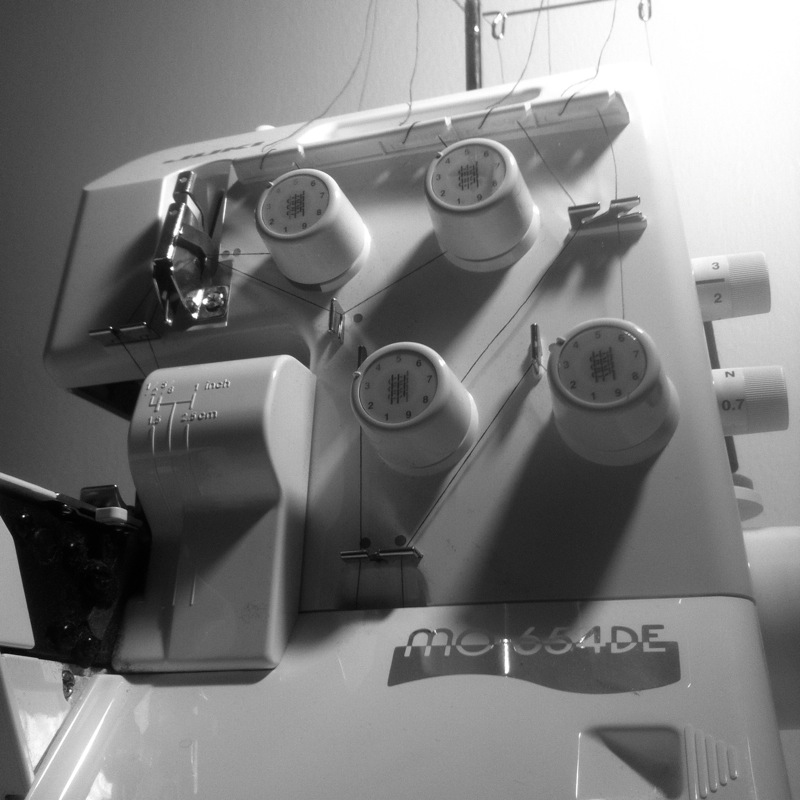
And oh boy, now that I have a serger of my own I would fight off zombie hordes to protect it. It is a beautiful, solid, reassuring piece of mechanical perfection. Let’s start with the differential feed: that thing is golden! It’s a dial that allows you to adjust the speed of the front and back feed, so that the fabric is stretched or compressed slightly as you sew. This can produce gathers or lettuce edges in extremes, but is more frequently employed to ward off puckers in delicate fabrics or prevent wavy seams in bias or stretch fabrics. I have no idea why regular sewing machines don’t come with this feature when basically all sergers have it, but I would be quite willing to plunk down some dollars for it.
I mostly use my serger in the standard 4-thread overlock mode, as it’s such an excellent general-purpose stitch for seaming knits and finishing edges on mid- to heavyweight fabrics. But in theory it can do a whole slew of other stitches, rolled hems and flatlocks and so forth. It also has all kinds of wacky feet, including ones for gathering, elastic, couching, and all kinds of other things that could theoretically come up someday (though admittedly I do just fine attaching elastic with the standard foot). It blazes through edge finishes, which makes long seams on skirts and pants much more bearable. I’ve even been known to use it for blind hemming on a t-shirt, when I was doing a rush alteration for a dude friend and didn’t want to bother switching out the sewing machine thread.
The biggest complaint about sergers as opposed to sewing machines is the complicated threading, but I SWEAR IT IS NOT THAT BAD. Even the one I learned on, which had an irritating lower looper assembly that you needed a special extra-long needle threader to get through, was not that bad. Two rules: thread the machine in order (usually right to left), and follow the color-coded dots. Most machines have a perfectly good threading diagram in the manual, or often printed right on the access door. If you’re actually allergic to poking threads through a series of loops, there are a number of brands now that are happy to perform a walletectomy in exchange for fancy pneumatic self-threading technology.
As for the tension issue, well, it’s just a matter of learning which control is associated with each thread. A good reference book will have you sorted in minutes, or just thread up your machine with a different color on each spool so you can see at a glance which goes where. Grab a good-sized scrap to test on, then adjust and sew and adjust and sew until you’ve got a nice balanced stitch that doesn’t crunch the fabric or hang off the edge. If you write down the settings you used, you can go right back to them the next time you use that stitch and fabric weight. Easy! And again, there are fancy-pants machines that will take care of all this business for you if you can’t be bothered.
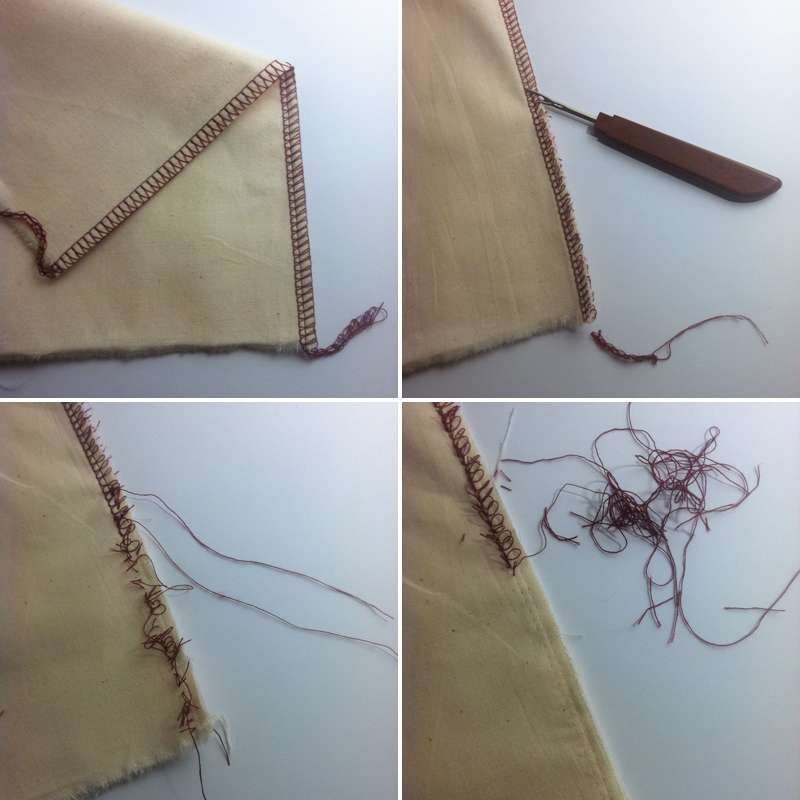 Unpicking serger seams is another area where people get hung up sometimes. It’s a lot of thread, and if you try to go about it stitch by stitch it is indeed a pain in the ass. But here’s the thing: all you have to do is cut the looper threads and the whole thing unravels. You can zip a seam ripper along the loops or even trim the edge off with your shears. Cut the chain off right at the end of the seam, then tug on the needle threads and they should pull right out, leaving a trail of looper “eyelashes” that you can pluck away with your fingers. Messy, but not difficult.
I can think of a few situations where you might not want to shell out for a serger. If you’re really really a beginner and still not sure sewing is your thing, it makes sense to keep your buy-in to one machine until you’re more certain. If you genuinely don’t give a shit what the insides of your garments look like, then don’t let me tell you otherwise. If you are seriously on a budget, there are plenty of decent alternatives to buying another machine, and you shouldn’t worry that it will compromise the quality of your work. And if you’re a hardcore couture nut who aims well above ready-to-wear quality, you may not be interested in the more utilitarian finish a serger produces.
But seriously, everyone else should consider getting one. I’m more than willing to invest the time in handwork when it counts, but for mundane seam finishes a serger is an invaluable time saver. It makes knit sewing a breeze, which should endear it to costume folks in particular. And given that you can have a basic model for about $200, it’s a more than reasonable investment for most serious hobbyists. You’ve probably spent more than that on fabric. So don’t let anyone talk you out of it.
]]> I spent the holidays visiting family in Portland and came back to a gnarly cold, so I’ve been offline mostly. I have bits and pieces of a half-dozen different projects brewing, but not much complete or bloggable due to frequent breaks for interacting with actual living people (you know how it goes). We had a house full of cats this year, including the two year’rounders (Purl and Felecia, aka Puddin’ and the Tiny Murderbeast) plus a visitor (Frederick Bear, who lost no time at all making himself at home.) So between Cat Politics, the photo-shy dog, and a full schedule of family and friends, it’s been a busy two weeks.
A visit to my parents’ basement is always both inspiring and sobering, crammed as it is with the creative paraphernalia of three generations. There are flat files full of art papers, bins of paints, bookbinding and framing supplies, beads and embroidery flosses, origami paper, bits of wire, chunks of wood, bins of yarn that we inherited from my mom’s mother, the legendary knitter, and of course boxes and boxes of fabric and patterns.
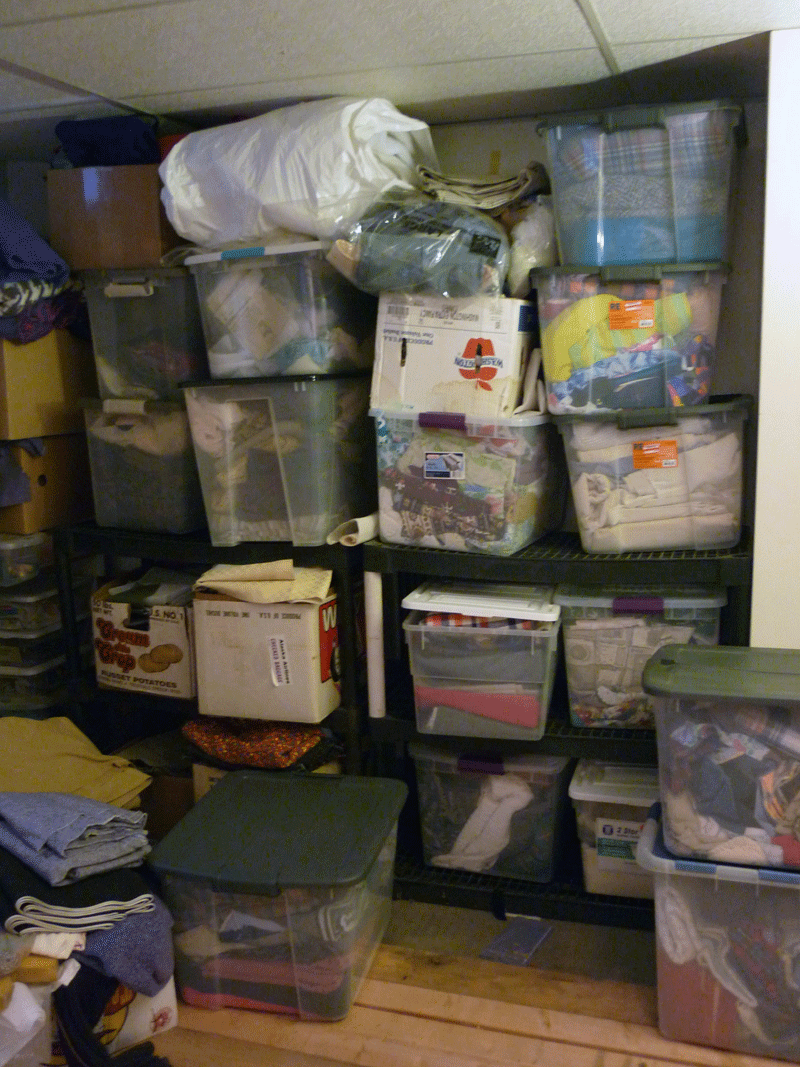 A few of the pieces here are my doing, though most of my stash is in NYC with me. Some of it came from my great grandmother, mostly corduroys and polyester prints. Most of it belonged to my dad’s mom, who contributed a good six or eight boxes—the big stapled-together kind with matching cardboard lids that they use to ship oranges (complete with assorted retro branding.)
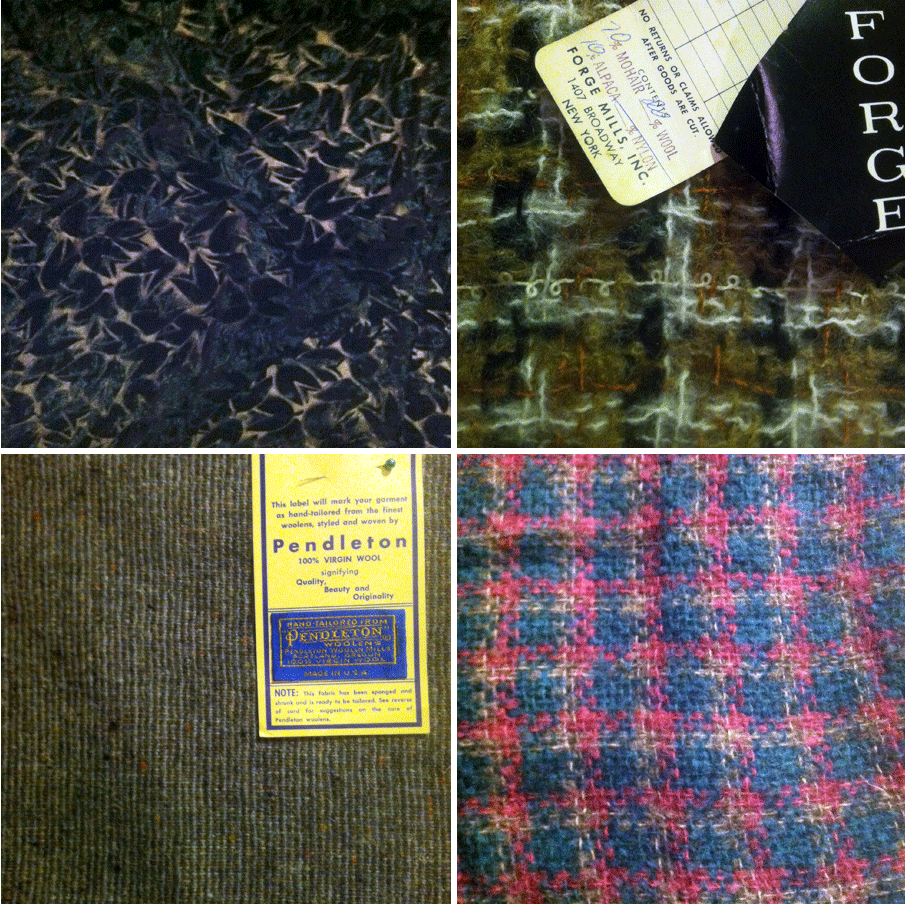
Grandma had excellent taste, and apparently spent a few of her youthful years in New York being MEGA GLAM. So a few of those boxes contained very fine cottons, silks, and wools. She favored soft, watercolor-y florals, often in pastel colors, vivid batiks, and occasional polka dots, none of which are exactly my cup of tea, but the quality of the fabrics is apparent. There are several yards of pink and turquoise plaid mohair that she once remembered to me in particular, plus a treasured bit of burnout velvet that her mother bought in the ’30s (which I’m a little afraid to even touch.) She definitely frequented the remnant racks, and there are a lot of interesting small cuts of wool and wool blends, some of them with labels still attached.
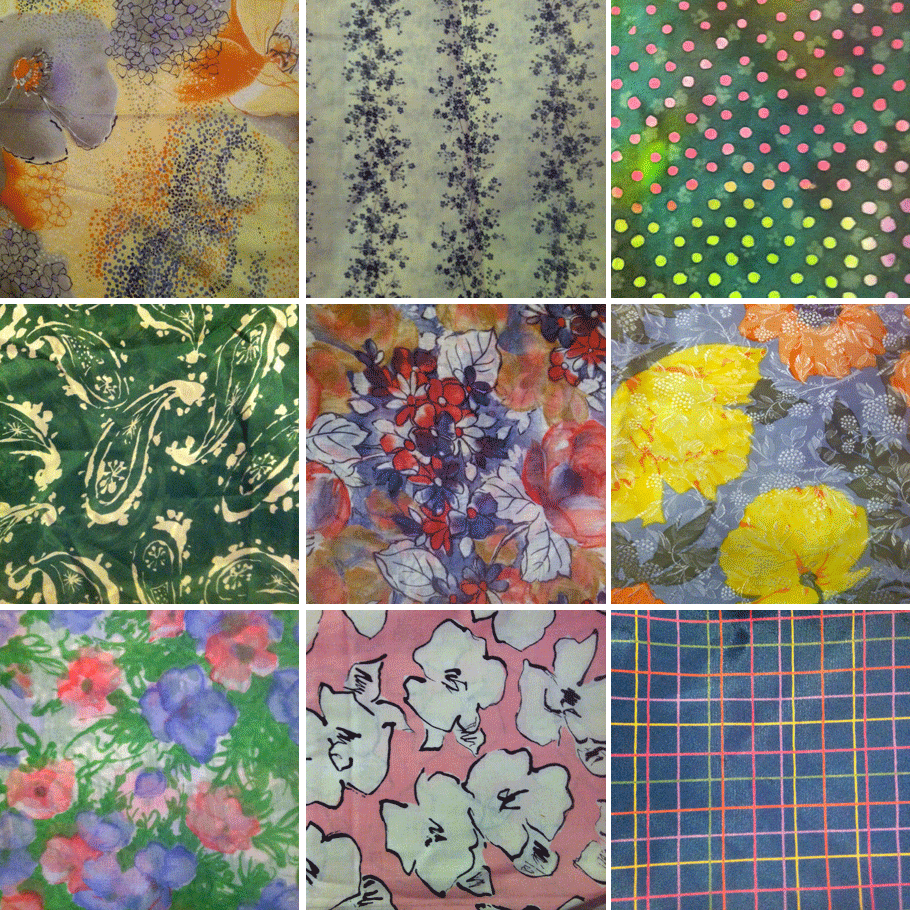
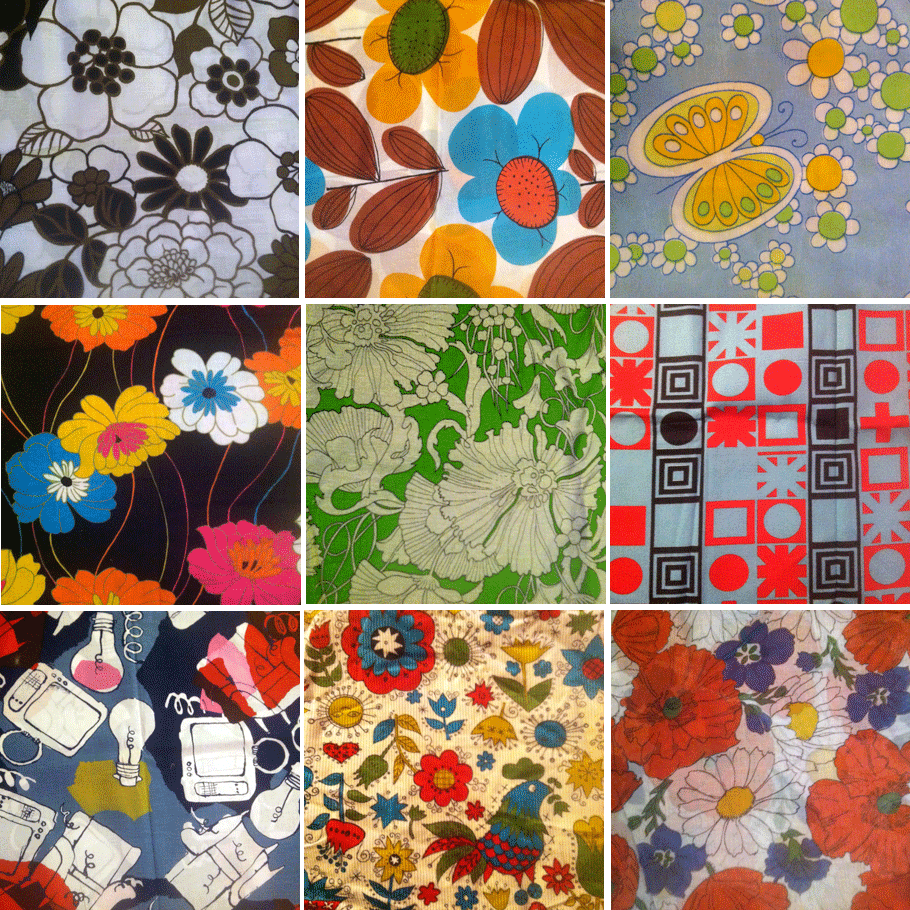
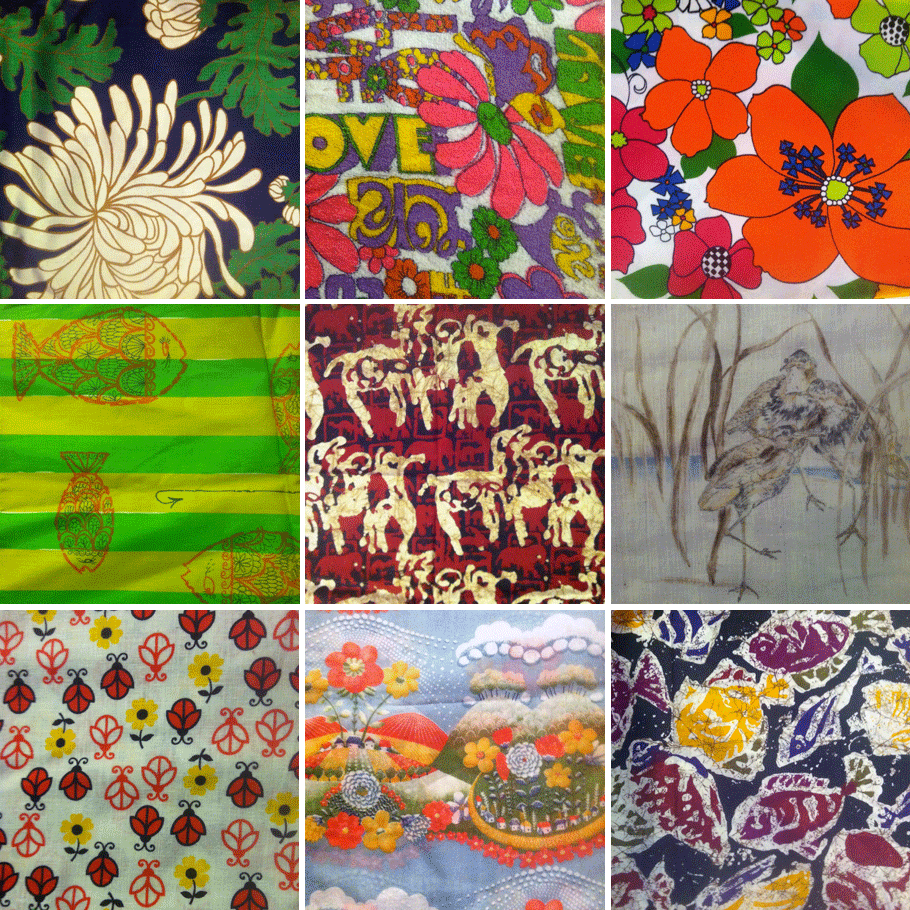
 She also had an impressive collection of sixties and seventies prints, many of them LOUD LOUD LOUD. I can’t begin to imagine wearing some of these, but since I’ll be the first to admit that my own affinity for basic, wearable fabrics is boring as hell, I don’t think that’s a bad thing. Here’s a sampling of prints that made me smile, but there’s a lot more where that came from:
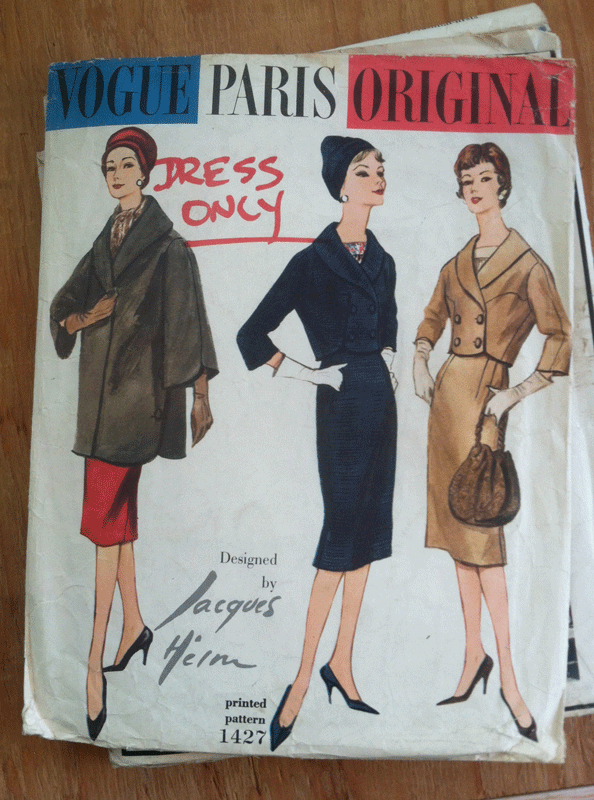
 Of course grandma had a pattern stash to match the fabric. She clearly favored Vogue patterns, and she had specimens from the late 1950s all the way through the early 2000s, about half of them with designer names. This included a truly staggering number of caftans and jumpsuits, three envelopes of hats from when people actually wore hats, evening and outerwear options from every era, beachwear, and every imaginable flavor of skirt suit and shift dress, plus a handful of styles for kids and men.
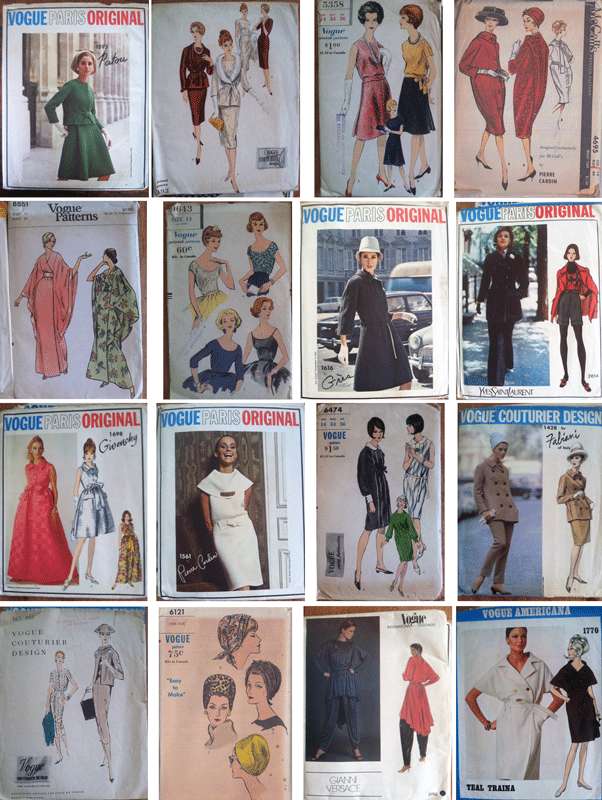 Not all the patterns are in great condition; not all are complete. This was very much a working collection.
Only the dress?! I WEEP.
We’ve even found several garments that she actually finished, stored in her actual wardrobe. V1551 and V6771, for example, both from the mid-1960s by the pattern date:
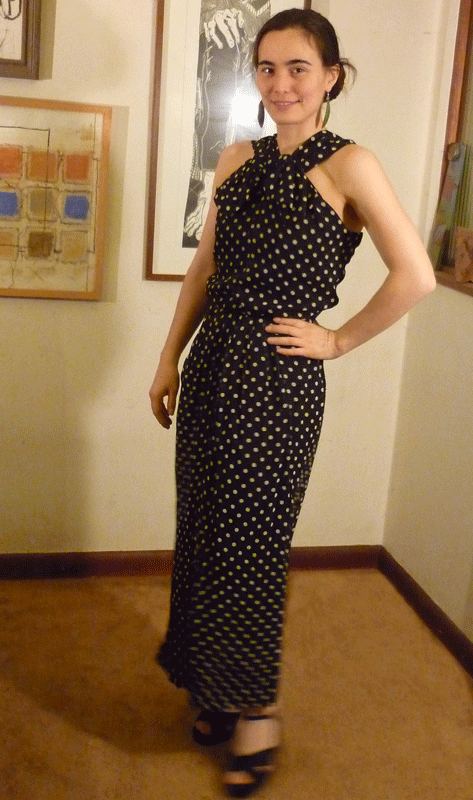
This one is still totally wearable, no? I did some minor repairs and added a hook and eye to the top of the zipper.
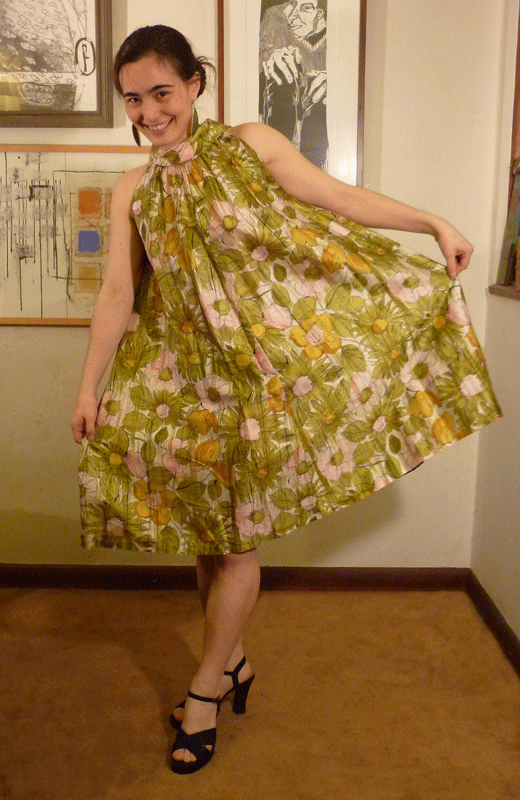
The fabric on this one is a lovely silk or pseudo-silk, but I dare say the print didn’t age so well. I also raided my high school shoe collection for this shoot, because all I’d brought with me was boots. Haw. Yes I know they don’t go.
Possibly the coolest thing was tucked away in various paper bags and envelopes amid the rest of the stash. Grandma had saved unfinished objects dating back decades, all neatly stored away to finish later. Although there are plenty of missing pieces and vanished instruction sheets elsewhere in the collection, these appear to be complete—meticulously folded and packed up with envelope and instructions, so that everything would be all ready to go whenever she found time to return to them. Some are uncut, some are cut and tailor tacked but not assembled, and others are in various stages of construction.
 There’s something a little forlorn about these abandoned projects, decades out of style and yet never finished. But they’re also kind of exciting, like a long-buried treasure or a time capsule. Each one is a glimpse of Grandma’s creative mind at a single point in time, and in total they represent a pretty wide span of years. I’d love to pull them out and make them up someday, though I have no idea when I’ll be through with my current lineup of projects. They’ve waited this long; I don’t imagine another year or two will hurt them.
In the meantime, of course, I’ve got my own freezer bags full of UFOs; my own piles of untouched fabric and bins of patterns. Clearly I inherited grandma’s stashing habit, if not her taste for fish prints. From a certain point of view it’s a waste—of time, money, storage space—but I like it. I like having materials on hand for impromptu projects; I enjoy sifting through the waiting stacks and daydreaming about what they might become. No matter how long it takes me to get around to making them up, I’ve already gotten quite a bit of pleasure out of them. And now I’m enjoying Grandma’s stash as well, and I feel like I know her a bit better for the time I’ve spent among her treasures.
In that spirit, whenever I visit home I like to pick out a few bits and pieces to take back with me. This is what I ended up with this time:
 Awfully sedate, I know. But it’s a start.
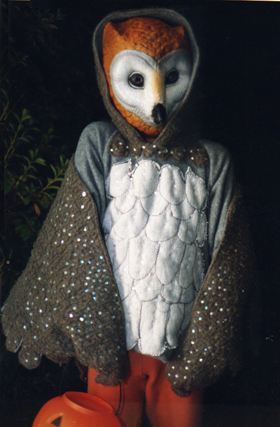
I don’t think I intended this to be a scary costume, but that mask is pretty terrifying.
Every hero needs one, right? Even if I’m only the champion of spending all my weekends buried in fabric and thread clippings.
Here’s where it begins: I grew up in a craft-obsessed city, among a family of relentless creatives. My folks are writers, designers, illustrators, crafters, and makers of all stripes. On any given day, most of the horizontal surfaces in the house would be strewn with creative paraphernalia: beads and jewelry findings, colored pencils, stacks of origami paper. My parents both sewed, too—maybe not every day, but given the right excuse they produced marvels.
It feels appropriate to be writing this the week of Halloween, because growing up it was probably the most-anticipated holiday of the year. My sister and I always scorned run-of-the-mill witches and ghosts; instead we demanded wildlife, characters from books, and creatures of our own imagining, and our parents obliged. There was the year I thumped around with a flashlight in my purple taffeta firefly tail. There was my owl costume with embroidered feathers down the front and fleecy wings encrusted with hand-sewn sequins. There was my sister’s utterly spectacular “weather girl” cape, painstakingly appliquéd with clouds and lightning, and my satin sorceress cloak with a floating cloud of glitter tulle.

Oh yeah. Me and being an INCREDIBLE DORK go way back.
Not that we always needed a holiday in order to dress up, as evidenced by my second grade school picture. My dad made me that purple superhero cape, and damned if I wasn’t going to wear it proudly. (Three cheers for tolerant teachers, no?)
Inevitably, my sister and I started making our own costumes. We’d start contemplating ideas as early as July, and execute them through a combination of thrift store scrounging and handmade ingenuity. I don’t know that I ever topped her handmade sumo wrestler suit, but one floor-length cloak in crushed black velvet, lined in coral jacquard, made for a particularly memorable ordeal of cutting and hemming. In eighth grade I wanted to be a mermaid, so I made a halter-neck fishtail gown in the scratchiest glitter dot fabric imaginable.
Eventually, of course, we outgrew the candy-fueled tours of the neighborhood, and my costuming efforts became more sporadic. I continued to spend time sewing clothes and experimenting with patterns, and even made my own prom dress, but during college fashion sewing fell by the wayside a bit too (due in part to my lack of a sewing machine.)
The summer I graduated I threw myself into learning patternmaking, got my own sewing machine, and started making pants, shirts, and jackets on a regular basis. It felt good to be making things again, and eventually it led me to my current career. But costumes were the beginning, so when I finally fell into cosplay, it was a bit like coming home.
]]>