I’m a bit of a contrarian when it comes to props. I live in a small, badly ventilated NYC apartment, and although this hasn’t been a major obstacle on the sewing side of things it effectively rules out a wide range of common propbuilding techniques. But I’m sometimes not very sensible, and I was determined to come up with a way to make Ciri’s sword, so I cobbled something together using about eight different building materials.
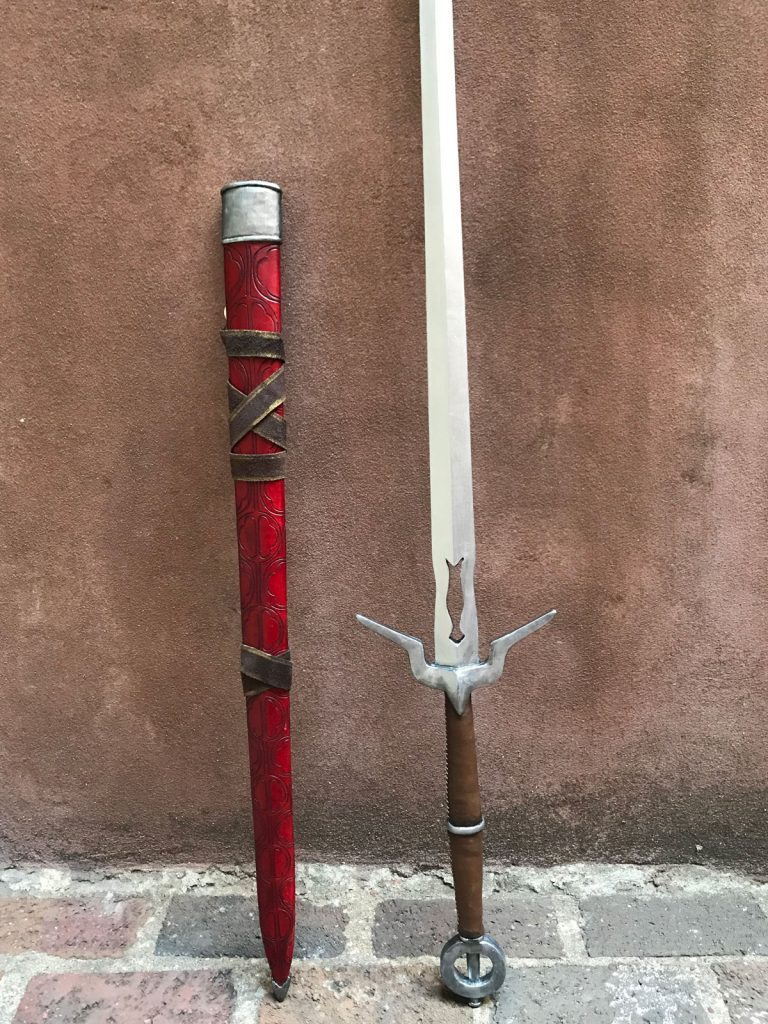
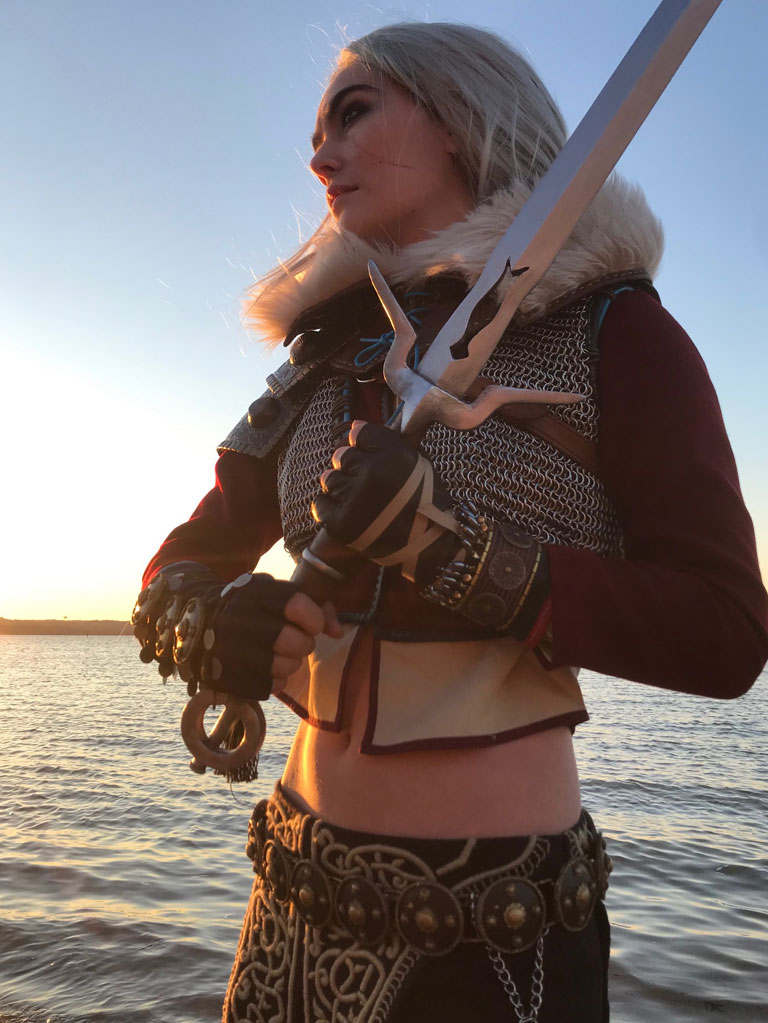
The most distinctive feature of Ciri’s sword is also why I went a bit overboard on the engineering: that stupid cutout in the blade. Even in metal that’s an obvious weak spot; in convention-safe materials it seems preposterous. So my first step was to find a material that would support that cutout while remaining thin, clean-lined, lightweight, and flexible. I didn’t want the sword to end up too heavy, or hard enough to spook convention security, so I consulted with Becka Noel at MWS and she suggested I use Kobracast as my main structural material. That proved to be exactly the right balance of lightweight, springy, and crush-resistant. The other main part of the solution was 1/8″ carbon kite spars, which I ran up the inside of the blade on each side of the cutout to add some rigid support.
For the outside shell of the blade I used oaktag, which is easy to work with, stiff enough to hold its shape when creased, and thick enough to smooth over the texture of the kobracast. I really like the idea of papercraft for making prop blades, since a creased edge can be perfectly straight and add a lot of rigidity without much weight. The one big drawback to this scheme is that you can’t un-crumple paper once it’s bent, so the backing material needs to be sturdy enough to prevent any buckling.
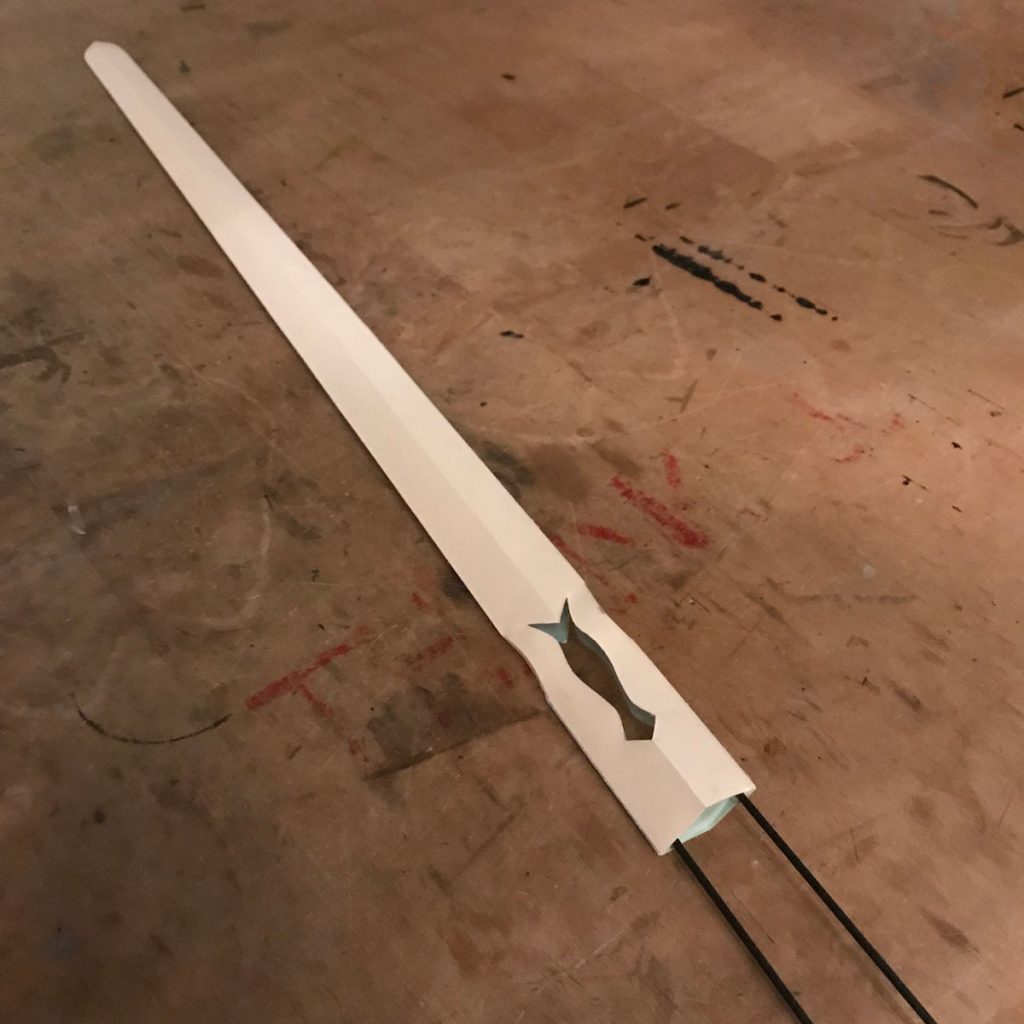
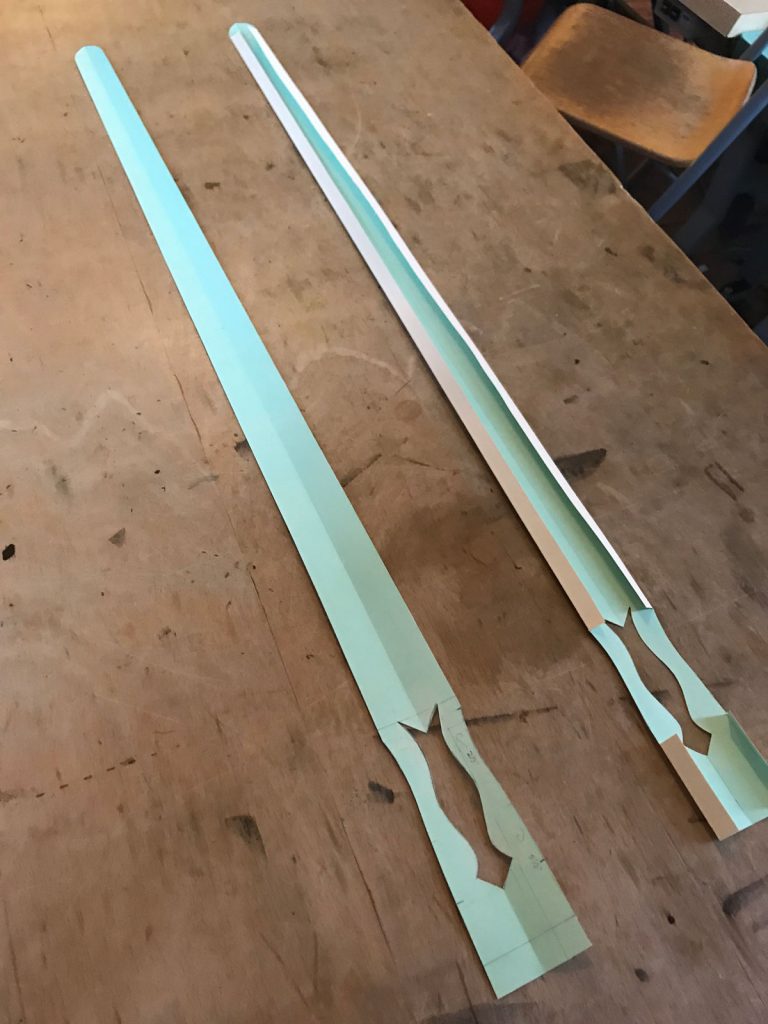
After a bit of experimenting, I ended up using a single layer of thermoplastic for most of the blade, and doubled up around the cutout and the tip for extra support. The blade was cut out in two halves, each lined with thermoplastic. The kobracast is self-adhesive, so I just nestled the kite spars into one half of the blade and then stuck the other half down on top of it and it held together beautifully. Once it was all cool, I lightly sanded the edges of the blade in order to clean up the lines and reduce the risk of papercuts.
Kobracast does have one significant drawback, which is that it tends to contract slightly as it cools. This can cause it to peel away from surfaces it’s applied to, or force the paper to curl (though the creased edges do a pretty good job of counteracting that.) I had one or two areas of the blade where the kobracast bubbled away from the paper a little bit, and those ended up giving me some trouble when I got to the finishing stage because the unsupported paper warped when I tried to prime it. You kind of have to keep a close eye on it, and avoid reheating the blade once it’s assembled because it’s very hard to repair any internal bubbles at that point.
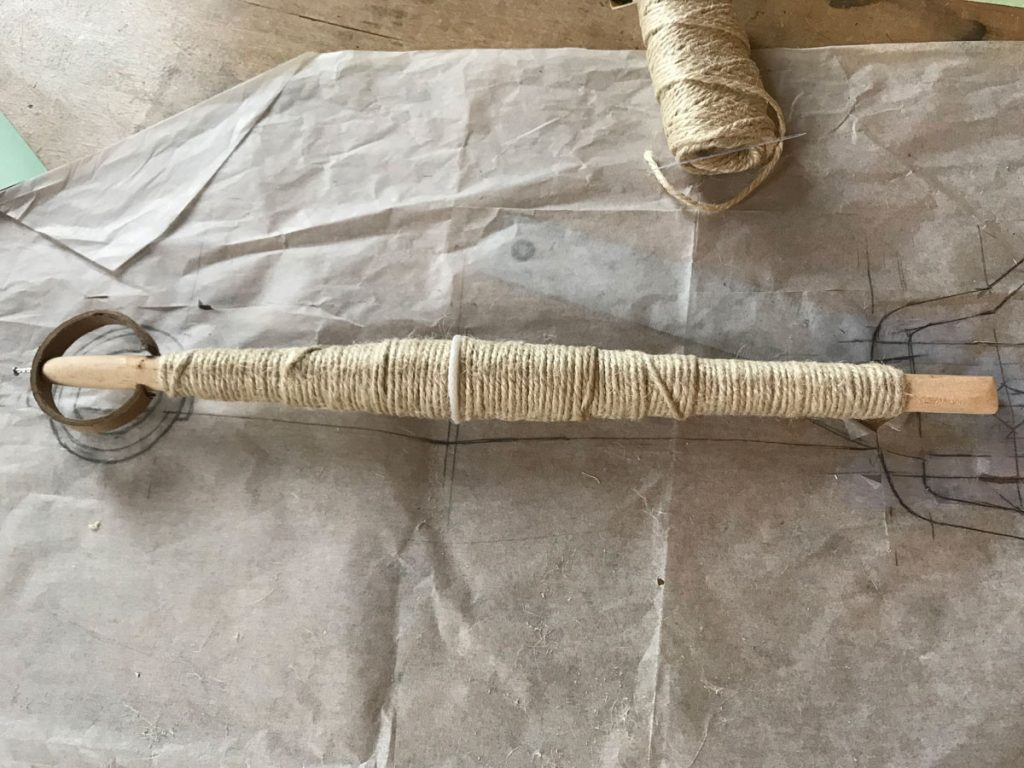
To make the hilt of the sword, I used a wooden dowel cut so that it extended into the blade as far as the base of the cutout. I built up the handle shape by wrapping twine around the dowel, so that I would only need a thin shell of worbla to smooth it out in the end.
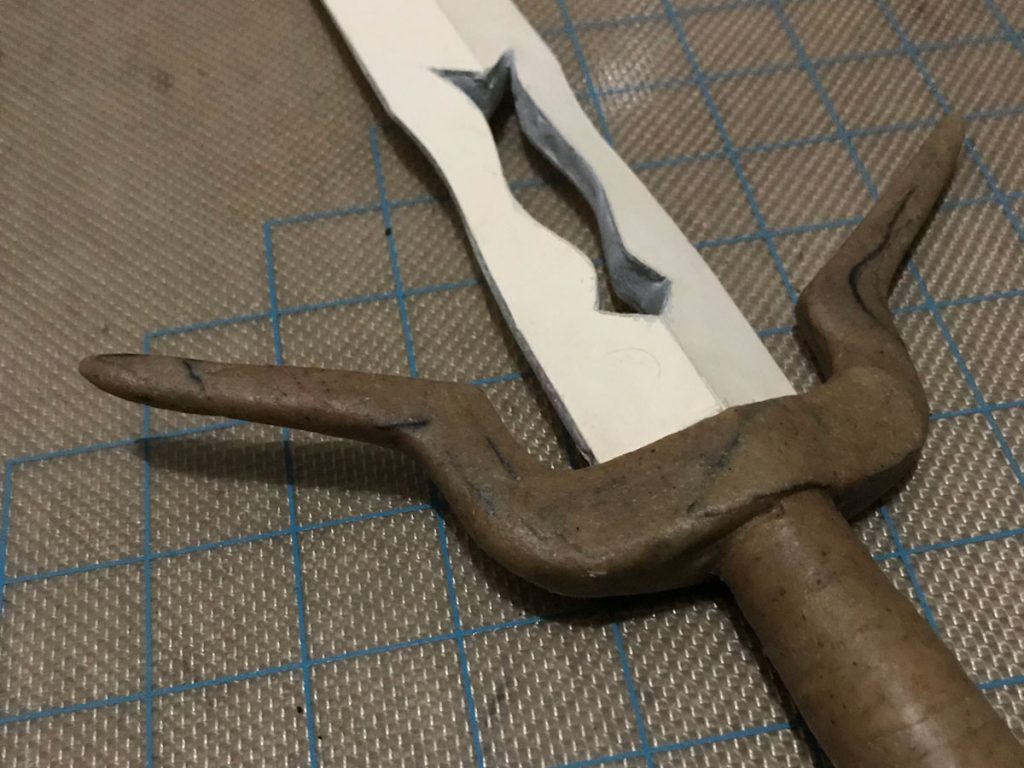
There isn’t a ton of overlap between the cutout and the base of the blade, so I wanted something really solid to reinforce the joint between the blade and the hilt. For that I used Apoxie Sculpt, which is a two-part sculpting compound that sticks like crazy to most materials (at least in the early stages of the curing process) and dries rock hard and pretty darn sturdy. I mixed the Apoxie by hand (with gloves,) packed it into the base of the blade around the dowel to give it a nice solid connection point, and used the extra to fill in around the cutout to give it a nice smooth face. Then I sculpted the pommel and cross-guard by hand from wads of worbla scraps, which requires very little explanation but lots of time and burnt fingers (farewell, fingerprints.)
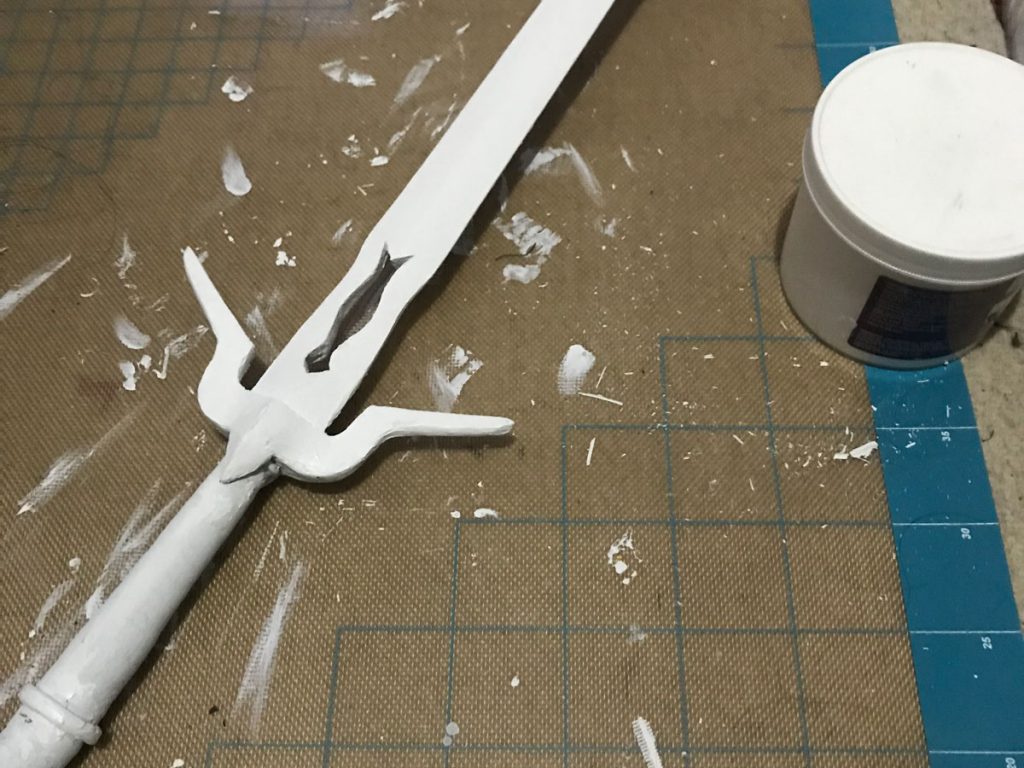
Finishing the blade posed another puzzle. I knew that any wet primers would risk warping the paper, but spray primers were out due to the aforementioned ventilation issue. I ended up settling on gesso, which is more paste than liquid and sets up semi-flexible and sandable. It still caused some slight ripples in the areas where the kobracast had given way, but I was able to mostly smooth this back out with a few extra coats and some sanding. I might experiment with a metallic vinyl wrap or something on future projects.
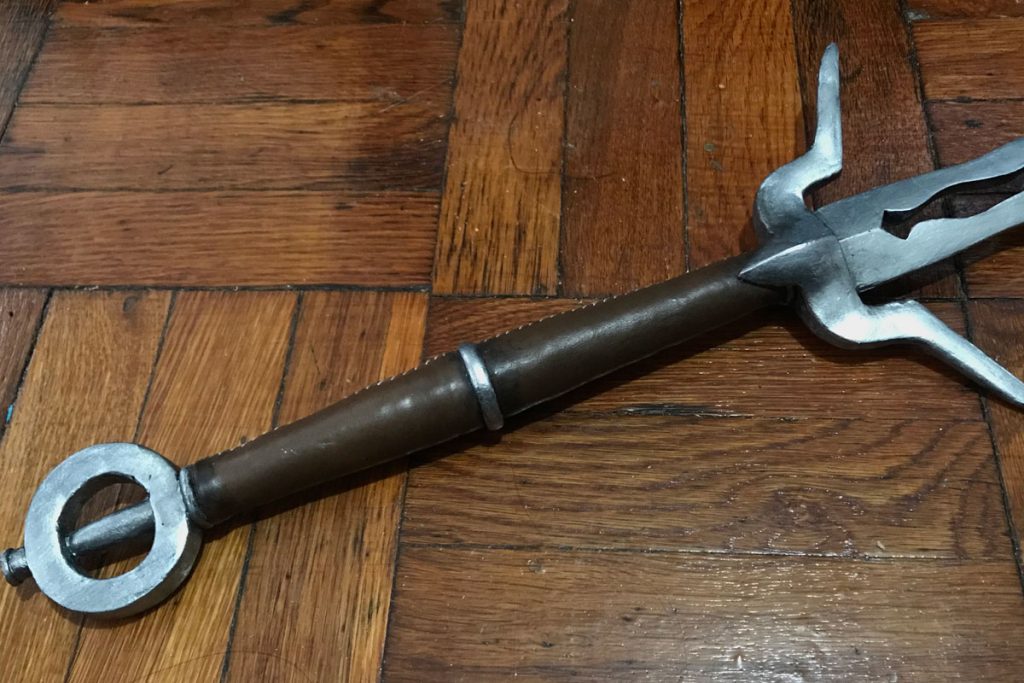
Once the painting was complete, I finished the hilt off with a leather wrap. This needed just a little bit of water-based glue to secure the edges, and was hand stitched to snug it up nice and smooth. I used acrylic paint to give it a little grimy depth around the joints and the sword was done.

My first attempt at the scabbard was a one-night crunch build, and I was never very happy with it. For the competition at C2E2 I upgraded to a tooled leather scabbard, which was more or less my first attempt at tooling but was pretty successful considering!
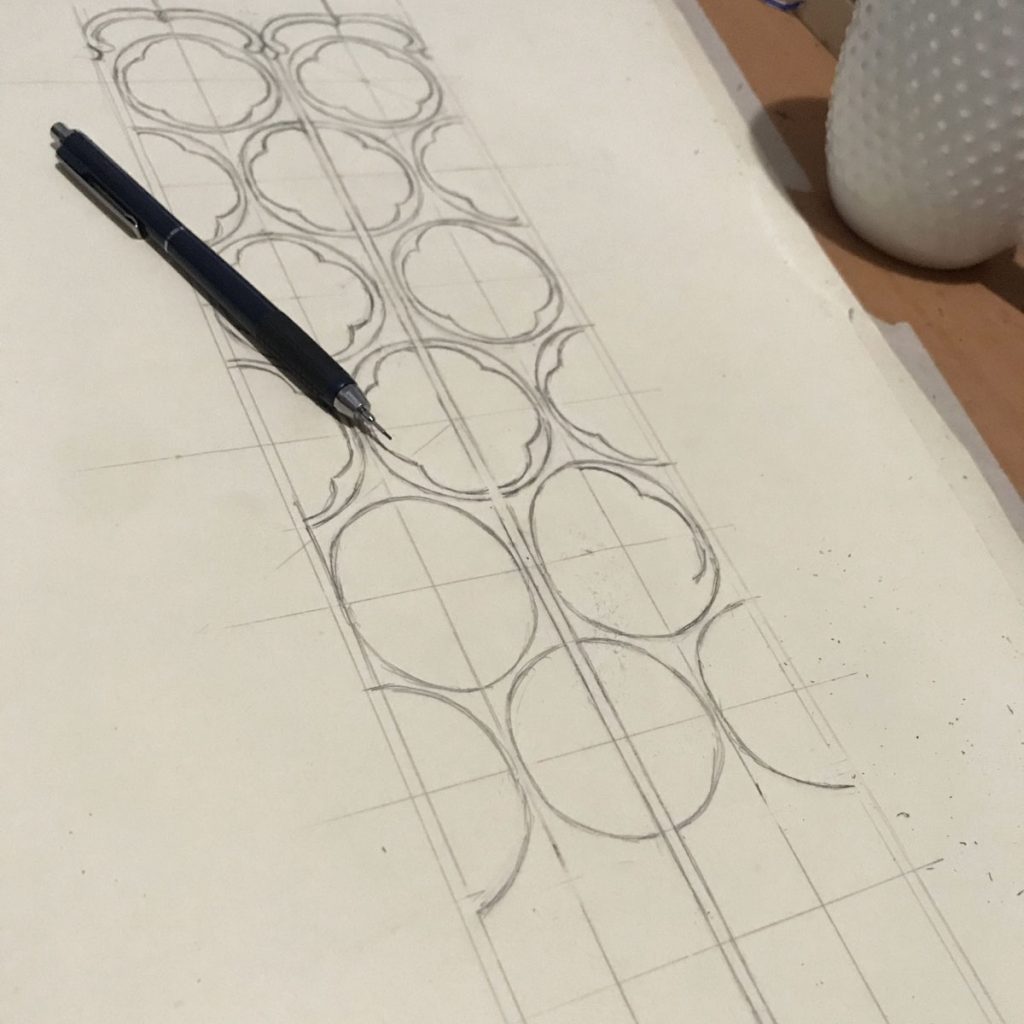
I created the pattern by wrapping the sword in foil and masking tape, then opened it down the back and transferred it to oaktag. I drew out the tooling pattern by hand, using a rough grid to guide the scaling of the design from top to bottom and then freehanding the actual shapes. I copied this to the veg tan tooling leather by rubbing a soft pencil on the back of the pattern, then taping it down and drawing over the design with a ballpoint pen.
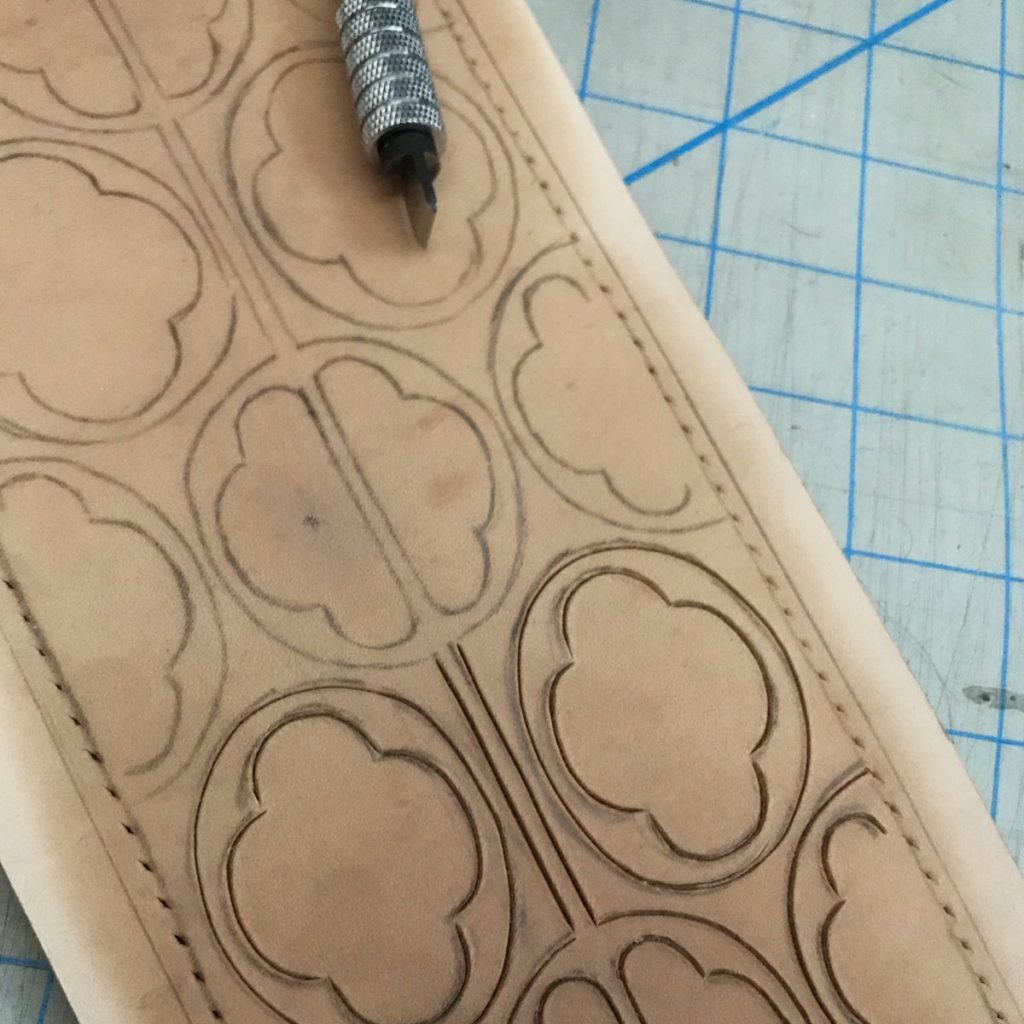
Next I wet down the leather and carved the whole design using a swivel knife. The hardest part was keeping the blade vertical throughout all the rounded cuts, and my first full attempt was a no-go but the second one seemed workable.

The pattern in the art is basically just linework, but I wanted to define the cuts a little more and make them look more polished so I went over each one with a modeling tool to give it a bit of a bevel. I’m still getting a feel for how much moisture to keep in the leather for this sort of thing, but it seemed to work out okay.
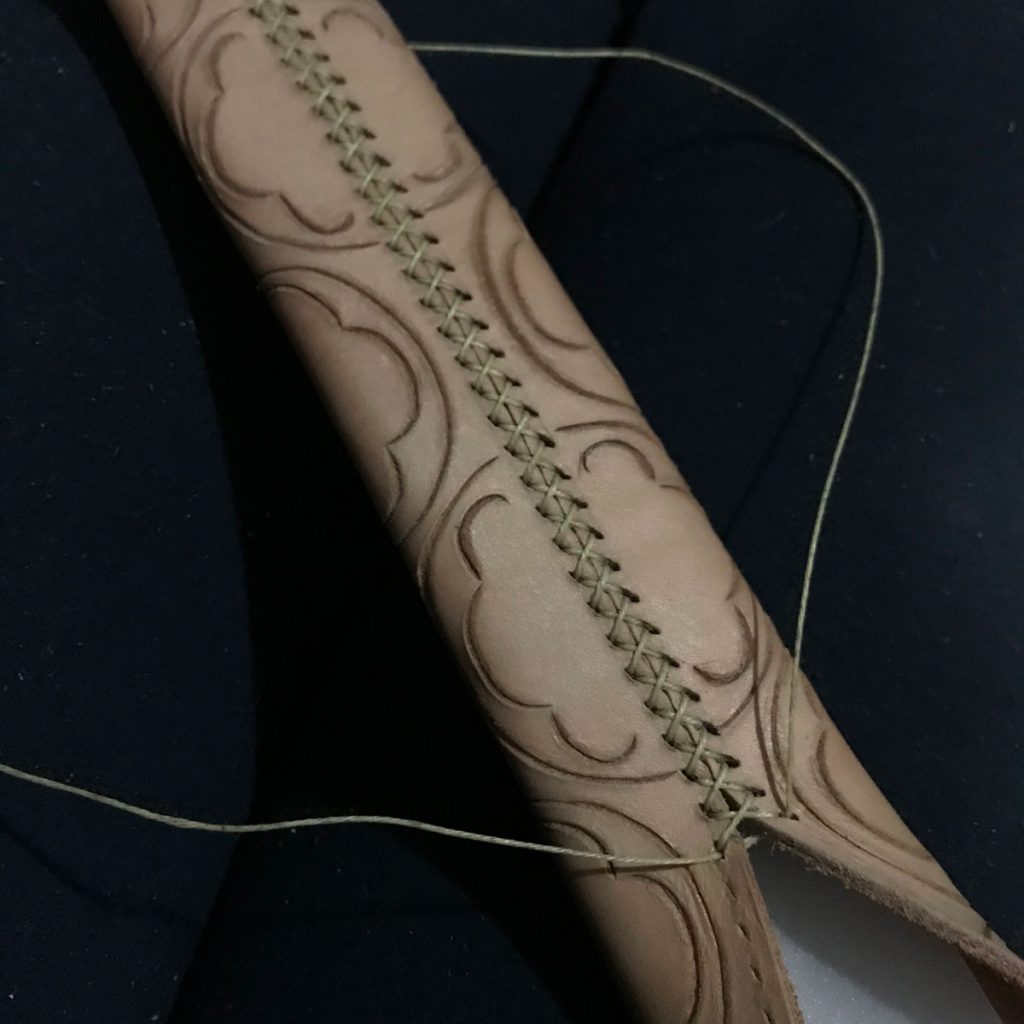
To wet-form the leather, I cut two templates for the finished shape from a sheet of flexible plastic and stitched the center back seam closed over them. Once this was finished, I wedged a dowel between the plastic layers to open up the shape (I’d shaved the end of the dowel down into a flattened point to get a nice smooth taper down to the end.) I also added a couple scraps of cardboard to ensure the finished shape would be open enough to fit the sword smoothly.
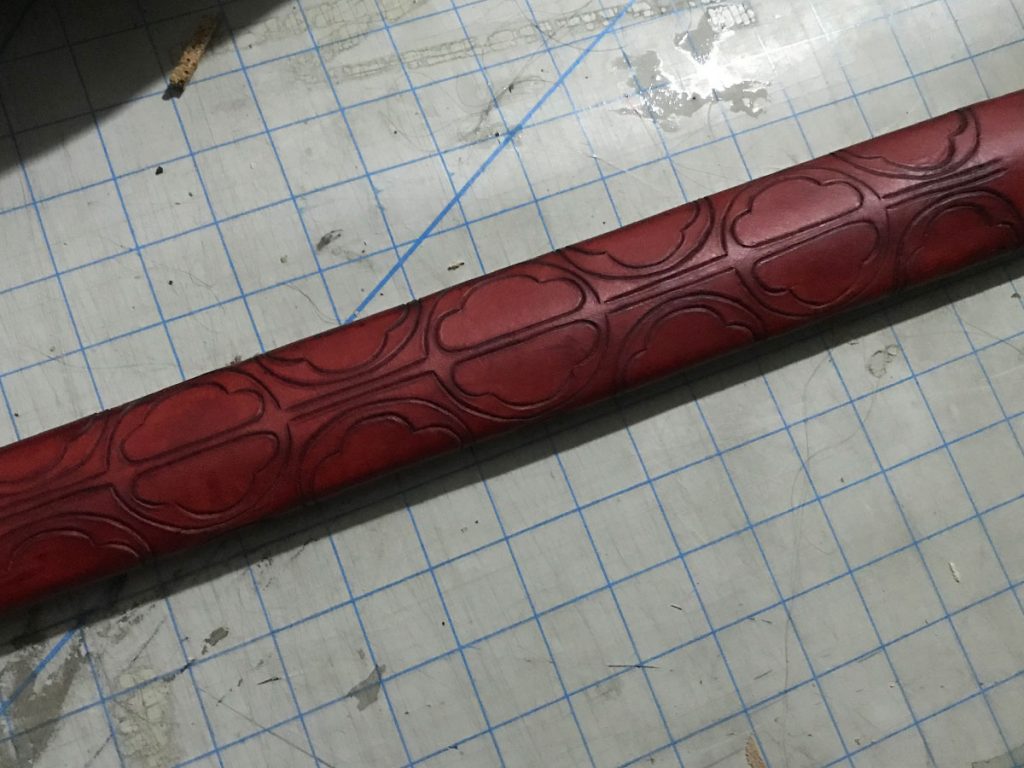
After the scabbard was completely dry, I re-wet the surface lightly and brushed the whole thing with water-based leather dye ordered from Lisa Sorrell. I’m kind of an impatient dumbass so I dove right in without even testing on a scrap, but I’m happy to report that these dyes RULE and I got a super rich deep color with one and a half coats and pretty economical dye usage. I let the dye dry then finished it with a light coat of wax.
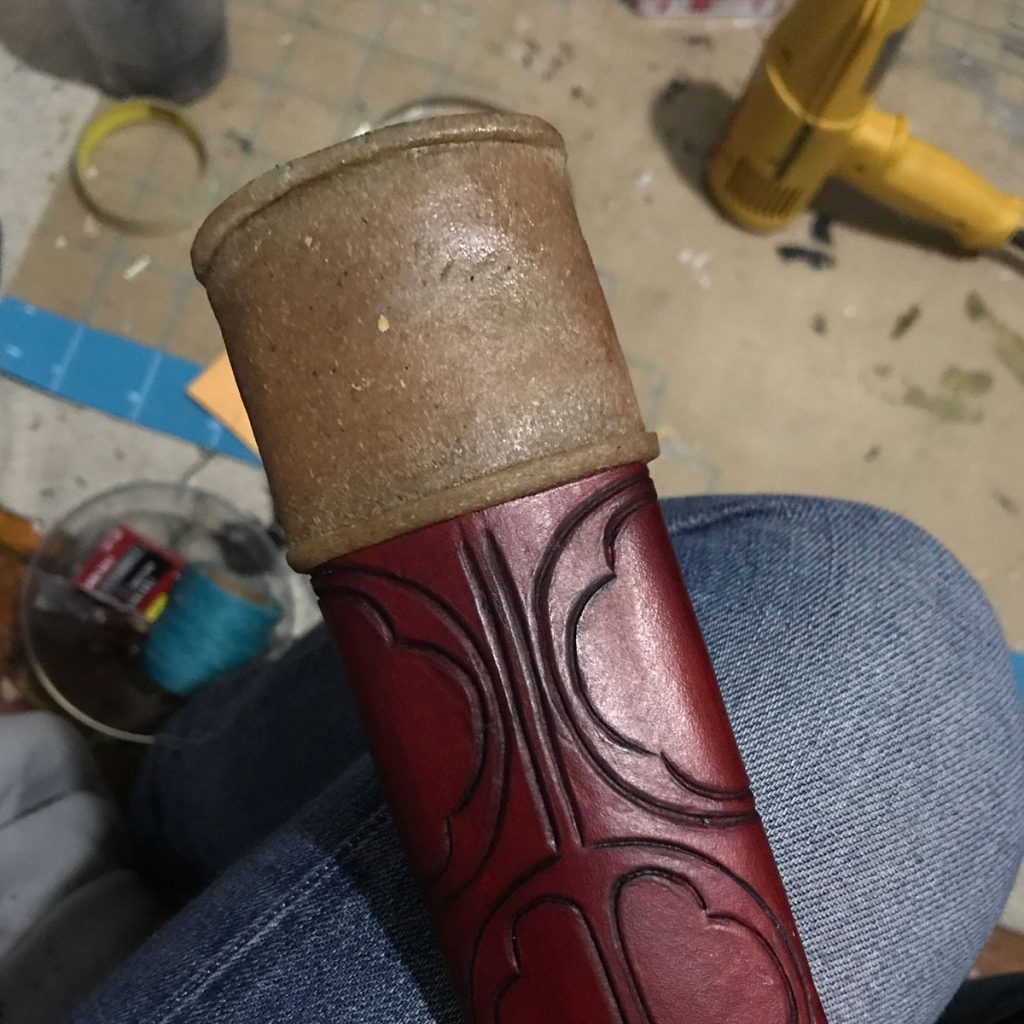
Interestingly, the shape of the scabbard end caps seems to differ slightly between the basic and dlc versions of Ciri’s outfit, although it’s clearly the same scabbard otherwise. I went with a not-very-successful hybrid for the first version, but this time I went with the look shown in-game for the DLC outfit. I roughed up the ends of the scabbard to help the worbla stick, sculpted the details by hand, then painted with flexbond and metallic acrylics.
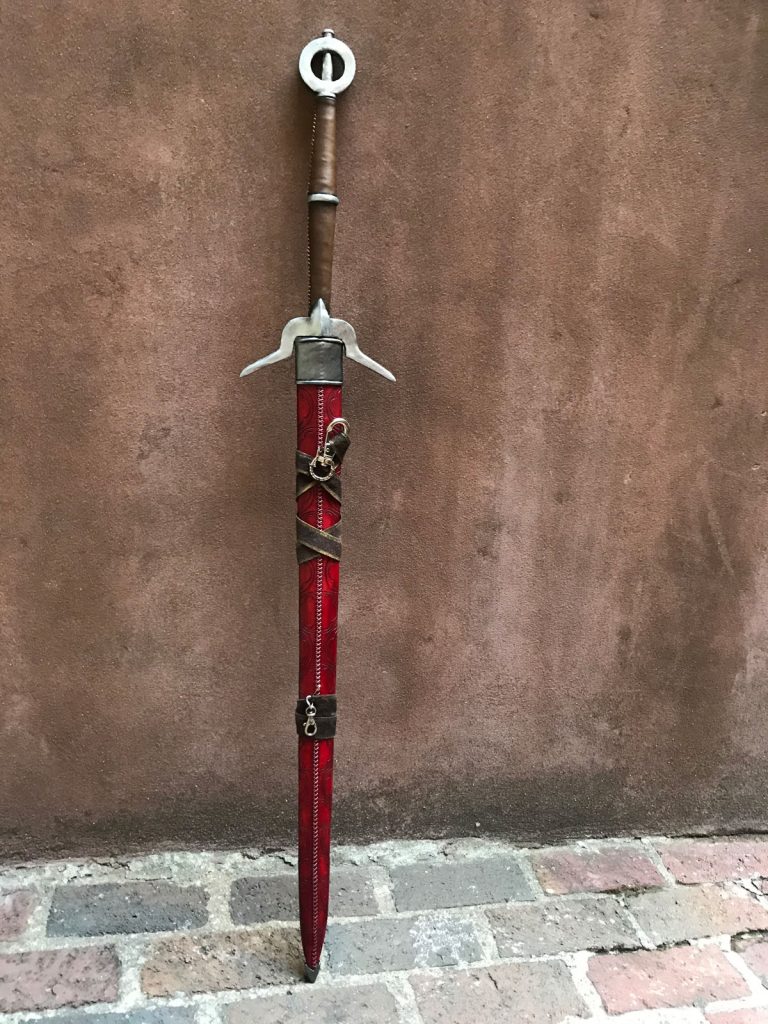
The attachment straps I created from leather scraps, highlighted at the edges with brass-colored metallic acrylic. I wrapped them and stitched the ends to themselves to secure the shape, then added clips to attach to the armor strapping and belt. This way the scabbard doesn’t swing when I’m wearing it, and it can be removed when the asymmetrical weight gets too uncomfortable (which it does, even though the sword is very lightweight overall.)
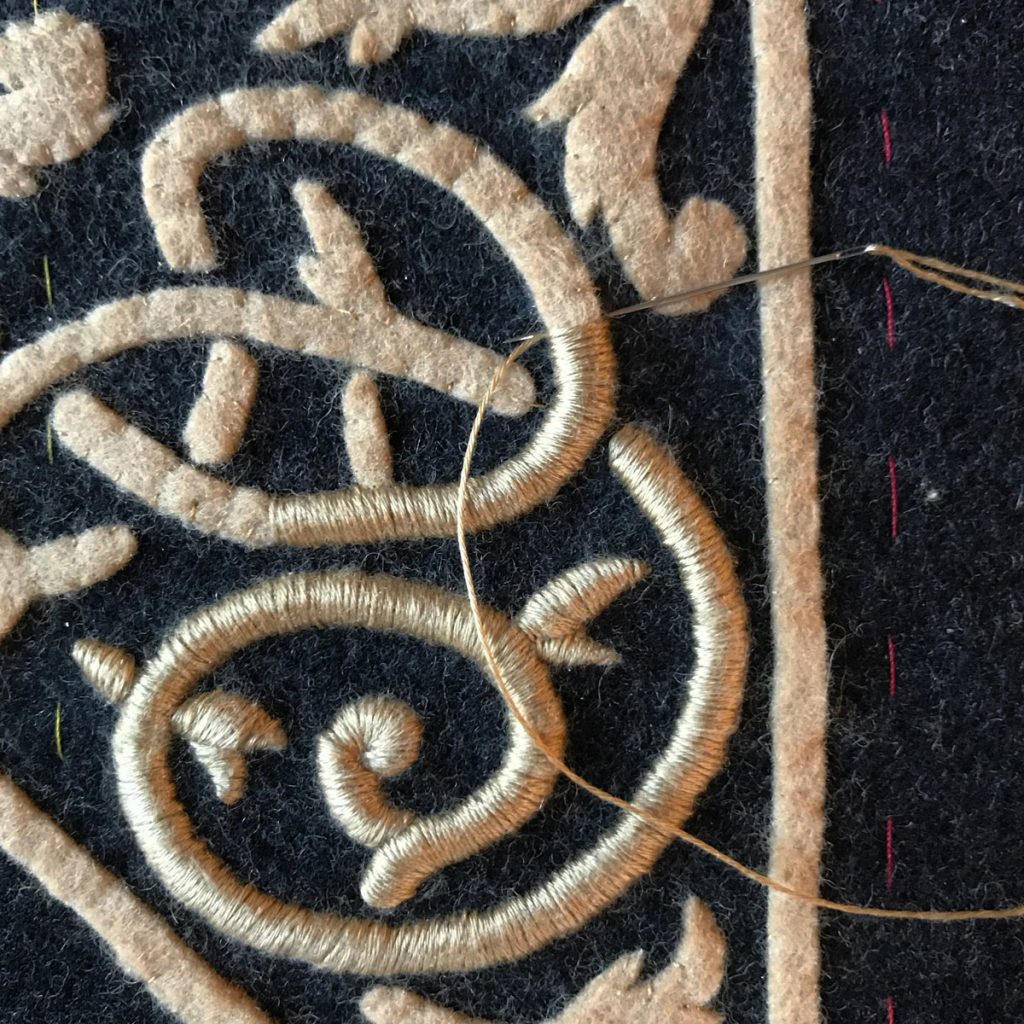
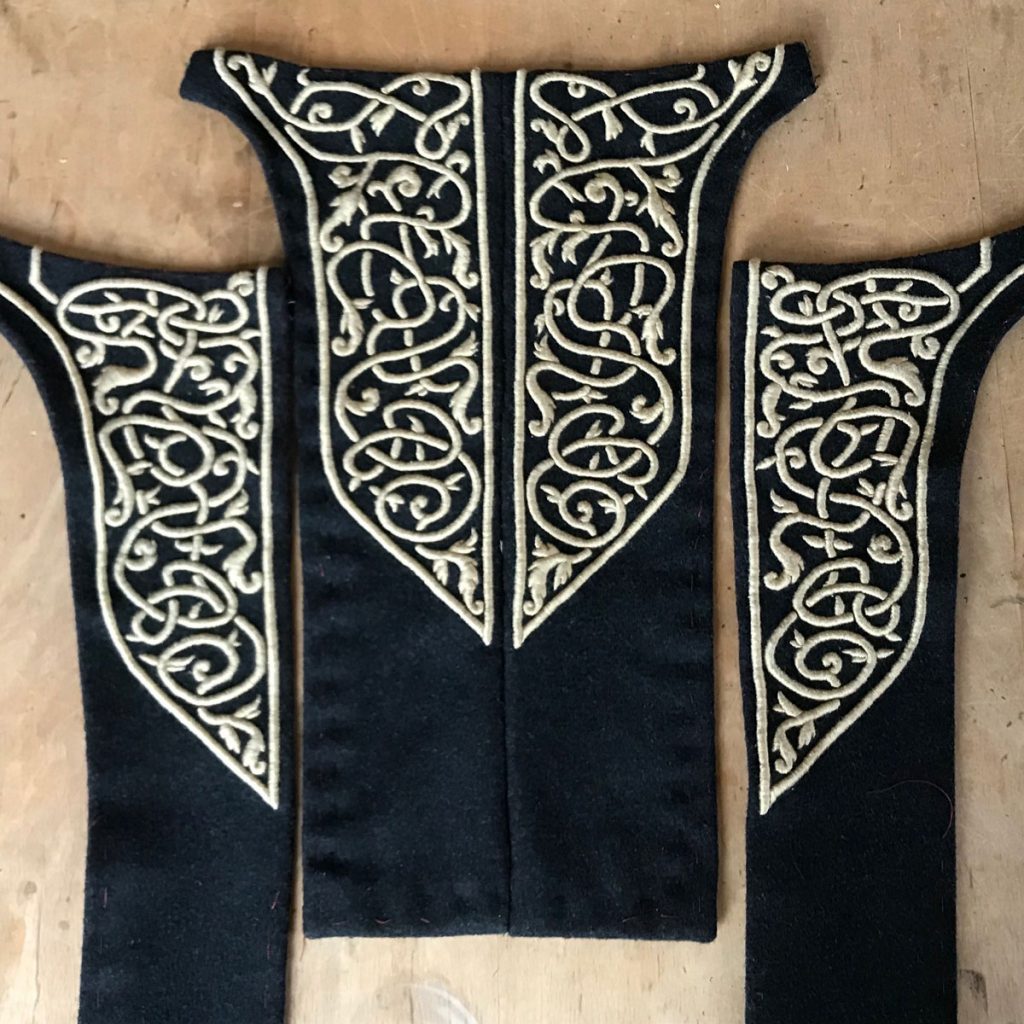
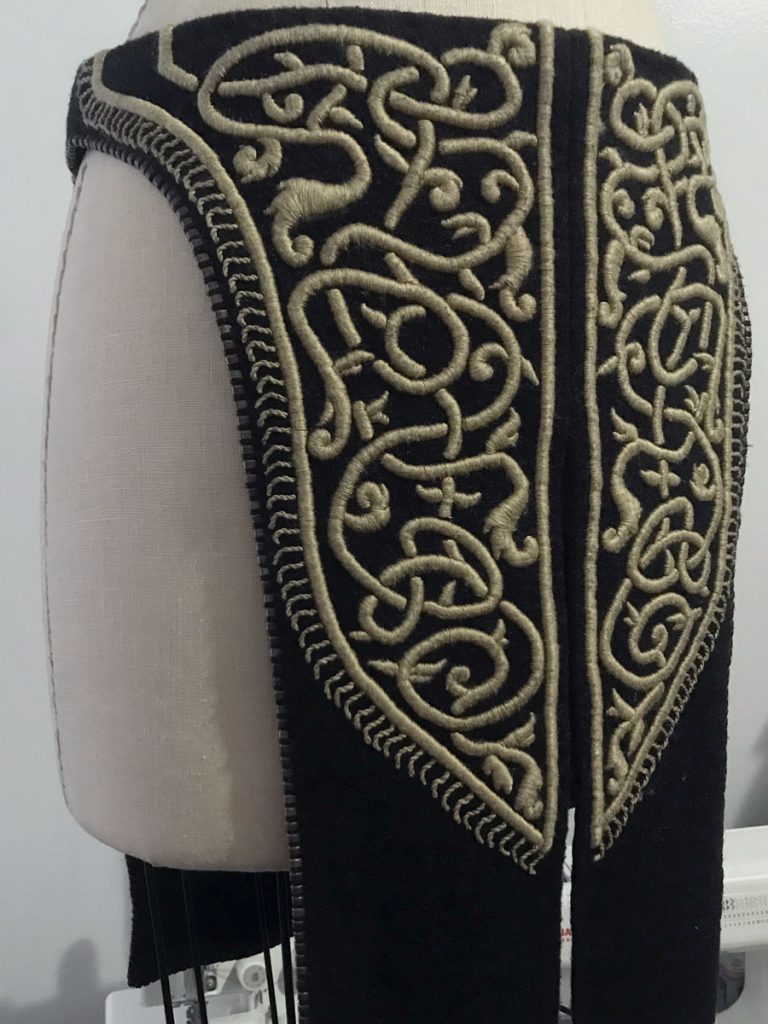
By far the longest part of the Ciri build was the hand embroidery on the skirt panels, which used about 500 yards of embroidery thread and took more than 250 hours to complete. It was also one of the main things that drew me to this particular project, so I pretty much got what I came for with that.
The base fabric for the skirt is wool-blend melton I’d had sitting around for years. I did pretty well at using fabrics I already had lying around for this project, although the leather, embroidery thread, and worbla more than made up for any sensible, economical choices I might have made here.
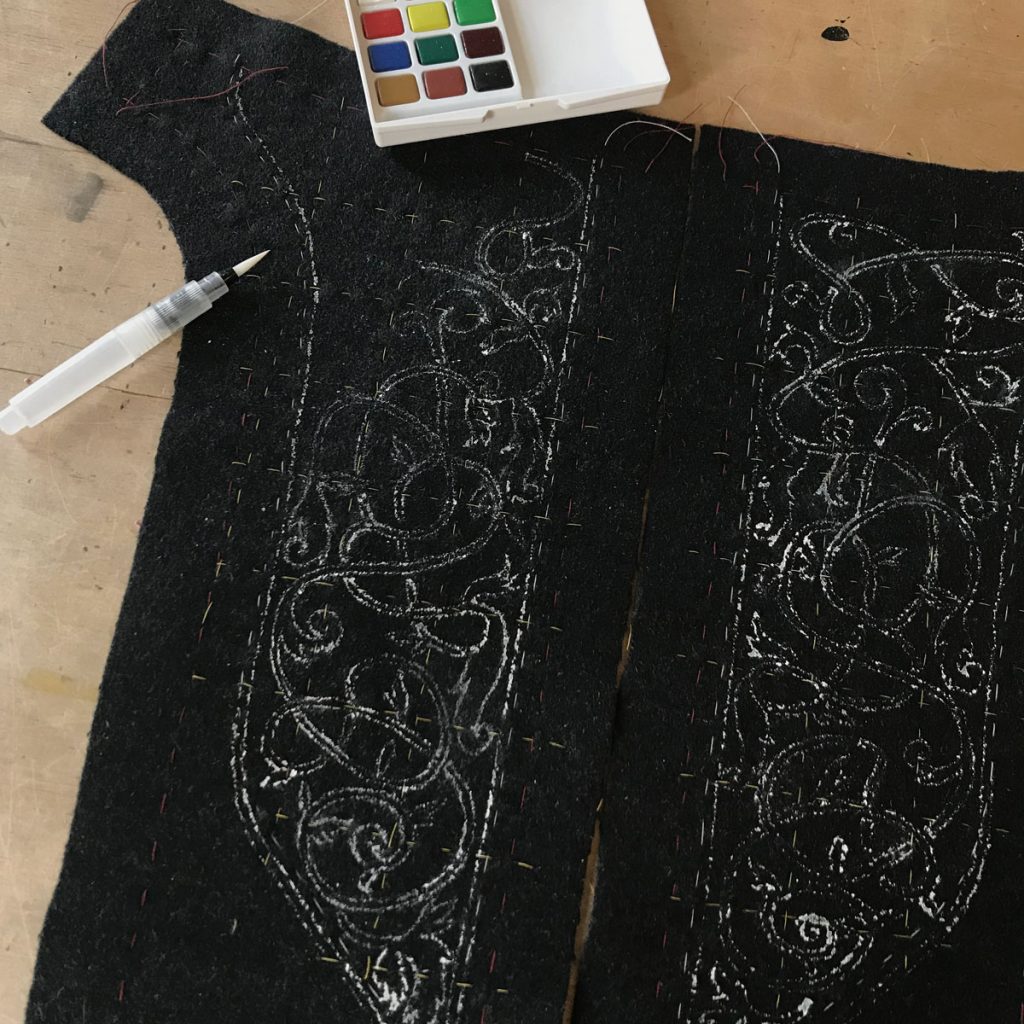
The napped surface of the fabric proved difficult to mark – too dark for ink or pencil, didn’t like gel pens, and shook off colored pencil and chalk like they’d never been. So finally I basted in a reference grid and freehanded the design with watercolor (a tip I picked up from embroiderer Mary Corbet.) This turned out to be an ideal method: it floated on the surface of the nap and didn’t soak in too much, didn’t budge with handling, but wiped away beautifully with a little water (I did most of my cleanup with a wet brush or cotton swab and a tissue to absorb the excess).
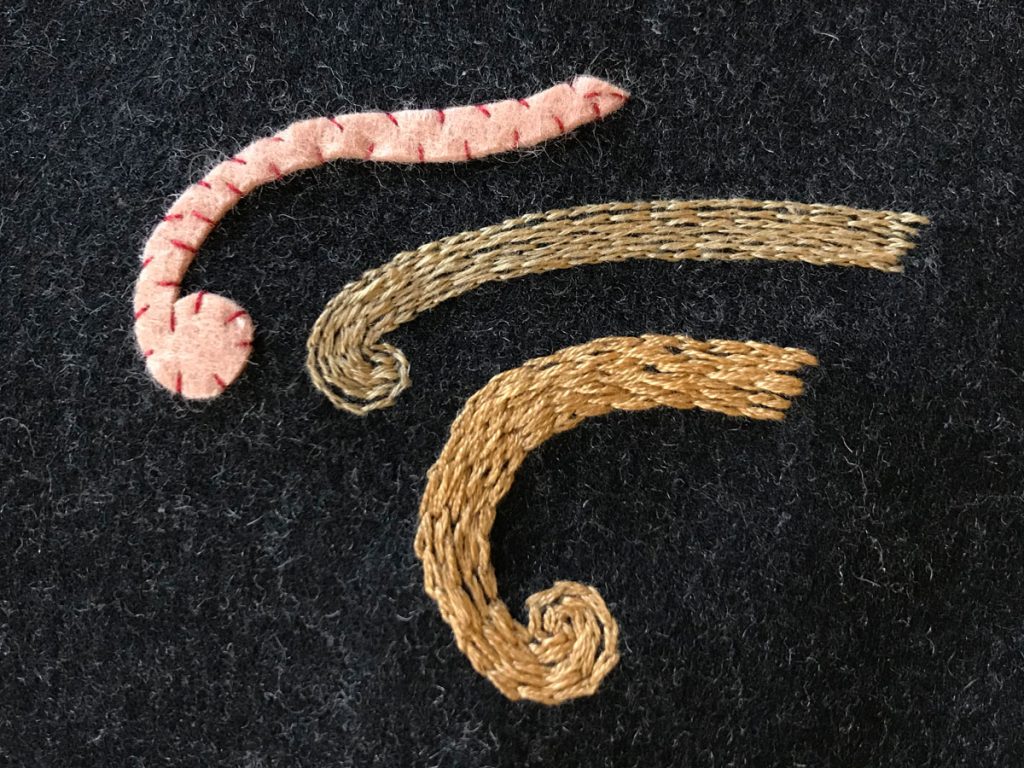
I tested a couple of different padding methods, but I liked the extra loft I got from wool felt. This is a more conventional padding method for goldwork than for regular satin stitching, but given the chunky base fabric I liked the way it rounded out with the stitches over it. It was also much faster than the stitched padding methods I tried, even though each individual piece had to be cut and whipstitched down by hand. The only drawback was that I had to be a little careful about the rounded ends of the padding pieces, so that the stitches wouldn’t slip off and leave gaps.
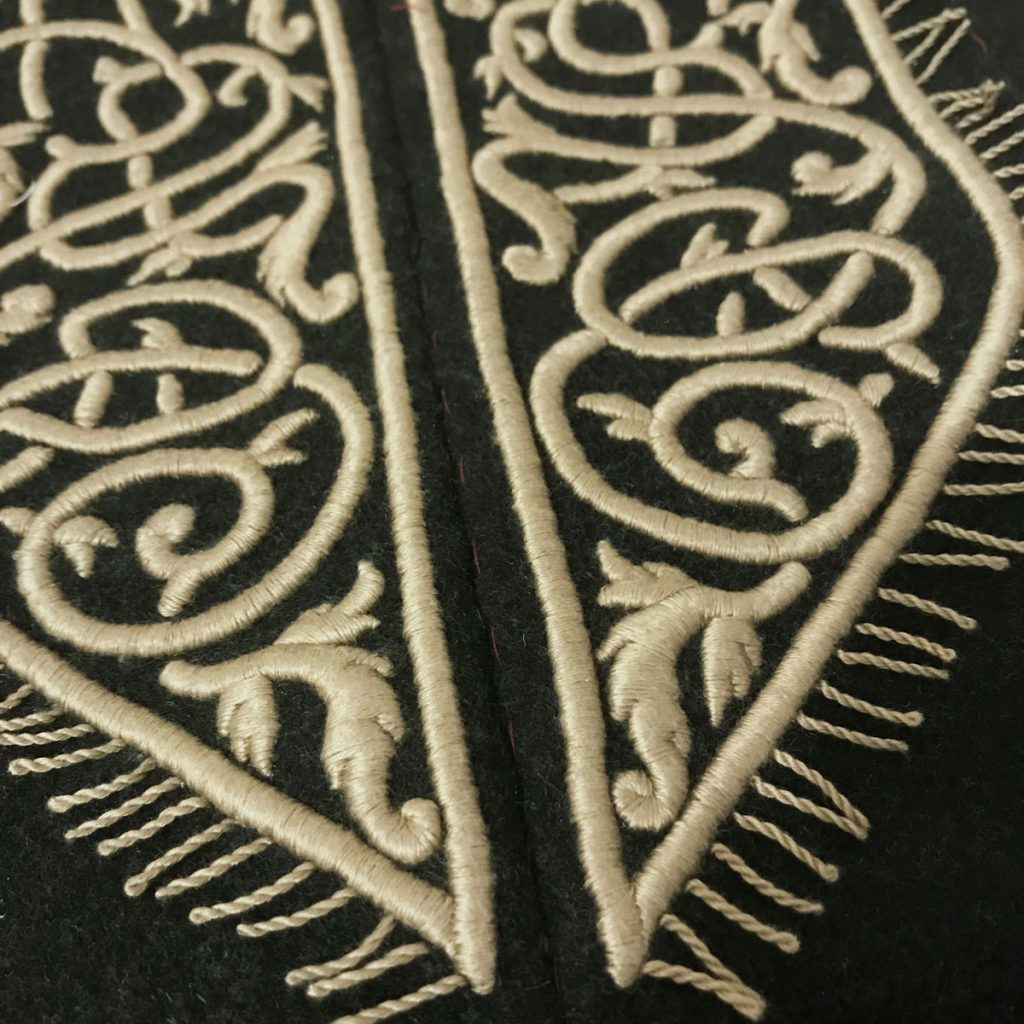
I also tested several threads for the satin stitch and chose cotton floche for the subtle sheen, fine weight, and stitch quality. It comes in gigantic 150-yard hanks, quite economical for a giant project like this one, and the smaller strand doesn’t need to be split before using. I wish it came in more colors, but it’s definitely going to be a favorite going forward.
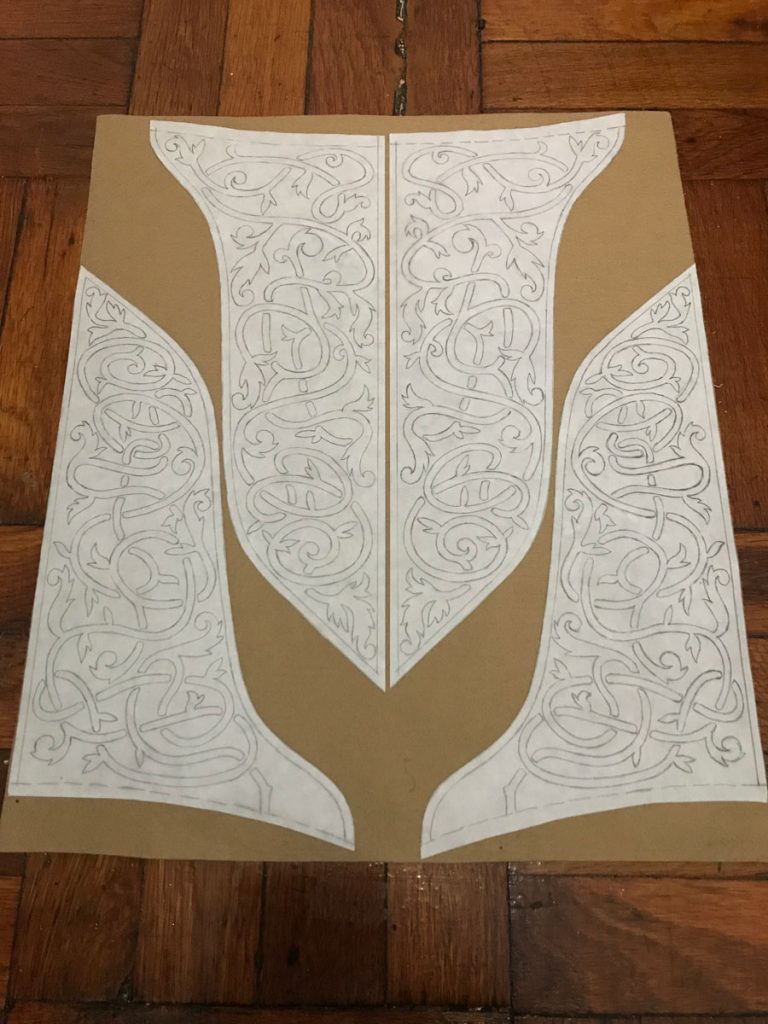
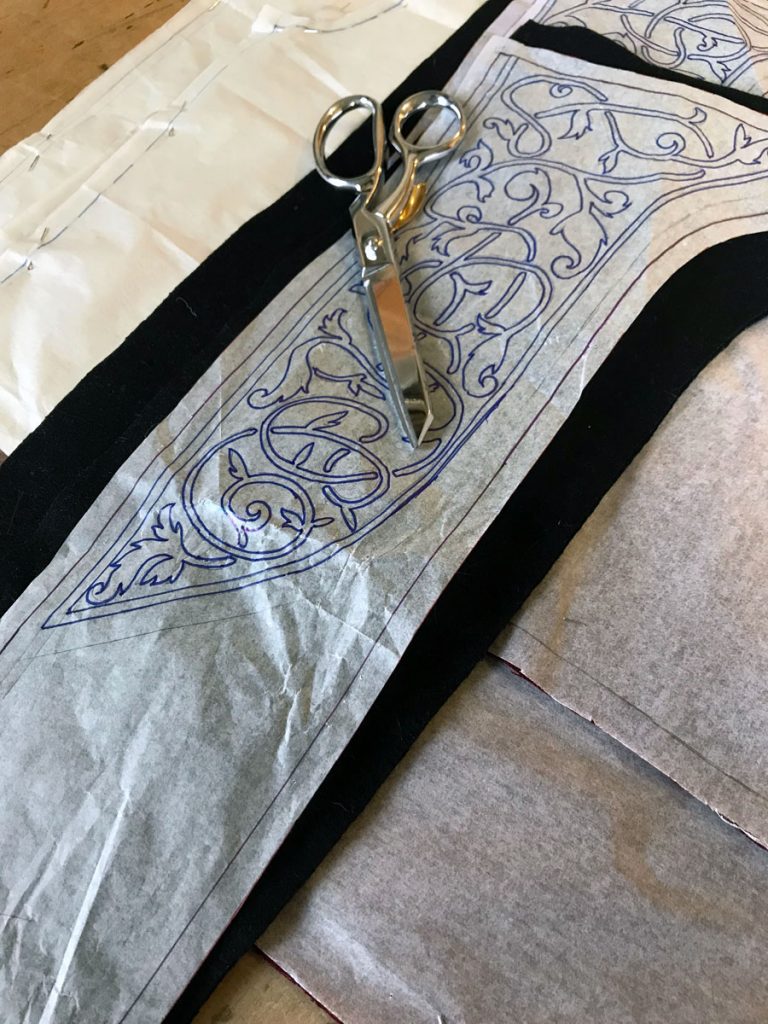
I traced my embroidery pattern onto freezer paper and stuck it to the felt with a warm iron, then cut out the pieces with the paper still attached. Not great for my scissors, but much easier than trying to pin all those fiddly bits and it also made it easier to keep track of which piece went where.
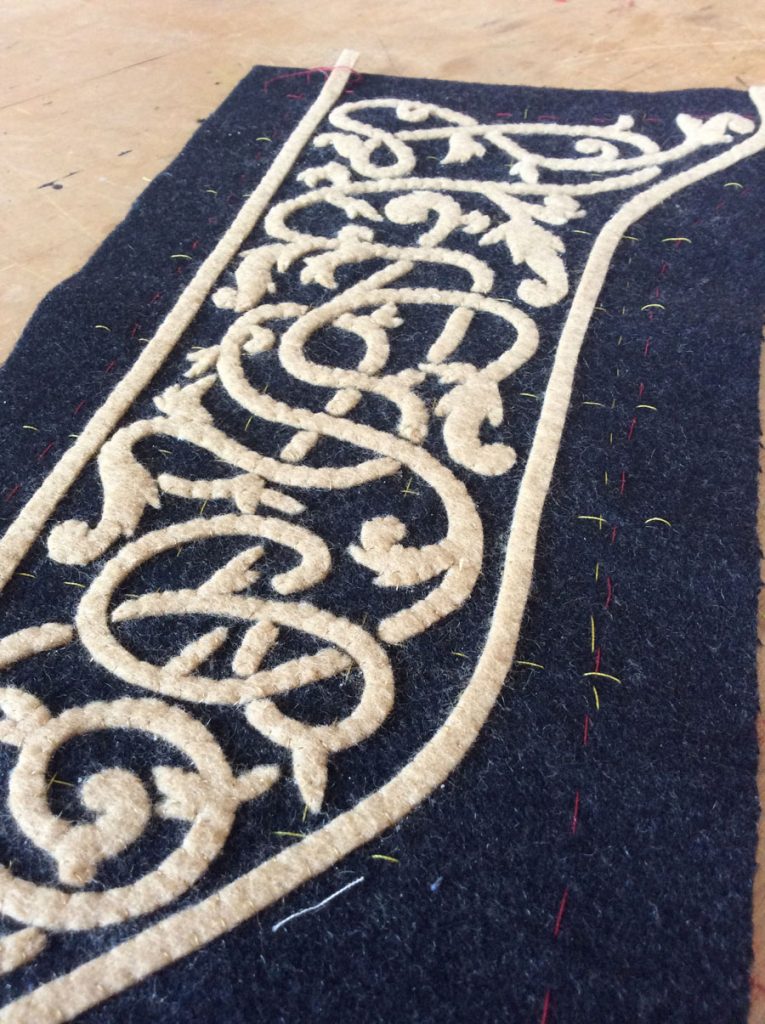
I sewed each piece down with a small whipstitch in fine thread. This was the point where it started to look like a real thing, which was exciting, but of course I still had a couple hundred hours of satin stitching to go.
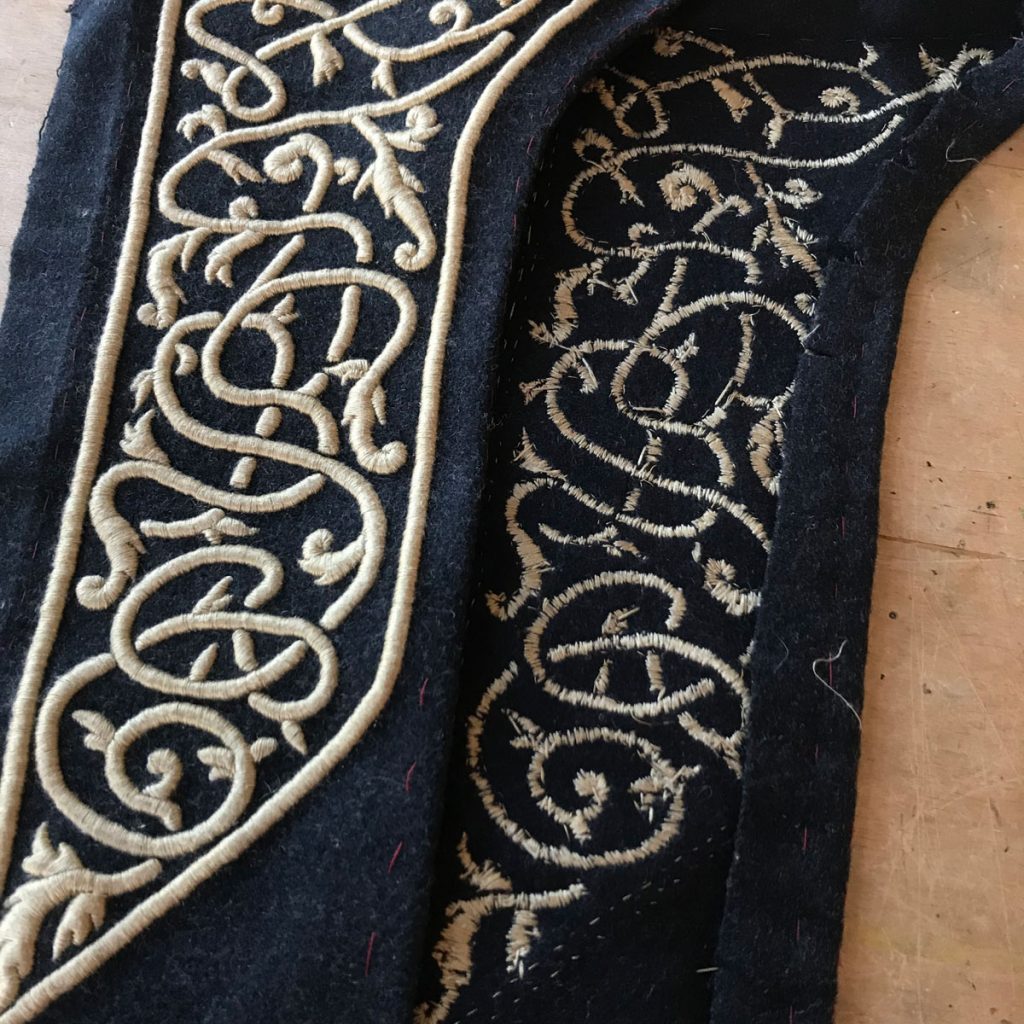
I started the satin stitching on the back of the skirt, which was both good and bad. It let me figure out the technique and stitching rhythm on a less visible part of the costume, but it also meant that the front and most visible part of the skirt was still unfinished as of the costume’s debut at NYCC 2018.
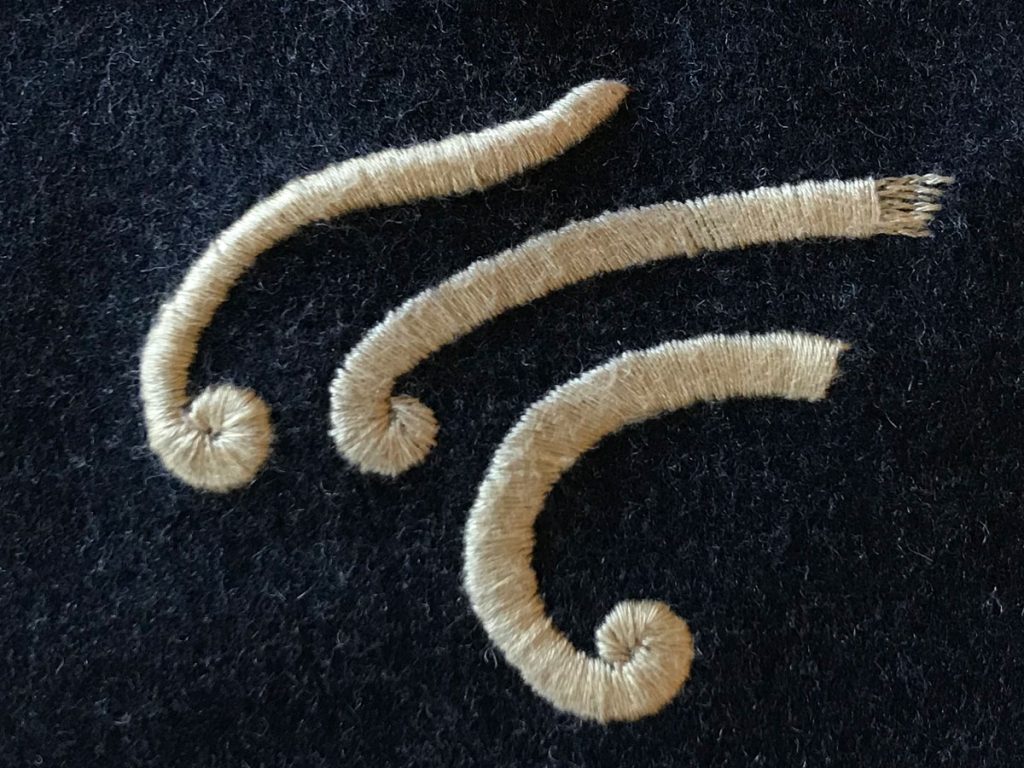
After the costume’s first outing, I took the skirt apart again to finish off the embroidery. The skirt in the art has a curious curly border design that didn’t match any stitch I’m familiar with. Given the amount of padding on the satin stitching, I knew I wanted something substantial so that the border wouldn’t look spindly in comparison.
What I came up with was a twisted fringe stitch, using a quadruple strand of the same embroidery thread twisted until it doubled back on itself. I stitched the fringe at roughly 1/4″ intervals around the border, then couched each strand down in the curl shape with fine thread.
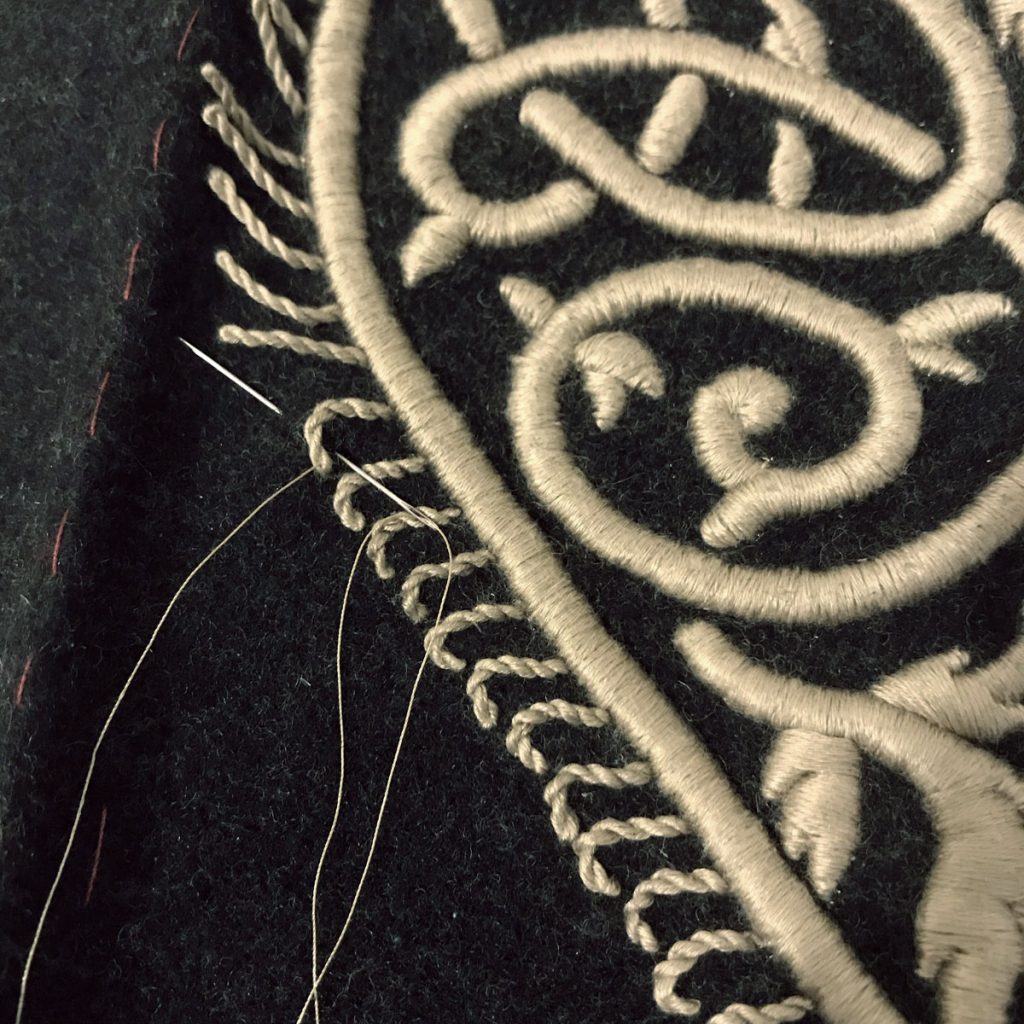
This may not be my sole invention, but it was not a technique I’d seen before employing it here! So there’s my gift to future Ciri cosplayers, I promise it goes faster than the satin stitching did.
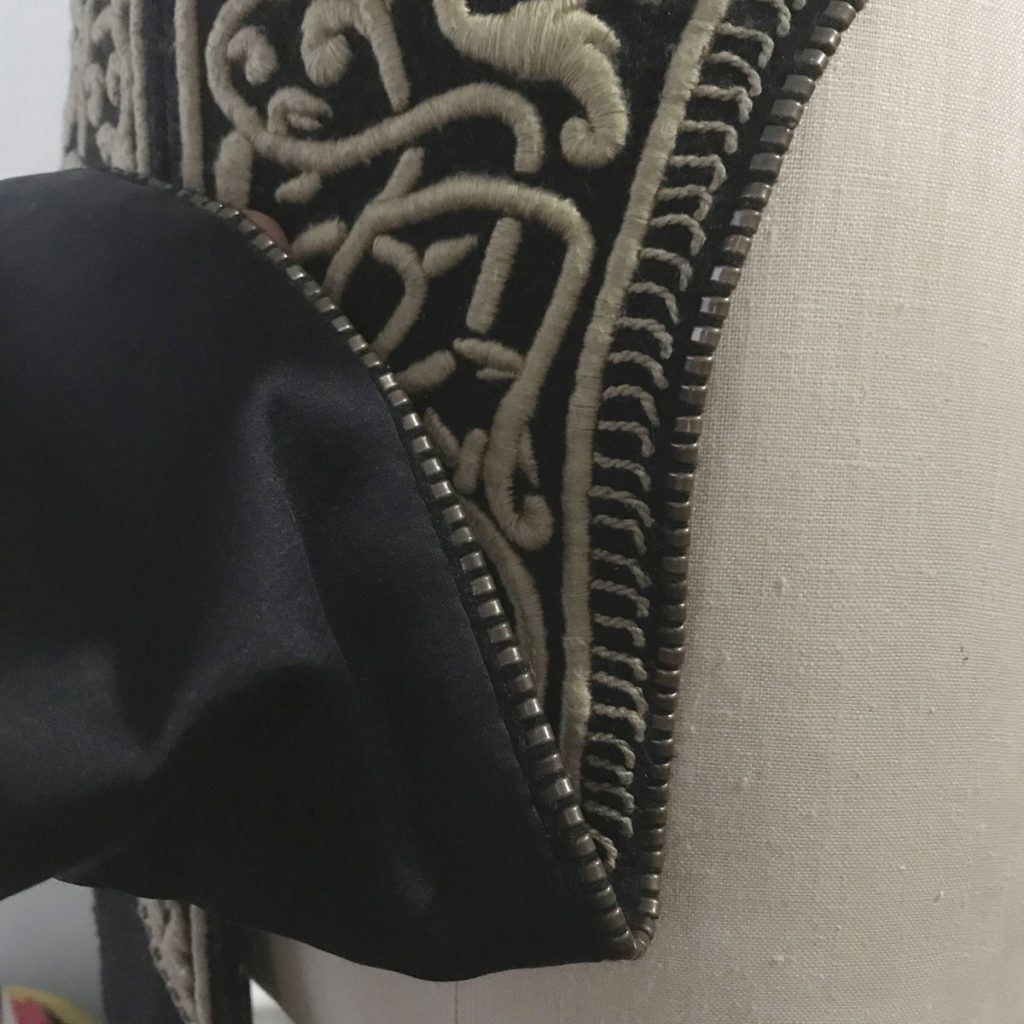
When all embroidery was complete, I assembled the panels and basted in the hem around the edges, then sewed in the cotton/rayon satin lining by hand. Finally, the outer edge was finished with several hundred individually applied size 7 zipper stops. (With thanks to Rachel Tobin, whose gift of 500 stops got me out of a jam when my usual supplier was out of stock at the last minute.)
To prevent the stops from rippling the edge as they were applied, I sewed a hand gathering stitch along the folded edge of the fabric and pulled it up as I worked. I realized a bit too late that it would have been clever to do a piped edge, as it would have given the stops a little more meat to hold onto while preventing any distortion, but this worked well enough. Almost exactly a full year after I first started the embroidery, the skirt was done.
]]>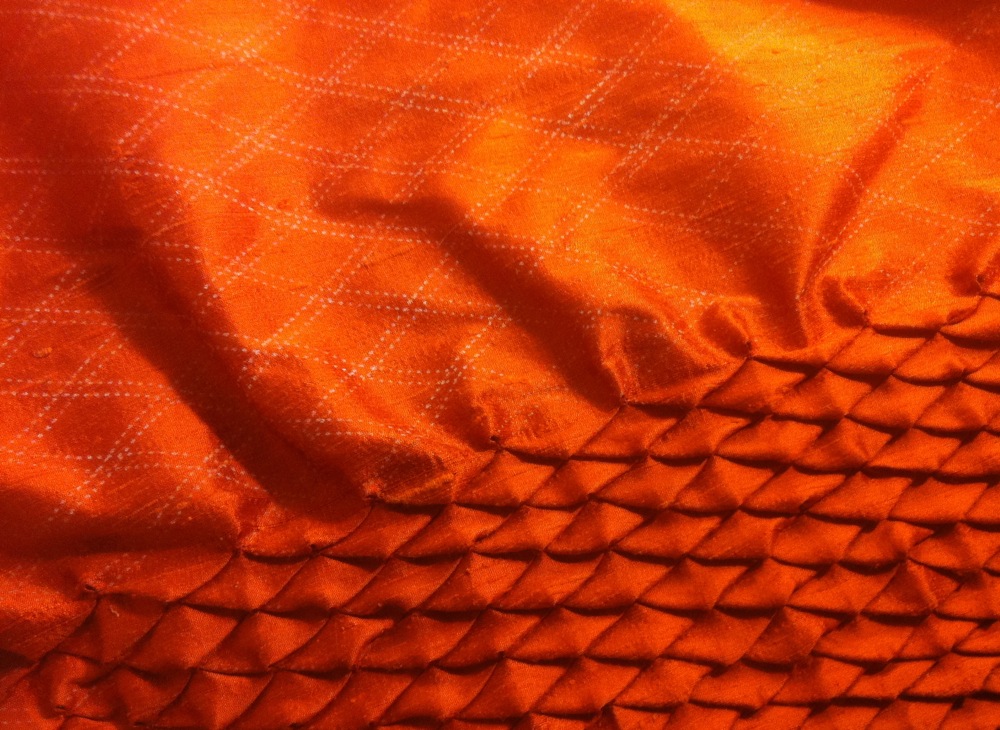 The project associated with those piles of silk is eating up most of my time, but I thought I’d take a minute to share a decorative technique I’ve been experimenting with for a bodice detail. I wanted some kind of fabric manipulation to contrast with the other embellishments I have planned for this piece, ideally with a feathery or scaly feel. I experimented with arrow smocking, which was one of the techniques Michele Carragher used to create the gorgeous dragonscale effect in her embroidery for Game of Thrones. It wasn’t quite what I was going for, though, so I kept looking.
The technique I ended up settling on was inspired by a project in Shadowfolds, by Jeffrey Rutzky and Chris K. Palmer, but I arrived at it by a different method. The Shadowfolds method uses a smocking stitch that goes through to the top of each “scale,” whereas I wanted the scales in my project to be a little more dimensional with no visible stitching on the surface.
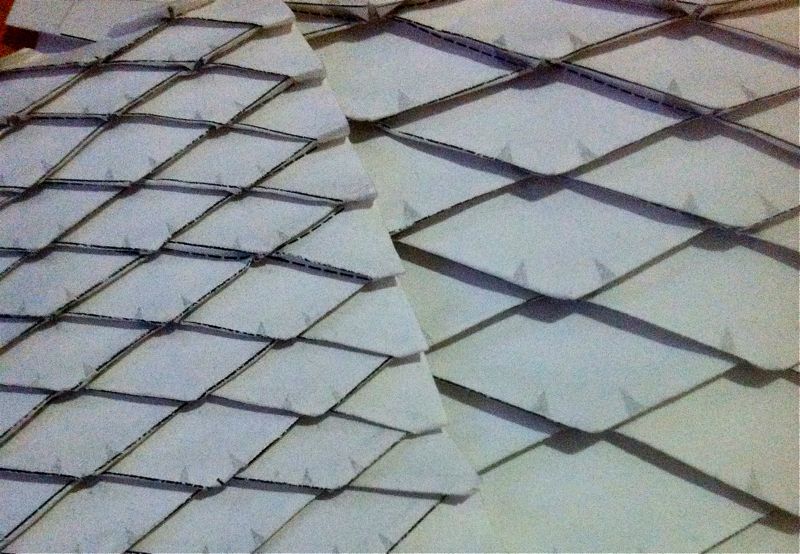 I used my best guess to recreate the folding diagram as if it was an origami design, since the smocking technique doesn’t work on paper. This took a little bit of expermentation, but eventually I got something workable and mocked it up at two different scales. (Though I dearly hoped I could get away with the larger size, the piece I intended to use it for is way too narrow for that. So instead I’m doing the small version, which is roughly four times the work. Never fails.)
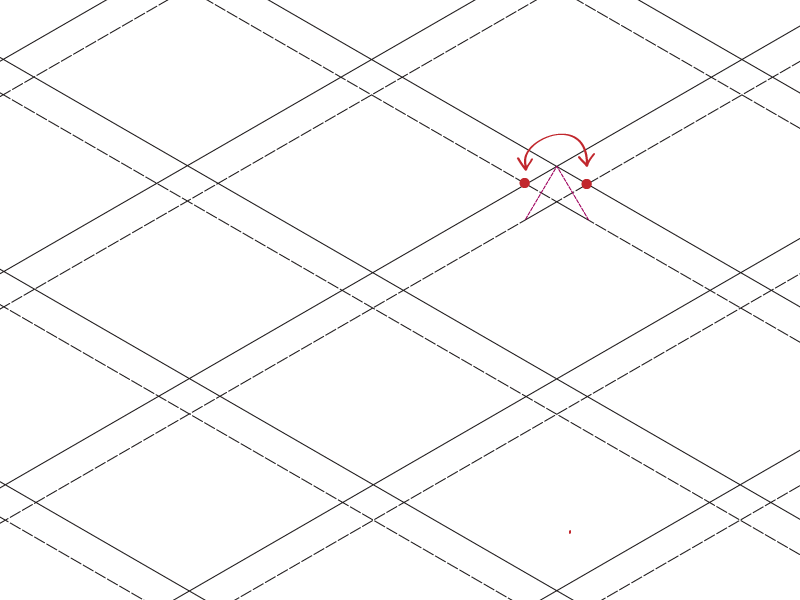 The basic folding pattern is two sets of parallel lines, separated by 120º. The separation between each pair of lines is about 1/5 the separation between the pairs, so the smaller-scale version above has pairs 1/8″ apart, separated by 5/8″. When folded, this produces scales that are about 1/2″ tall and 3/4″ wide.
In the paper version, the long diagonal creases are folded first – the solid lines above are “mountain” folds in origami parlance, the dotted lines “valleys” – and then they’re collapsed in on themselves to form the scales. For each scale, the two points marked in red in the image above are brought together, and diagonal folds form along the dotted purple lines. I found it easiest to start at the corners and work toward the center, pinching the point of each scale to flatten it. It’s a little tricky at the smaller size, but you just kind of have to fuss with it until it works.
Once I had a workable paper model, it was time to translate it back into fabric.
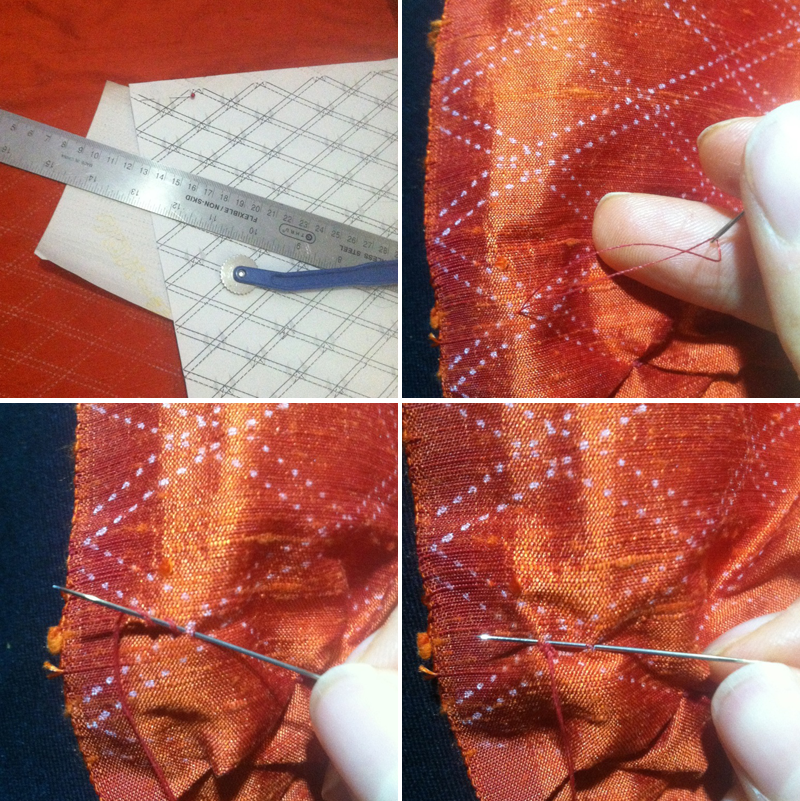 This is basically a smocking technique, worked on the right side of the fabric. I printed out a copy of my folding diagram, and used tracing paper and a tracing wheel to transfer it to the silk. You could also create the pattern directly on the fabric using a ruler and protractor, though. Knot the thread underneath, then bring it up through one of the two points marked above. I like to knot it again on the top of the fabric to make sure it’ll hold. Then bring the needle over to the other dot and pick up a small stitch through the point where the lines intersect, working back toward the first dot. Pick up another stitch across the first dot, and pull the thread through.
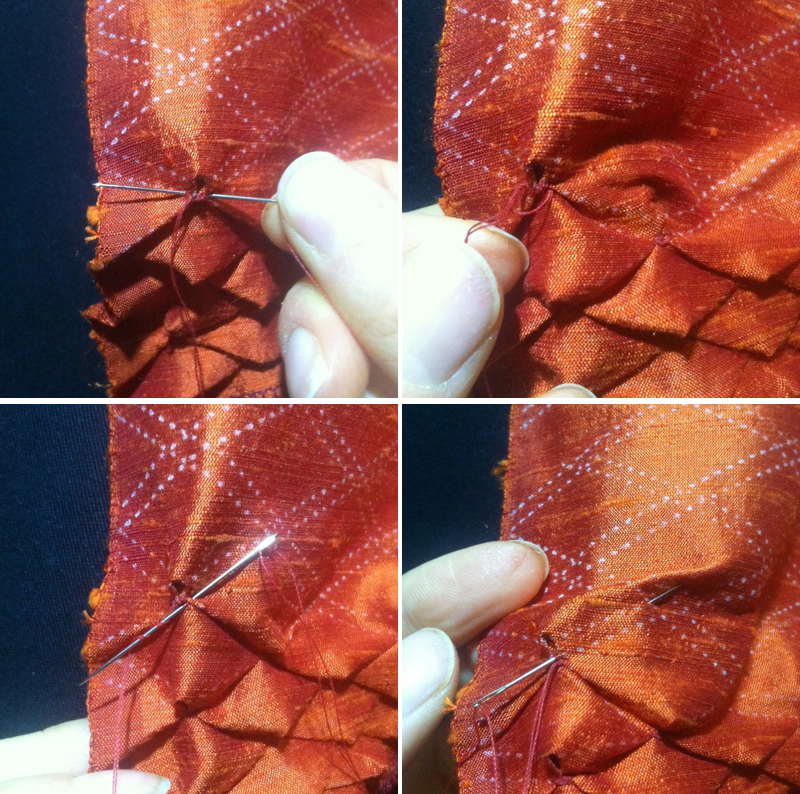 Take a second stitch through the same layers to help pull them together, and wrap the thread around the needle to form a knot. Pull the knot tight. Make sure the creases have formed correctly for the pleats on each side of the stitch, then take a stitch through the pleat and the layer below to hold them in place. I like to knot the thread once more at this point, to make extra sure the scale is secure. Stick the needle through to the underside of the fabric and come up at the first dot for the next scale. This is a “slack” stitch that doesn’t get pulled tight, so do another knot stitch before starting the next scale to prevent it from puckering.
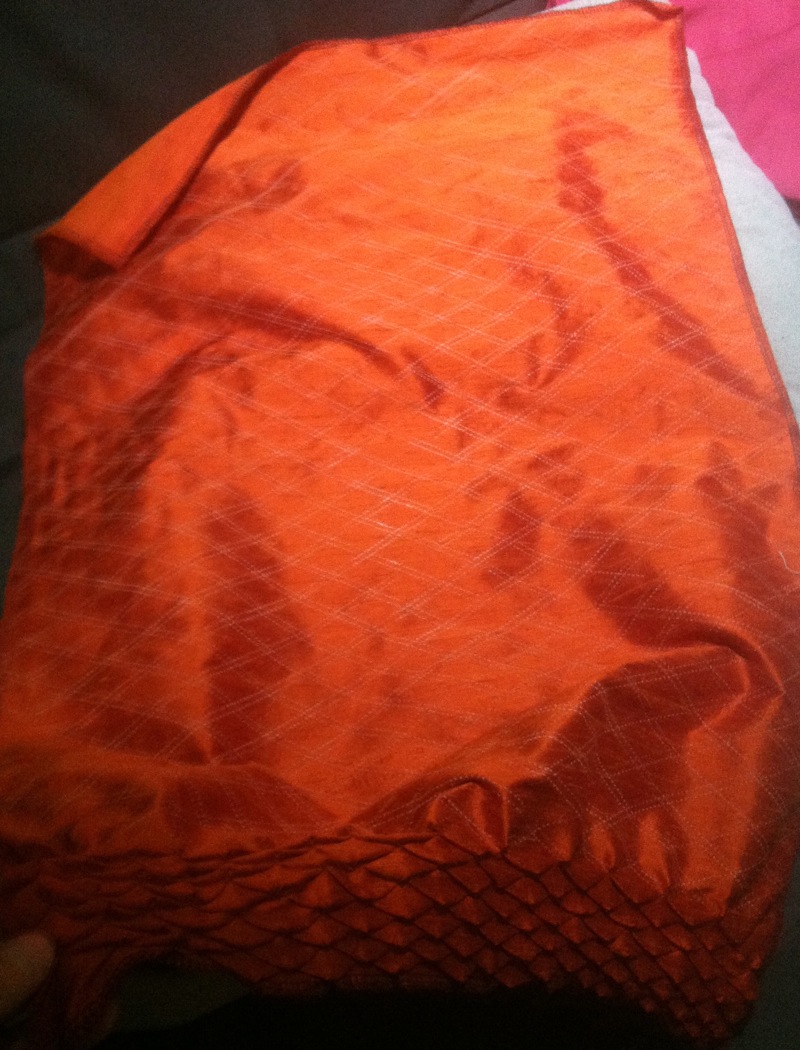
I like to work the scales across the fabric from left to right, bottom to top. I measured my paper samples to determine how big I needed to cut my fabric panel, and once I’ve smocked the full panel I’ll cut out my pattern pieces from that. I’ve got some long nights of stitching ahead of me before I get to that point, though. Yikes.
 I see a lot of people trying to scare beginners off sergers. Suggestions that they’re too tricky to thread, the stitching is hard to unpick, the tension finicky, the blade choppy and intimidating, etc. Generally it’s meant kindly—to spare people frustration, and maybe let them off the hook if they don’t have budget or confidence to invest in a second machine and are afraid they need one for x or y reason. Okay, fine! You don’t need a serger to sew knits, or finish seams, or anything else really, and people do fabulous work on knits and otherwise without ever coming near one. But I really like them!
I spent almost ten years in gymnastics, so leotard sewing was a pretty big deal in my early days. A serger is nice for that kind of thing because the seams have more give than a standard straight stitch, so they’re less likely to pop when stretched. As a result, I was whirring away on the family serger by my early teens. By high school my grandma was calling me over to rethread and fix the tension so she didn’t have to dig out a magnifying glass. I don’t mean this as a boast—I was just fortunate enough to have learned the basic operation and troubleshooting bits before anyone told me it was supposed to be difficult. If my slapdash teenage self could handle it with a manual and a reference book or two, I am certain that serger operation is well within the capacities of the average adult with internet access.
The majority of my sewing projects in those days were knits—leotards, t-shirts, knit dresses. I still have a couple pairs of jersey lounge pants from that era, though most of my ventures into jeans and woven tops encountered insurmountable fitting issues and are long gone. I’m boggled by the people who think beginners should stick to wovens; to my mind a t-shirt in a hefty cotton-spandex knit is much easier and more practical than a woven dress. And with a serger, you can whip up a top that’s basically indistinguishable from RTW in the span of an afternoon. That’s pretty satisfying, especially for a beginner! Certainly it was a good fit for my impatient sewing habits of that time.
After college, when I moved into my first apartment and got my very own sewing machine, it was a couple years before I worked up to adding a serger. (a freelancer at the time, I was very good at talking myself out of large purchases.) I made a handful of knit tops on the regular sewing machine, using zigzag stitches and stretch stitches and all the other workarounds that are commonly recommended, and found it intensely frustrating. It was slow, especially when using the stretch stitch, and it always felt like a half-baked approximation compared to the neat, efficient finishes I’d enjoyed at home. I actually felt quite a bit less confident about my knit sewing than I’d felt as a teenager, even though my technical knowledge had improved, and I found myself buying mostly wovens as a result.
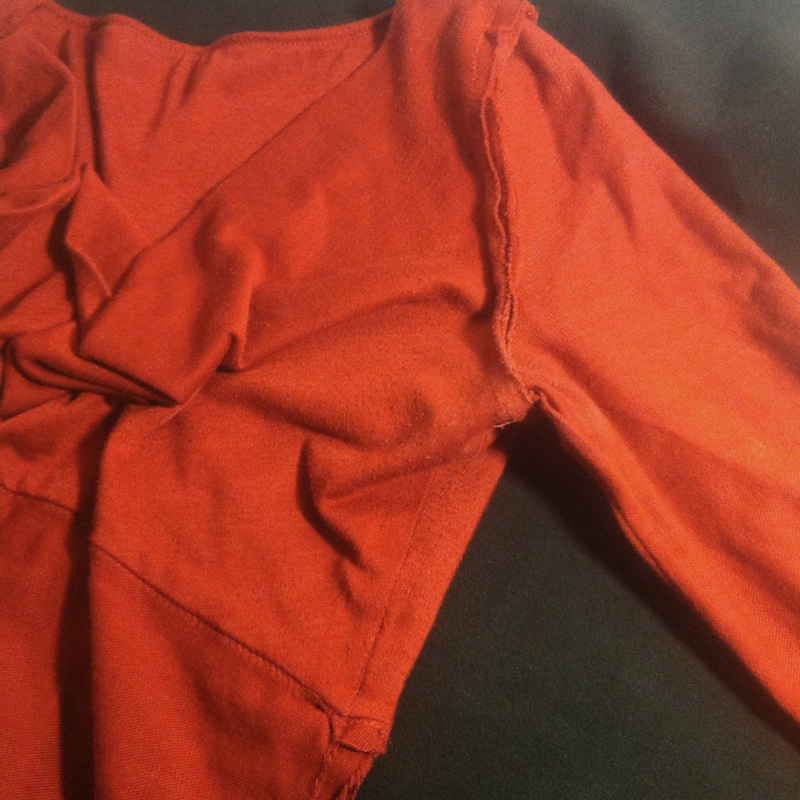
A top from the long grim sergerless era. I still wear it sometimes, but those seams annoy me every time I put it on.
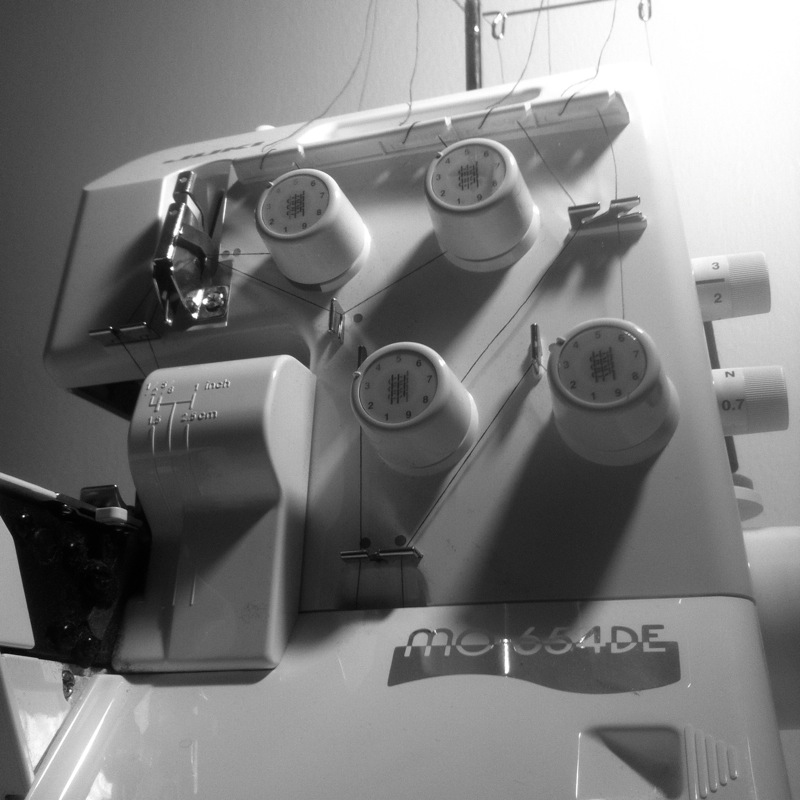
And oh boy, now that I have a serger of my own I would fight off zombie hordes to protect it. It is a beautiful, solid, reassuring piece of mechanical perfection. Let’s start with the differential feed: that thing is golden! It’s a dial that allows you to adjust the speed of the front and back feed, so that the fabric is stretched or compressed slightly as you sew. This can produce gathers or lettuce edges in extremes, but is more frequently employed to ward off puckers in delicate fabrics or prevent wavy seams in bias or stretch fabrics. I have no idea why regular sewing machines don’t come with this feature when basically all sergers have it, but I would be quite willing to plunk down some dollars for it.
I mostly use my serger in the standard 4-thread overlock mode, as it’s such an excellent general-purpose stitch for seaming knits and finishing edges on mid- to heavyweight fabrics. But in theory it can do a whole slew of other stitches, rolled hems and flatlocks and so forth. It also has all kinds of wacky feet, including ones for gathering, elastic, couching, and all kinds of other things that could theoretically come up someday (though admittedly I do just fine attaching elastic with the standard foot). It blazes through edge finishes, which makes long seams on skirts and pants much more bearable. I’ve even been known to use it for blind hemming on a t-shirt, when I was doing a rush alteration for a dude friend and didn’t want to bother switching out the sewing machine thread.
The biggest complaint about sergers as opposed to sewing machines is the complicated threading, but I SWEAR IT IS NOT THAT BAD. Even the one I learned on, which had an irritating lower looper assembly that you needed a special extra-long needle threader to get through, was not that bad. Two rules: thread the machine in order (usually right to left), and follow the color-coded dots. Most machines have a perfectly good threading diagram in the manual, or often printed right on the access door. If you’re actually allergic to poking threads through a series of loops, there are a number of brands now that are happy to perform a walletectomy in exchange for fancy pneumatic self-threading technology.
As for the tension issue, well, it’s just a matter of learning which control is associated with each thread. A good reference book will have you sorted in minutes, or just thread up your machine with a different color on each spool so you can see at a glance which goes where. Grab a good-sized scrap to test on, then adjust and sew and adjust and sew until you’ve got a nice balanced stitch that doesn’t crunch the fabric or hang off the edge. If you write down the settings you used, you can go right back to them the next time you use that stitch and fabric weight. Easy! And again, there are fancy-pants machines that will take care of all this business for you if you can’t be bothered.
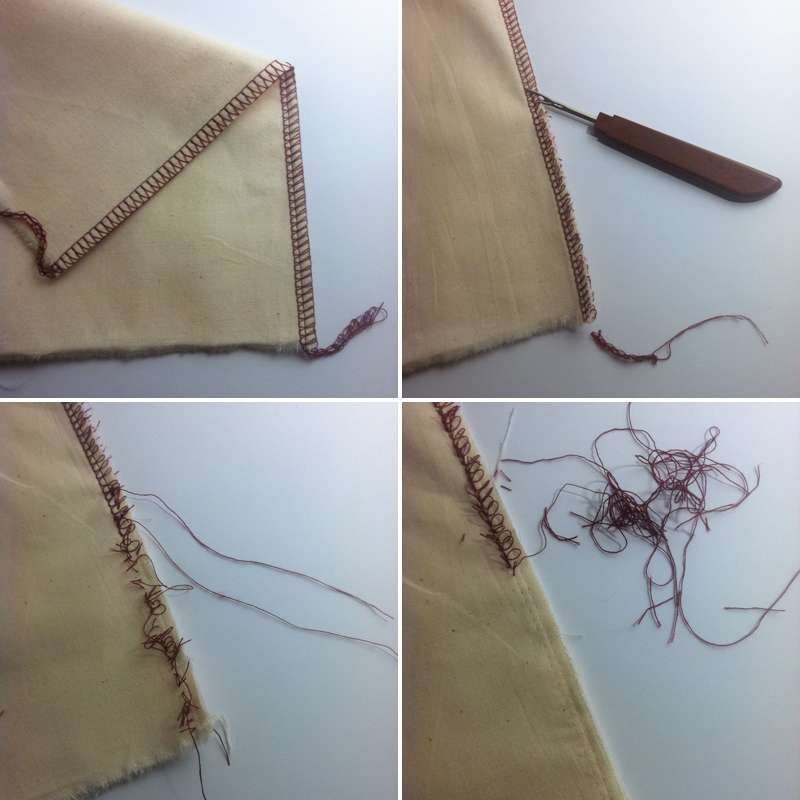 Unpicking serger seams is another area where people get hung up sometimes. It’s a lot of thread, and if you try to go about it stitch by stitch it is indeed a pain in the ass. But here’s the thing: all you have to do is cut the looper threads and the whole thing unravels. You can zip a seam ripper along the loops or even trim the edge off with your shears. Cut the chain off right at the end of the seam, then tug on the needle threads and they should pull right out, leaving a trail of looper “eyelashes” that you can pluck away with your fingers. Messy, but not difficult.
I can think of a few situations where you might not want to shell out for a serger. If you’re really really a beginner and still not sure sewing is your thing, it makes sense to keep your buy-in to one machine until you’re more certain. If you genuinely don’t give a shit what the insides of your garments look like, then don’t let me tell you otherwise. If you are seriously on a budget, there are plenty of decent alternatives to buying another machine, and you shouldn’t worry that it will compromise the quality of your work. And if you’re a hardcore couture nut who aims well above ready-to-wear quality, you may not be interested in the more utilitarian finish a serger produces.
But seriously, everyone else should consider getting one. I’m more than willing to invest the time in handwork when it counts, but for mundane seam finishes a serger is an invaluable time saver. It makes knit sewing a breeze, which should endear it to costume folks in particular. And given that you can have a basic model for about $200, it’s a more than reasonable investment for most serious hobbyists. You’ve probably spent more than that on fabric. So don’t let anyone talk you out of it.
]]> I was all over the new Spider-Woman costume when it was unveiled a couple months back. The outfit is functional and interesting, with cool patternmaking and embellishment details, so it checked a lot of boxes for me, plus spiders are kind of a thing. I started playing with it right away, but between gift sewing and work stuff I didn’t have a chance to work on it much until this week. Delicious crunchy patternmaking ahead!
I based the jacket on one of my personal pattern blocks, aiming for pretty minimal ease to get the streamlined look in the art. I used a cotton twill with a bit of give for the muslin, and might go with stretch wovens for the real version. (I think the jacket is actually supposed to be leather, but I’m going to aim for a wearable version in regular fabric before I shell out the $$$.) Here’s the block I started with:
Princess-seamed jacket block with one-piece darted sleeve (no seam allowances)
The first step in turning this into the jacket is drafting the raglan sleeves. Now, the references conflict a bit on exactly how the sleeves are put together. If you look at the close-up view here, it looks like the raglan sleeves stop about an inch short of the neck opening. If you look at the view here, it looks like they actually intersect the neck opening. I went with the first version, because it’s a little unusual and I like a challenge, but if you wanted to use a commercial pattern instead of drafting your own raglan sleeves (understandable) the latter would be much easier to find.
First step in drafting the modified raglan sleeves
The first step is to line up the top of the princess seams and draw in the lines of the raglan sleeve The shape is pretty much a judgment thing, but note that I’ve drawn the back seam to intersect the tip of the back shoulder dart so I can rotate it closed. I also drew both front and back seams to intersect the shoulder seam at right angles.The sleeve is temporarily split into front and back pieces, right down the middle.
Second step for the modified raglan sleeves
Next, line the sleeves up with the armhole opening. The sleeve cap has a little bit of ease in it, so that sticks out at the top. The sleeve and armhole cross near the inflection point of the sleeve cap, and the length below this point should be the same on both.
Finishing the modified raglan sleeve draft
Redraw the underarm curve, blending the raglan seam into the base of the sleeve cap. It’s a good idea to compare this to the matching seam on the bodice pieces, to make sure they’ve ended up the same length. You don’t want a lot of excess ease in the seam here or it’ll look puffy. Draw in a smooth curve for the shoulder, but note that you might need to fiddle with the shape to get a nice fit. Definitely plan on a muslin or two here. When it’s good, rejoin the sleeve pieces into a single sleeve with shoulder and elbow darts.
Drawing in the hem shape
The next step is to draw in the shape of the hem. This is another place where the references disagree – some of them have a straight lower edge, while others come to a point in front and back. I waffled on this, but I ended up going with a point because it seems a little more superhero-ish and less like ordinary streetwear. Then I lined up all the front and back panels in order, matching up the seams below the waist. I felt safe overlapping the curves a little at the hip because most of my hip width is below where the jacket will end, but it’s no big deal to leave a little more room there if needed.
I divided the distance from waist to hip into thirds to give me guides for shaping the hem. The lowest point is at about the 2/3 mark, and the highest point at the side is just above 1/3. I pulled some of my references into illustrator to measure the angle, and determined that the hem comes up at about a 30º angle from the center front and back. I also made sure that the curve would be perpendicular to the side seam. After drawing in the hemline, I separated the pieces again.

Basic pieces for the jacket
At this point, the main pieces are done and you can sew up a muslin to check the fit. I also sketched the placement for the front pockets. The underlap side doesn’t allow for a very deep pocket, but it’s such a close-fitting jacket that not much would fit in there. I only ever seem to use pockets for sticking my hands in and looking awkward anyway.
Creating the zipper shield and left front
Pictures of the jacket open show that it closes with a zipper along the left front princess seam, then with snaps along the raglan edge. I wanted the zipper to be completely hidden under the overlap when closed, so I created a separate left side front piece with the princess seam offset by 1/4″. When I cut the actual jacket, I’ll either add a small facing on the overlap edge or just cut it with an extra wide seam allowance so I can do a generous lapped zipper. (On the first muslin I extended the overlap piece instead of moving the princess seam, but I don’t like how it makes the insignia asymmetrical so I’m going to try it this way for the next one.)
The left side front attaches to the zipper shield, so I accounted for the shifted princess seam when creating that pattern piece. I also shortened the bottom point slightly so it wouldn’t peep out when the jacket is closed.
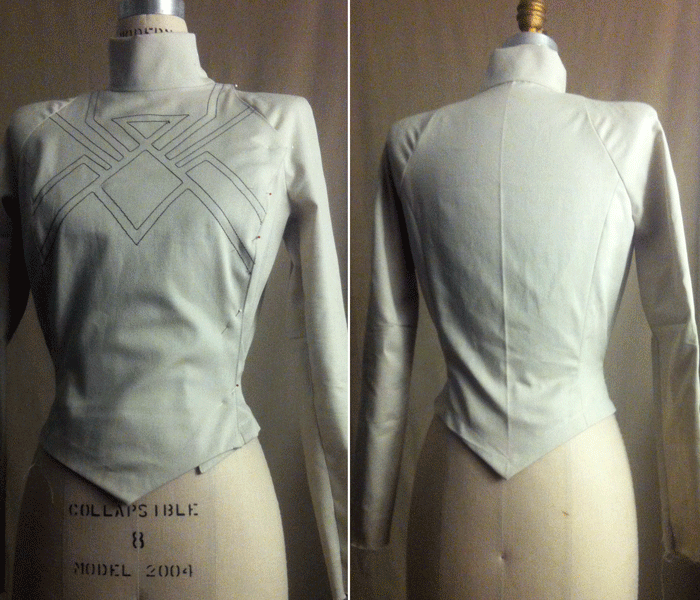
First trial of the Spider-Woman jacket pattern, in cotton twill
Here’s my muslin with the zipper shield attached (but no zipper inserted, thus the pins.) An impatient muslin-maker, I skipped the pockets and only lined the front. You may notice the zipper shield sticks out a bit in spite of my modification, but that’s just because the dress form and I disagree on the topic of hips. The fabric is a cotton twill I had lying around, probably something I got in a scrap sale at work. It’s got some nasty creases that didn’t want to press out, but of course in a muslin it doesn’t matter.
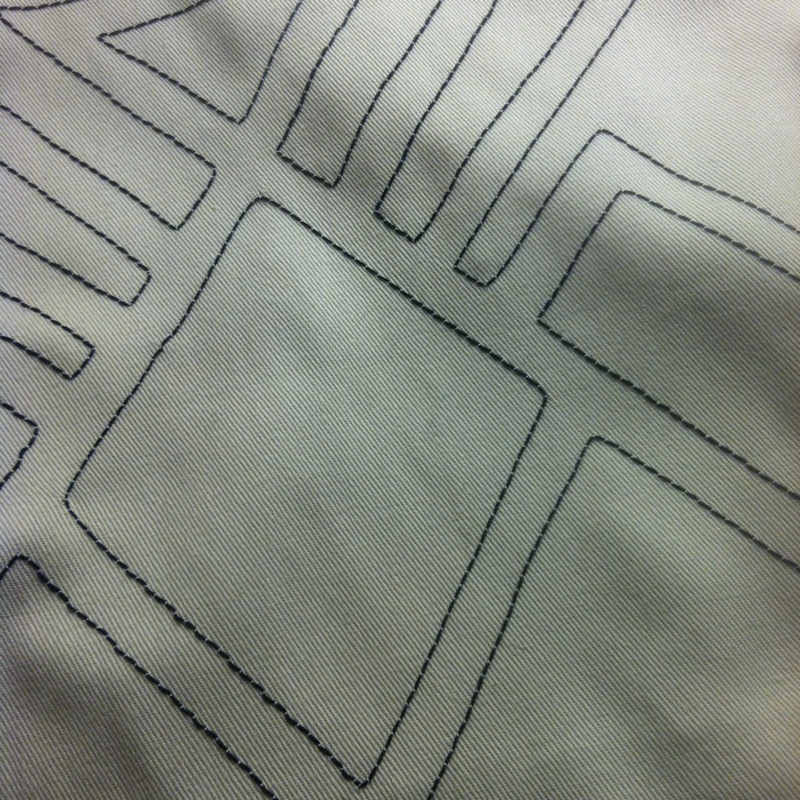
Before I attached the front piece I traced the spider insignia onto the back of the fabric, then stitched over it with a beefy black topstitching thread in the bobbin. I’ll applique the final design, which should be pretty simple since it’s all nice straight lines, but for the muslin I just wanted to sketch it out so I could check the proportions. I’m pretty happy with it!
I made a few refinements to the fit after this muslin, mostly in the sleeves. The bicep was a bit too large and the wrist too narrow, so I tweaked accordingly. I took the bodice in a little bit along the front and back raglan seams as there seemed to be a bit of excess fabric in there, raised the underarm seam about 1/2″, and flattened out the shoulder curve about 1/4″. Hoping these modifications will also alleviate some of the wrinkling visible along the raglan seams, otherwise I’ll have to think about how to stabilize them better.
The art shows an extremely close fit in the arms, so I’m actually leaning toward using a heavy knit for the sleeves, at least for the fabric version. Which might require me to take them in even further, but we’ll see how it goes. The neck opening measures 18″ with overlap, and I just made the collar a rectangle, cutting on the cross-grain so it would have a bit more give. The collar on the muslin is 2 1/2″ tall, which looks a little too big to me, so I’ll probably knock that down to 2 1/4″ or 2″ for the real thing. I’ll update when I do my next version to show how it all works out.
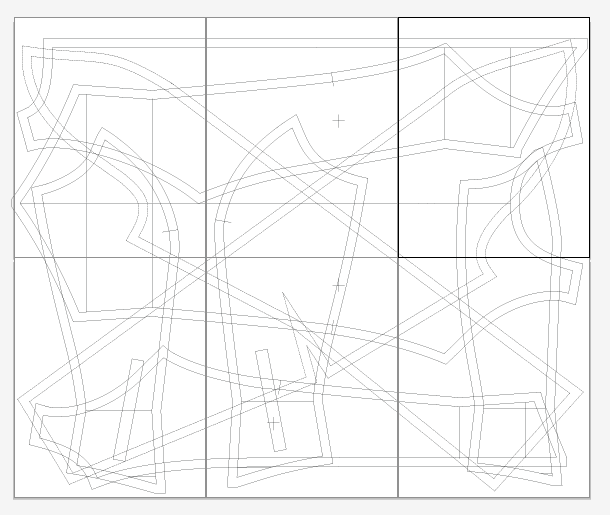
The version of the pattern I use for printing – a mere six sheets of paper. I actually split the sleeve back into two pieces so it would fit on the paper, but I’ll most likely graft them back together when I trace it.
The last step is to add seam allowances and print the pattern out. Printing patterns is the bit I hate about drafting in illustrator, to the point where I sometimes actually prefer drafting manually. I particularly hate wasting 20 or 30 sheets of printer paper, painstakingly trimming the edges, and assembling them into a stiff, unruly paper quilt that’s awkward to use and store. My solution is the mess above – I use only enough sheets to fit my largest piece, overlapping the rest. After printing and assembling the resulting 4-8 sheets, I trace the individual pieces off onto lightweight pattern paper. I’m not sure if this actually saves any time, but I like tracing much more than I like aligning and taping so it works well for me (and feels less wasteful).
Next step is the fabric version with an actual zipper. Hope my fitting tweaks worked out!
]]>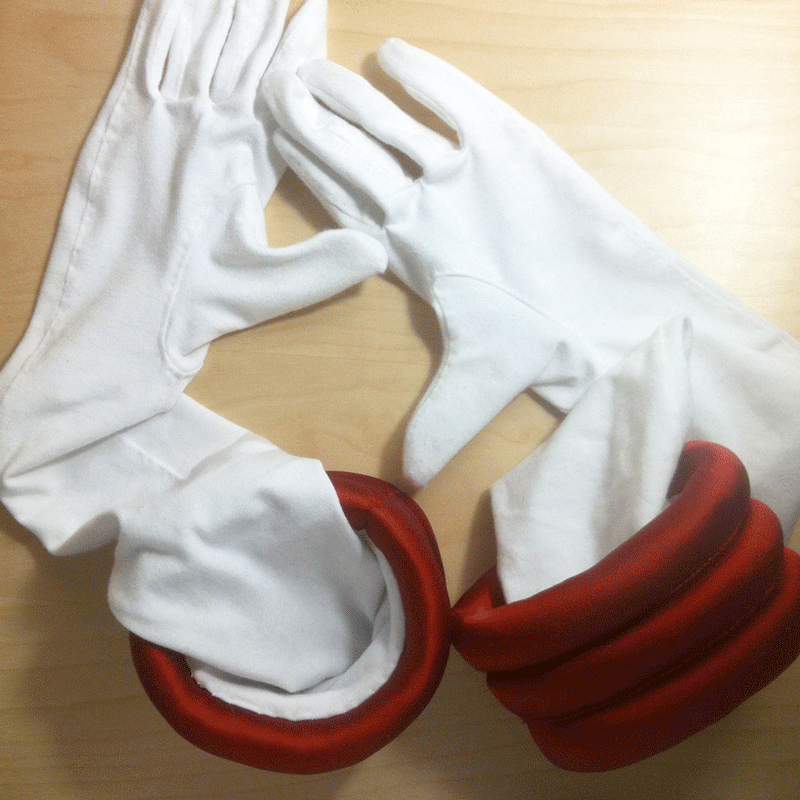 I’ve got a big fat glove sewing tutorial up at the McCall blog this week, with all kinds of good stuff on fitting glove patterns and embellishment and working with those tiny dang seam allowances. The angle over there is holiday gift sewing, but of course gloves come up time and again in cosplay too. Since I’d already done a lot of the work altering the pattern and nailing down the technique, I decided to make a second pair while everything was still fresh. This is the result!
For green gloves I’d used view G of the pattern (V7949), but for Sailor Mars gloves I needed view B, the above-elbow version (which works out to be more or less opera length on me, at least in this super stretchy cotton jersey). So I needed to transfer my alterations to the new pattern pieces, and make a few more tweaks to get a really smooth fit.
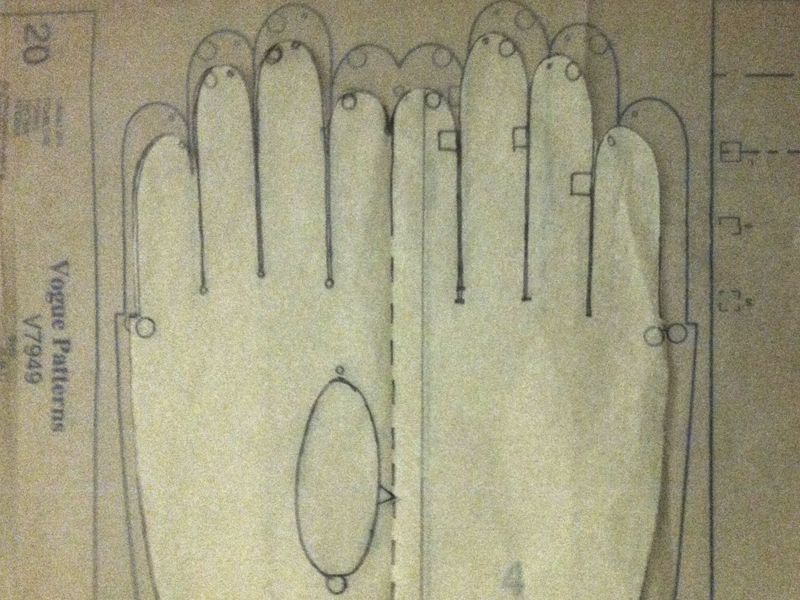 I started by tracing the finger section onto a new sheet of pattern paper. As I did, I took 1/8″ of width out of each side the middle and ring fingers, for a total 1/2″ reduction in the width of the palm. Then I placed the redrafted hand over the pattern for the long gloves and traced off the rest of the arm, blending the patterns together at the wrist.
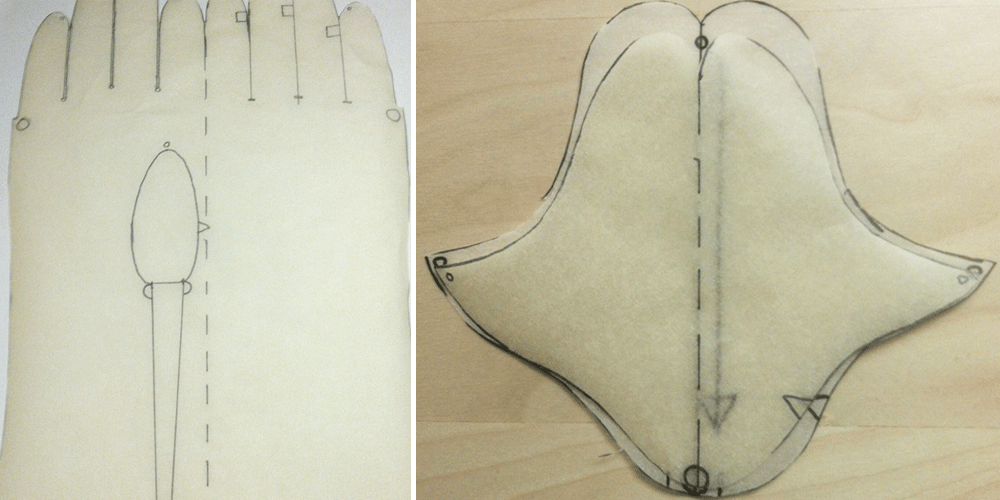 Since my fabric was so stretchy, I decided I wanted to narrow the actual piece instead of using elastic to snug it in at the wrist. I tried on the green gloves and pinched out the excess on both sides of the wrist, and determined I needed to take out about 1/2″ on each side. Because only the outside of the wrist had a seam, this meant adding a dart from the thumb opening about halfway down the forearm. I redrew the thumb hole slightly to give it a nicer shape, but it’s still narrower than it was previously, so I also had to narrow the thumb piece to match. If I didn’t want to make the thumb smaller, I could have split the piece along the center fold line and added a seam all the way down.
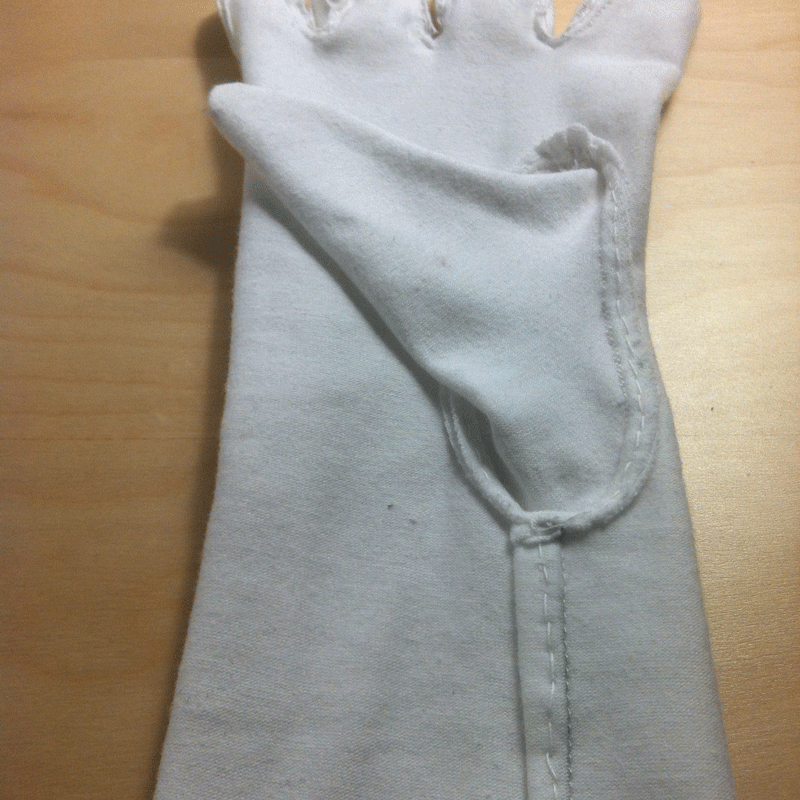
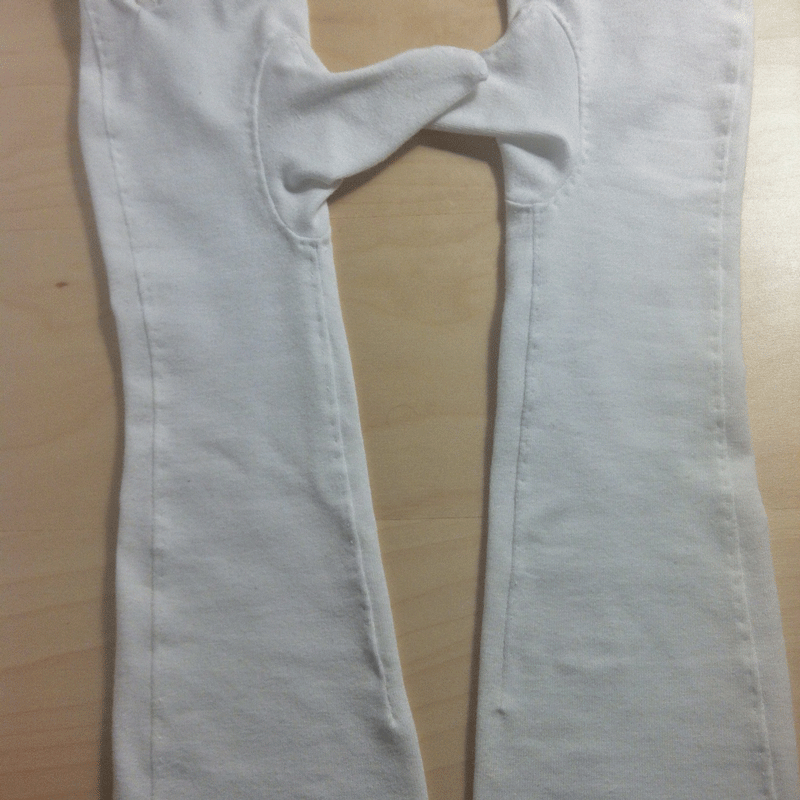 When assembling the gloves I sewed the dart first, before inserting the thumbs. Then I proceeded more or less as with the previous pair, though without the elaborate embellishment. Because the jersey isn’t 100% opaque and I didn’t really feel like attempting to line these, I trimmed all the seam allowances to an even 1/8″ before topstitching so they’d look nice and tidy.
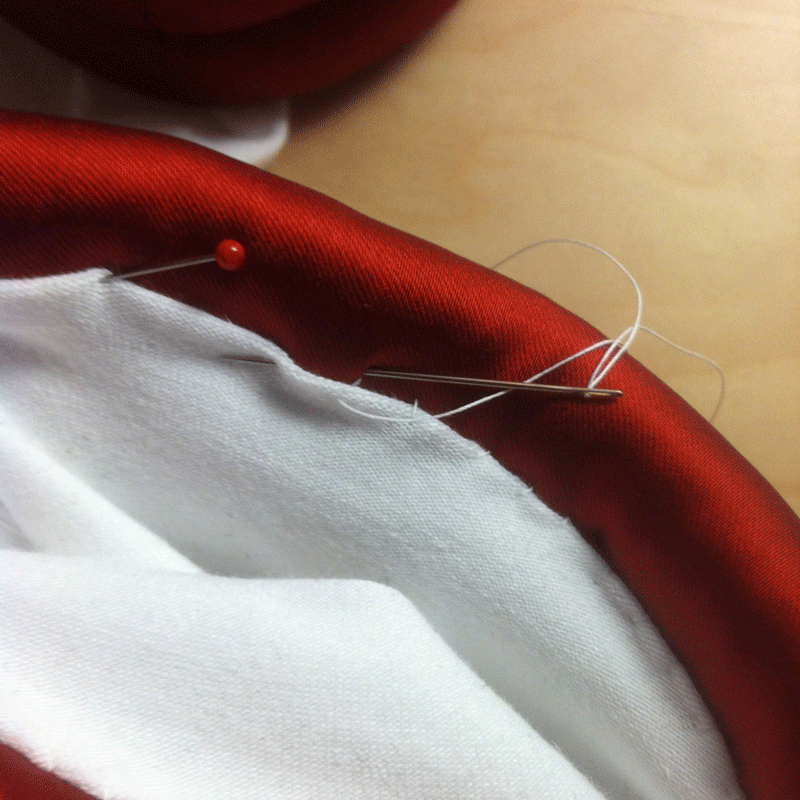
 Of course, I needed a few additional steps to make white opera-length gloves into Sailor Mars gloves. I had some heavy red stretch satin left over from another project, which I knew was gorgeous and perfect for the costume but also a bear to work with because it contains both spandex and acetate. The spandex makes it prone to springing back when pressed, especially when the fabric is this thick, and the acetate melts if you so much as wave the iron at it, so I had to make do with steam and pounding on it with my fists. Oh well!
 I cut two 7″ by 10″ strips of the satin, and sewed the long edges together with a half-inch seam. I pressed the seam allowances open as best I could, turned it inside out, and rolled the seam to the underside so it wouldn’t show at the outer edge. I tucked the raw edges in at the ends, then pressed and pinned it all flat. From the right side, I marked and topstitched the piece in thirds, using all-purpose and metallic threads twisted together in the needle for extra emphasis. Then I stuffed the channels with polyester fiberfill. To avoid lumpiness it worked best to separate the fiberfill into smallish tufts and stuff from both ends, using a pencil to push it through.
 I joined the ends of the channels by hand, using sturdy thread and a ladder stitch. It’s probably not as pretty as it could have been, but it was the easiest way to get a clean finish without flattening the rolls. Once I’d closed up both rolls, it was time to join them to the gloves.
 The gloves were about two inches longer than I needed, so I folded the excess to the outside so it would be hidden by the cuff roll. Then I pinned the glove into the roll, about 1/2″ down from the upper edge, and secured it with a fell stitch all the way around, tugging on the opening every so often to make sure it had enough room to stretch. I did the same thing at the bottom end of the roll to secure the free edge so it wouldn’t creep out while I was wearing them. And that’s one piece of Sailor Mars down!