About ten years ago, fresh out of college and about to leap into a science writing program, I was home for the summer and looking around for ways to keep busy. A little sewing school had opened down the street from my folks’ place, and they were offering not only construction classes but pattern drafting. I’d been sewing for years, occasionally copying a pattern from an existing garment or making minor pattern changes like dropping a waistband or reshaping a neckline or skirt. The idea that I could instead create them from the ground up? Revolutionary.
A mere few weeks of workshop later, I was burning with newfound power. Flat drafting on paper isn’t the only way to create sewing patterns, but it clicked into my brain like a game expansion. Start by drawing up a properly fitted sloper or block, which is a pattern shaped exactly like your body that forms the foundation for anything else you might make. Learn a few basic manipulations like adding ease and transforming darts, add collar and sleeve drafts, and you can create nearly any pattern. I was unbound by trends, no longer limited by what the pattern companies thought would sell, free to rip off the designer stuff I couldn’t afford and all the steampunk gear my nerd heart could want. (Yeah, I know, but it was 2010.)
Patternmaking was also a road into good fit, which had eluded me for years. I grew up using commercial patterns, which are a bit like flattened-out ready-to-wear clothes but based on fit standards that have been frozen in time for decades (not that they were ever designed to fit square-shouldered teenage gymnasts). I attempted to make my own jeans once in high school, and was utterly thwarted by bizarre fit problems. But through trial and error, a lot of detailed measurements, and plenty of failed muslins, I gradually learned the shapes that worked for my body. Now they’re so ingrained that I can freehand a crotch curve or sleeve cap from a few reference lines.
An obsession was born. I collected tools and reference books – the photo above isn’t complete, but a rough approximation of where ten years of library-building has gotten me. I bought rolls of tracing paper and started experimenting, making patterns for pants, dresses, shirts, jackets. I bought commercial patterns and international pattern magazines to study the shapes, building a whole vocabulary of style lines, silhouettes, and proportion.
But also, patterns for everyday clothes could only hold my interest for so long. Real clothing is largely designed by people who went to fashion school, who know where the seams of a garment conventionally go and how they fit together. The kind of patterns that are widely available reflect that, and the pattern pieces are predictable enough that an experienced stitcher can often leap right in without any need for instructions or even labels. Compare that to the joyful anarchy of translating garments that sprang whole from the brain of an artist who’s barely heard of zippers, and you can see how cosplay changes the game for a patternmaking enthusiast. There was something deeply satisfying about puzzling out Ezio’s hood from Assassin’s Creed 2, or Garnet’s weird jumpsuit from FF9.
So, where to start? Assuming you have a basic idea of how to put garments together, nearly any patternmaking textbook will do the job. (If not, a basic sewing book or commercial pattern is a great place to start!) Many of the books I learned from are now out of print, but there are so many others out there that it doesn’t matter much. As long as you find one with a communication style you like, that shows how to draw up a basic block, fit it to your body, and transform it with dart rotations, ease, and detail variations, it should do the job just fine. Most pattern books also contain some number of basic garment drafts, but while they’re useful examples you shouldn’t feel limited to what’s shown in the book. The basic principles are what you’re really after, and the rest is up to practice, experimentation, and learning the proportions that work for your body and your preferences.
Flat drafting systems are always going to be an approximation of a 3D body, and in order to achieve that approximation they’re always going to have some assumptions baked in. Depending on how your personal dimensions interact with these, you may end up with some weirdness in the initial block. A good fitting book should be your next stop, as you troubleshoot the draft and make any alterations necessary to customize it. Really take the time and make the block fit as perfect as you can get it, because any patterns you make from it in the future should inherit this same fit.
Very few patternmaking books also discuss construction (the Bunka Garment Design Textbook series in the picture above are some of the only ones I’ve found) so you need to be able to puzzle out assembly order on your own. This is where it helps to have made garments before, or at least have a good general sewing book at hand. For figuring out the finer points – this needs to be finished before that piece goes on, etc. – nothing beats making a mock-up before you move on to your real fabric. This is a good practice anyway, because sometimes a proportion that looks good on paper lands badly on a 3D body, and sometimes a mistaken measurement or other error leads to a non-obvious flaw in the draft. Any problems or construction challenges you can discover in this test run will save you lots of grief in the final garment, so even a very bad mock-up can be a worthwhile experience. Additionally, you should expect a bit of tinkering on any new pattern to accommodate the specific properties of the fabric you plan to use. Is it a thick, stiff material that makes everything feel tighter than it would in muslin? Is it something floppy and fluid, that wants to sag away from the shape you put it in? In the end, fit is a three-way conversation between the pattern, fabric, and the body inside, and even more so when you get into making patterns for stretch fabrics.
For cosplayers especially, I recommend learning the basics and then checking out some of the patternmaking books that deal with more unusual ideas and transformations, like the Pattern Magic series by Tomoko Nakamichi, Antonio Donnanno’s books on patternmaking for haute couture and accessories, and Stuart Anderson’s Pattern School page for stretch pattern drafting. Since cosplay is so full of odd silhouettes and unusual materials, you want a broad and varied pattern vocabulary in able to accommodate this variety.
Much more recently, I decided I needed to add draping to the repertoire. Lots of people start with this method, and I’d done enough reading to grasp the basic idea, but I didn’t have a dress form that really matched my shape until the end of 2018. Since the entire point of draping is to create patterns directly on a body, it wasn’t very practical before that. When I acquire a new tool though, I go looking for a way to use it.
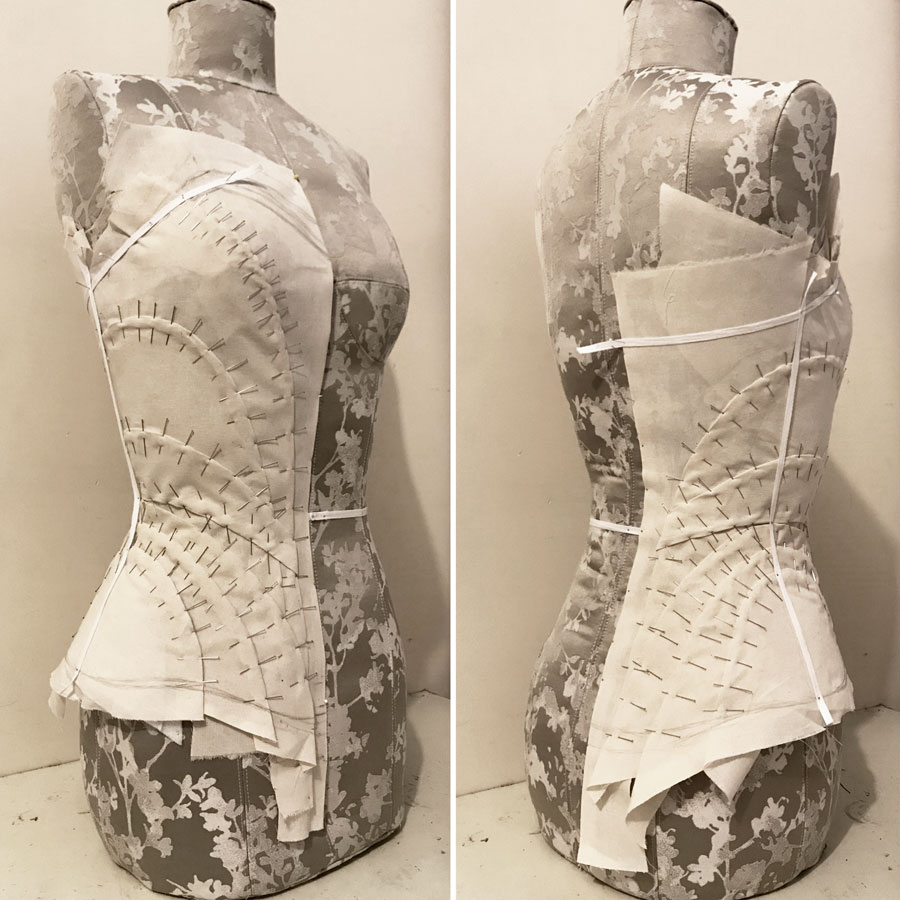
My longest-term project is the Shaman Empress from Monstress. Basically none of whatever the Empress wears under her robes is visible in the reference materials we’ve seen so far, so I’m making something up based on the available information. Most importantly, the full-length embroidered panel at center front needs to hang from something that isn’t the floaty gathered blouse – ideally a structured bodice or corset with lots of boning to prevent distortion and sagging from the weight. I drew up this paneled bodice with lots of seams wrapping around at weird angles, strongly influenced by Maika’s armor from the Monstress issue 13 cover, which I built back in early 2018 and still love. The neckline is shaped to match the upper edge of the embroidery panel, and will be refined in mockups to play nicely with the blouse underneath as well.
I spent a couple days trying to do the pattern flat, but a major weakness of paper drafting is that every time you change one piece, you need to trace the effects across all the other pieces it touches to ensure that they’ll still match up. I’ve mostly been a flat patterning partisan thus far, but trying to lay out all these curvy seams while preserving fit was not a fun time and after a deeply mediocre first muslin I needed to try something different.
This bodice has been on extreme slow cook (that post was fully a year and a half ago, with only intermittent progress since) but I’m happy with where it’s going, and it’s a nice reminder that if one tool isn’t doing the job, there’s usually something out there that will work better. Learning new skills is always worth it.
]]>
I didn’t expect to get into another competitive sport after I quit gymnastics, but I’ve found myself getting hooked on cosplay contests. I’m not the winning-motivated kind of competitive, but I’m definitely the kind where if you lay down a challenge I’ll go to excruciating lengths to meet it, and the challenge of creating a competition-worthy costume hits me right in the obsessive tendencies. The competitive community is also a really fantastic concentration of interesting and innovative creators, and there’s nothing I like better than talking shop with other overambitious craft nerds.
If you’ve competed in cosplay lately, or even just watched a competition or two, you’ve probably encountered some kind of attempt to divide cosplay up into categories. Needlework and armor are typical, sometimes bolstered by a larger-than-life, fx, or catch-all group that accounts for specialized techniques like wing building, body paint and prosthetics, or lighting and electronics. The reason for grouping entries this way is straightforward: cosplay is a multi-faceted hobby drawing on a wide range of skillsets, and to judge a giant foam robot against a hand-sewn historical gown isn’t so much apples to oranges as elephants to race cars. Categories make it easier to compare like to like, so that both judges and audience can more easily see how the entries stack up. They also present a way of organizing the contest, with natural breaks that help to keep the show feeling fresh.
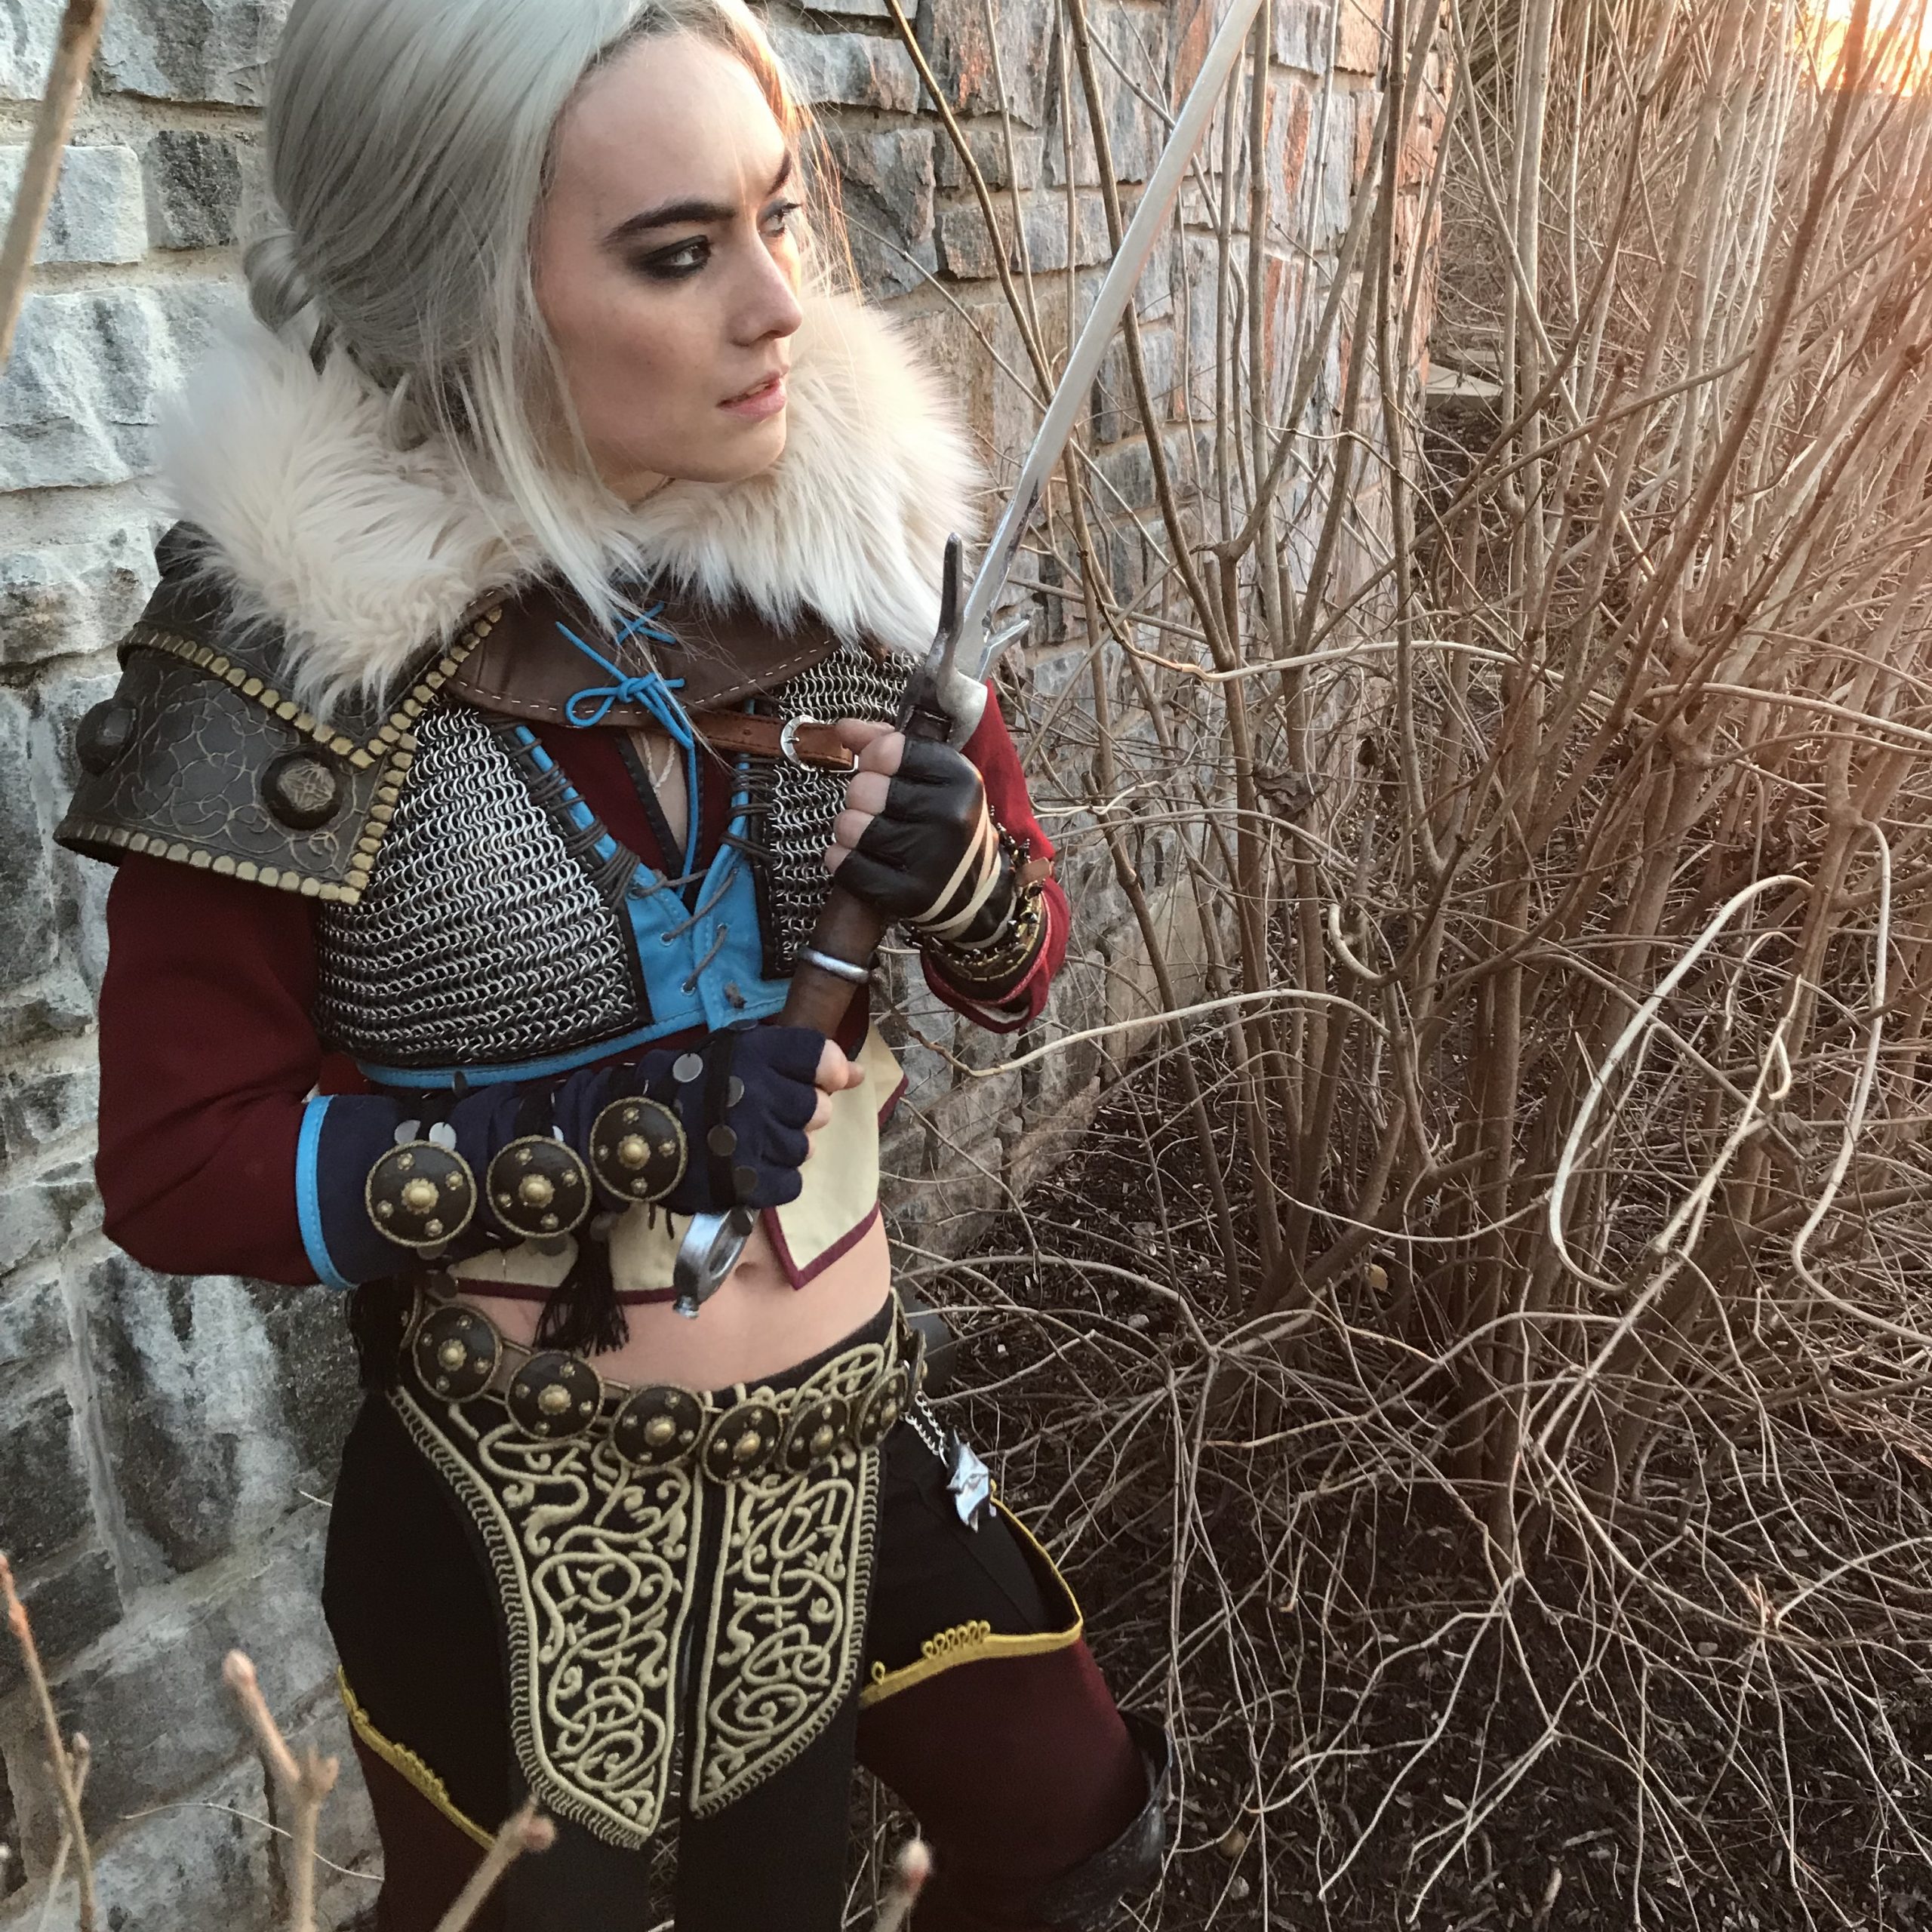
But in practice, choosing what category your costume fits into can cause a lot of angst. Where do you enter the half-and-half design so common in fantasy and game designs, which pairs an ornately embroidered robe or skirt with a breastplate, pauldrons, and light-up wizard staff? Even my Ciri costume challenges categorization. To most people it probably reads as an armor build. But if you compare the time I spent on the various components, it probably has less than 200 hours of work on the ‘hard’ chainmail and worbla pieces and 400+ hours on hand embroidery, boots, and miscellaneous sewing and leatherwork. On the other hand, my pal Cornetto Cosplay is working on Nyx from Hades, a character who wears a loosely draped gown with elaborate jewelry and over-the-top hairstyle. The costume is mostly fabric, so it looks like a needlework build, but in fact the sewing part is relatively simple while a huge amount of work goes into the 3d-printed jewelry – a technique more typical of armor.
It’s actually more common than not for a costume to pull elements from more than one skill domain, so how do you choose which category to enter? Do you pick the largest fraction of the costume, down to counting components or surface area? Do you pick the area that displays the most technical skill? Some contests will even move people between categories, because the organizers or judges disagree about which is the best fit or simply to balance out numbers, which is a recipe for confusion and disappointment if they don’t have all the information about what went into the build.
If the goal is to avoid turtle-to-piano comparisons and ensure everyone is being assessed against comparable skillsets, then this premise also runs into trouble within the categories. Leatherwork is often lumped in with the sewing category, which is sensible on the textile-meets-thread face of it but can result in weird misjudgments because they draw on very different craft traditions. A maker of historical gowns does not necessarily know what goes into wet molding, stamping, and carving leather, and an adept leatherworker can still be baffled by corsetry or padstitching. Within armor you have foam, thermoplastics, moldmaking and casting, and 3d printing, which are all wildly different processes with their own challenges and techniques to master. That’s not even getting into such classic genre-defiers as animatronic wings and creature makeup, which are often lumped into the same third category despite having even less in common than sewing and foam.
A distinction that I don’t often see addressed in contest categories is between manual and digital fabrication. How do you weigh the relative quality of hand embroidery versus machine embroidery? How do you assess a worbla component or one hand sculpted in clay and then cast versus a 3d-printed one? On the one side, you have difficult manual skills that can take years to develop through exhaustive practice. On the other, you can more readily replicate the crisp surface and perfect symmetry of a manufactured item, and the speed bonus can allow for additional detail in the overall build. Flame wars I’m sure have raged over which method is technically superior or more difficult, but of course the answer is neither. They’re just different, and a fair judging system has to weigh each independently on its own merits. Making this clear in the categories instead of leaving it implicit or at the discretion of the judges might be one way forward.
But on another level, I think this whole category business might be a lost cause, and the reason is the best in show award. Nearly every contest has one, and by collapsing all the categories into one podium of overall winners it demonstrates that in the end you’re going to compare pineapples and starfish after all. So how can we acknowledge this while still promoting fair and meaningful competition? I think it starts by accepting that cosplay is an inherently interdisciplinary craft, encompassing many different skillsets. Each competitor brings some subset of these skills to the table, and each judge is competent to assess some other subset, and hopefully by spelling out the variety of techniques on offer you can present a diverse and interesting pool of costumes to a group of people who know what exactly they’re looking at, without forcing people to pigeonhole themselves.
Competitive gymnastics also has the problem of how to objectively compare routines that don’t necessarily contain the same skills. It deals with this through the Code of Points, which is a comprehensive listing of all the documented skills grouped by apparatus, type of movement, and difficulty rating. So instead of requiring every routine to be the same, they can establish guidelines for the number of jumps, turns, and flips and assign points for difficulty and quality of execution. Although still sometimes subjective and subject to infuriating politics, the Code allows routines to be customized for each athlete’s skills, preferences, and creativity to a much greater extent than would otherwise be possible while allowing meaningful competition between them.
This doesn’t translate directly to cosplay contests because we’re a collection of hobbyist nerds with no governing body to establish such a code or train judges to interpret it. Cosplay contests are hosted by a hodgepodge of volunteer and commercial conventions with no incentive to coordinate on such a level, and the entire enterprise is too niche and too low-budget to justify this amount of organization. But I think that anybody putting together a rubric for contest scoring could take inspiration from the general approach, and maybe we can move toward a structure that reflects the multifaceted reality of cosplay.
Imagine if a contest entry form presented a list of categories, and instead of shoehorning you into one it asked you to pick the three areas that you’d like to be judged on. So maybe the contest is looking at sewing, armor, electronics, makeup/prosthetics/wig work, and engineering. You’ve got the classic light-up giant robot, so you check armor, electronics, and engineering for the rigging and stilts. Next to you is a cosplayer in an embroidered ballgown, who checks engineering for the hoopskirts but also sewing and wig work for their towering 18th century coiffure. The judges have a score card that tallies points for each category, based on the difficulty and execution of the techniques, and every category is worth the same number of points overall. So you’re rewarded for a diverse skillset, but because you can pick and choose the areas where you’ve made the best showing, you don’t necessarily have to be good at everything or incorporate more techniques than the particular build calls for.
I’m not a contest organizer and event planning is the opposite of my cup of tea, so I’m flinging this out into the universe as a challenge and hoping that the community will pick it up and run with it. If none of us know how to categorize our costumes, then maybe it’s the structure that’s the problem. What can we build that will be clearer, fairer, and more attuned to the needs of the community than what we’ve seen so far?
]]> I see a lot of people trying to scare beginners off sergers. Suggestions that they’re too tricky to thread, the stitching is hard to unpick, the tension finicky, the blade choppy and intimidating, etc. Generally it’s meant kindly—to spare people frustration, and maybe let them off the hook if they don’t have budget or confidence to invest in a second machine and are afraid they need one for x or y reason. Okay, fine! You don’t need a serger to sew knits, or finish seams, or anything else really, and people do fabulous work on knits and otherwise without ever coming near one. But I really like them!
I spent almost ten years in gymnastics, so leotard sewing was a pretty big deal in my early days. A serger is nice for that kind of thing because the seams have more give than a standard straight stitch, so they’re less likely to pop when stretched. As a result, I was whirring away on the family serger by my early teens. By high school my grandma was calling me over to rethread and fix the tension so she didn’t have to dig out a magnifying glass. I don’t mean this as a boast—I was just fortunate enough to have learned the basic operation and troubleshooting bits before anyone told me it was supposed to be difficult. If my slapdash teenage self could handle it with a manual and a reference book or two, I am certain that serger operation is well within the capacities of the average adult with internet access.
The majority of my sewing projects in those days were knits—leotards, t-shirts, knit dresses. I still have a couple pairs of jersey lounge pants from that era, though most of my ventures into jeans and woven tops encountered insurmountable fitting issues and are long gone. I’m boggled by the people who think beginners should stick to wovens; to my mind a t-shirt in a hefty cotton-spandex knit is much easier and more practical than a woven dress. And with a serger, you can whip up a top that’s basically indistinguishable from RTW in the span of an afternoon. That’s pretty satisfying, especially for a beginner! Certainly it was a good fit for my impatient sewing habits of that time.
After college, when I moved into my first apartment and got my very own sewing machine, it was a couple years before I worked up to adding a serger. (a freelancer at the time, I was very good at talking myself out of large purchases.) I made a handful of knit tops on the regular sewing machine, using zigzag stitches and stretch stitches and all the other workarounds that are commonly recommended, and found it intensely frustrating. It was slow, especially when using the stretch stitch, and it always felt like a half-baked approximation compared to the neat, efficient finishes I’d enjoyed at home. I actually felt quite a bit less confident about my knit sewing than I’d felt as a teenager, even though my technical knowledge had improved, and I found myself buying mostly wovens as a result.
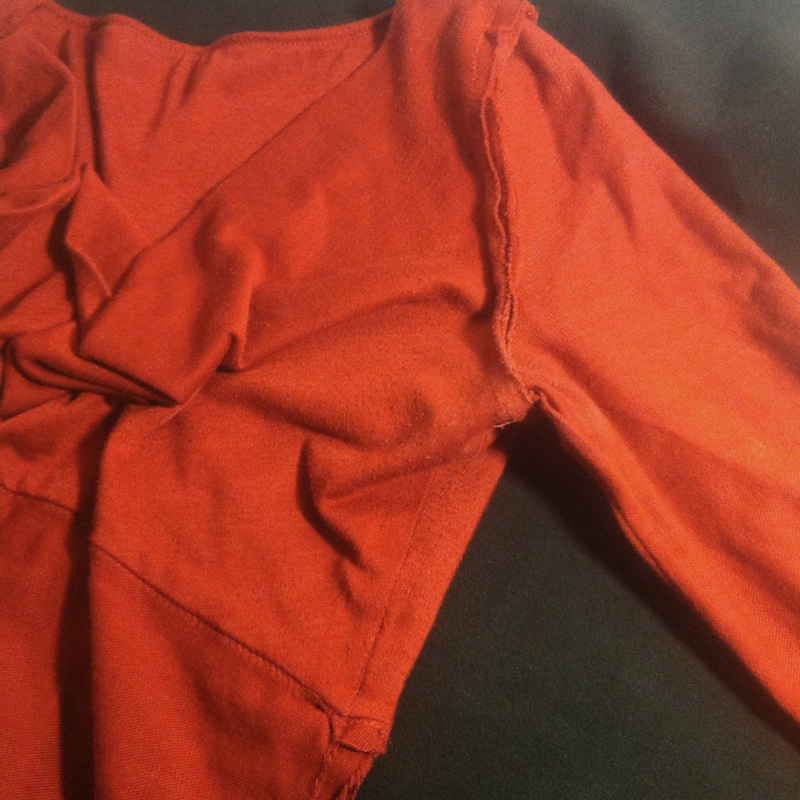
A top from the long grim sergerless era. I still wear it sometimes, but those seams annoy me every time I put it on.
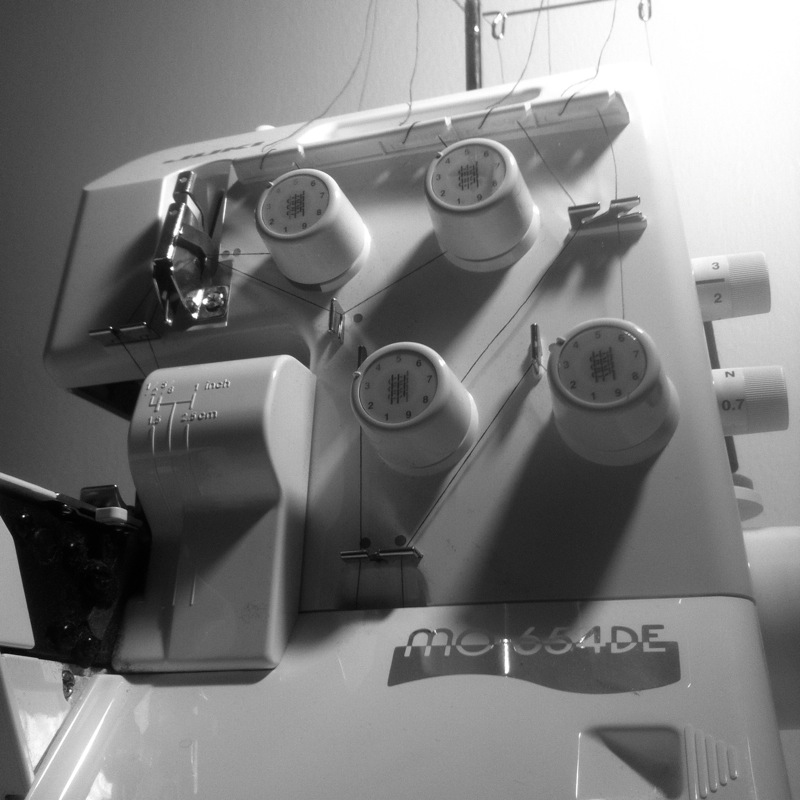
And oh boy, now that I have a serger of my own I would fight off zombie hordes to protect it. It is a beautiful, solid, reassuring piece of mechanical perfection. Let’s start with the differential feed: that thing is golden! It’s a dial that allows you to adjust the speed of the front and back feed, so that the fabric is stretched or compressed slightly as you sew. This can produce gathers or lettuce edges in extremes, but is more frequently employed to ward off puckers in delicate fabrics or prevent wavy seams in bias or stretch fabrics. I have no idea why regular sewing machines don’t come with this feature when basically all sergers have it, but I would be quite willing to plunk down some dollars for it.
I mostly use my serger in the standard 4-thread overlock mode, as it’s such an excellent general-purpose stitch for seaming knits and finishing edges on mid- to heavyweight fabrics. But in theory it can do a whole slew of other stitches, rolled hems and flatlocks and so forth. It also has all kinds of wacky feet, including ones for gathering, elastic, couching, and all kinds of other things that could theoretically come up someday (though admittedly I do just fine attaching elastic with the standard foot). It blazes through edge finishes, which makes long seams on skirts and pants much more bearable. I’ve even been known to use it for blind hemming on a t-shirt, when I was doing a rush alteration for a dude friend and didn’t want to bother switching out the sewing machine thread.
The biggest complaint about sergers as opposed to sewing machines is the complicated threading, but I SWEAR IT IS NOT THAT BAD. Even the one I learned on, which had an irritating lower looper assembly that you needed a special extra-long needle threader to get through, was not that bad. Two rules: thread the machine in order (usually right to left), and follow the color-coded dots. Most machines have a perfectly good threading diagram in the manual, or often printed right on the access door. If you’re actually allergic to poking threads through a series of loops, there are a number of brands now that are happy to perform a walletectomy in exchange for fancy pneumatic self-threading technology.
As for the tension issue, well, it’s just a matter of learning which control is associated with each thread. A good reference book will have you sorted in minutes, or just thread up your machine with a different color on each spool so you can see at a glance which goes where. Grab a good-sized scrap to test on, then adjust and sew and adjust and sew until you’ve got a nice balanced stitch that doesn’t crunch the fabric or hang off the edge. If you write down the settings you used, you can go right back to them the next time you use that stitch and fabric weight. Easy! And again, there are fancy-pants machines that will take care of all this business for you if you can’t be bothered.
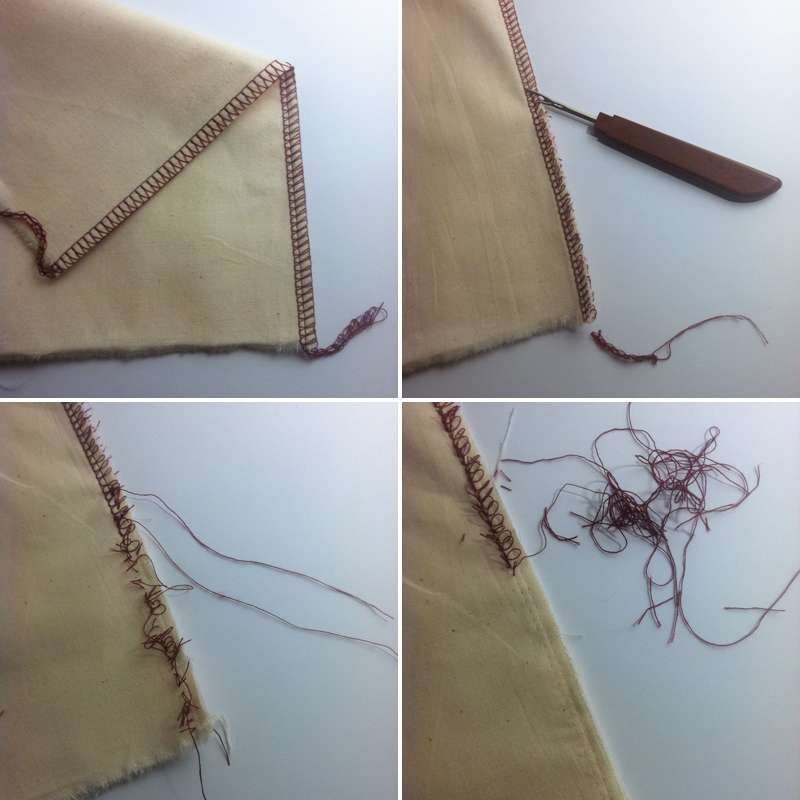 Unpicking serger seams is another area where people get hung up sometimes. It’s a lot of thread, and if you try to go about it stitch by stitch it is indeed a pain in the ass. But here’s the thing: all you have to do is cut the looper threads and the whole thing unravels. You can zip a seam ripper along the loops or even trim the edge off with your shears. Cut the chain off right at the end of the seam, then tug on the needle threads and they should pull right out, leaving a trail of looper “eyelashes” that you can pluck away with your fingers. Messy, but not difficult.
I can think of a few situations where you might not want to shell out for a serger. If you’re really really a beginner and still not sure sewing is your thing, it makes sense to keep your buy-in to one machine until you’re more certain. If you genuinely don’t give a shit what the insides of your garments look like, then don’t let me tell you otherwise. If you are seriously on a budget, there are plenty of decent alternatives to buying another machine, and you shouldn’t worry that it will compromise the quality of your work. And if you’re a hardcore couture nut who aims well above ready-to-wear quality, you may not be interested in the more utilitarian finish a serger produces.
But seriously, everyone else should consider getting one. I’m more than willing to invest the time in handwork when it counts, but for mundane seam finishes a serger is an invaluable time saver. It makes knit sewing a breeze, which should endear it to costume folks in particular. And given that you can have a basic model for about $200, it’s a more than reasonable investment for most serious hobbyists. You’ve probably spent more than that on fabric. So don’t let anyone talk you out of it.
]]>