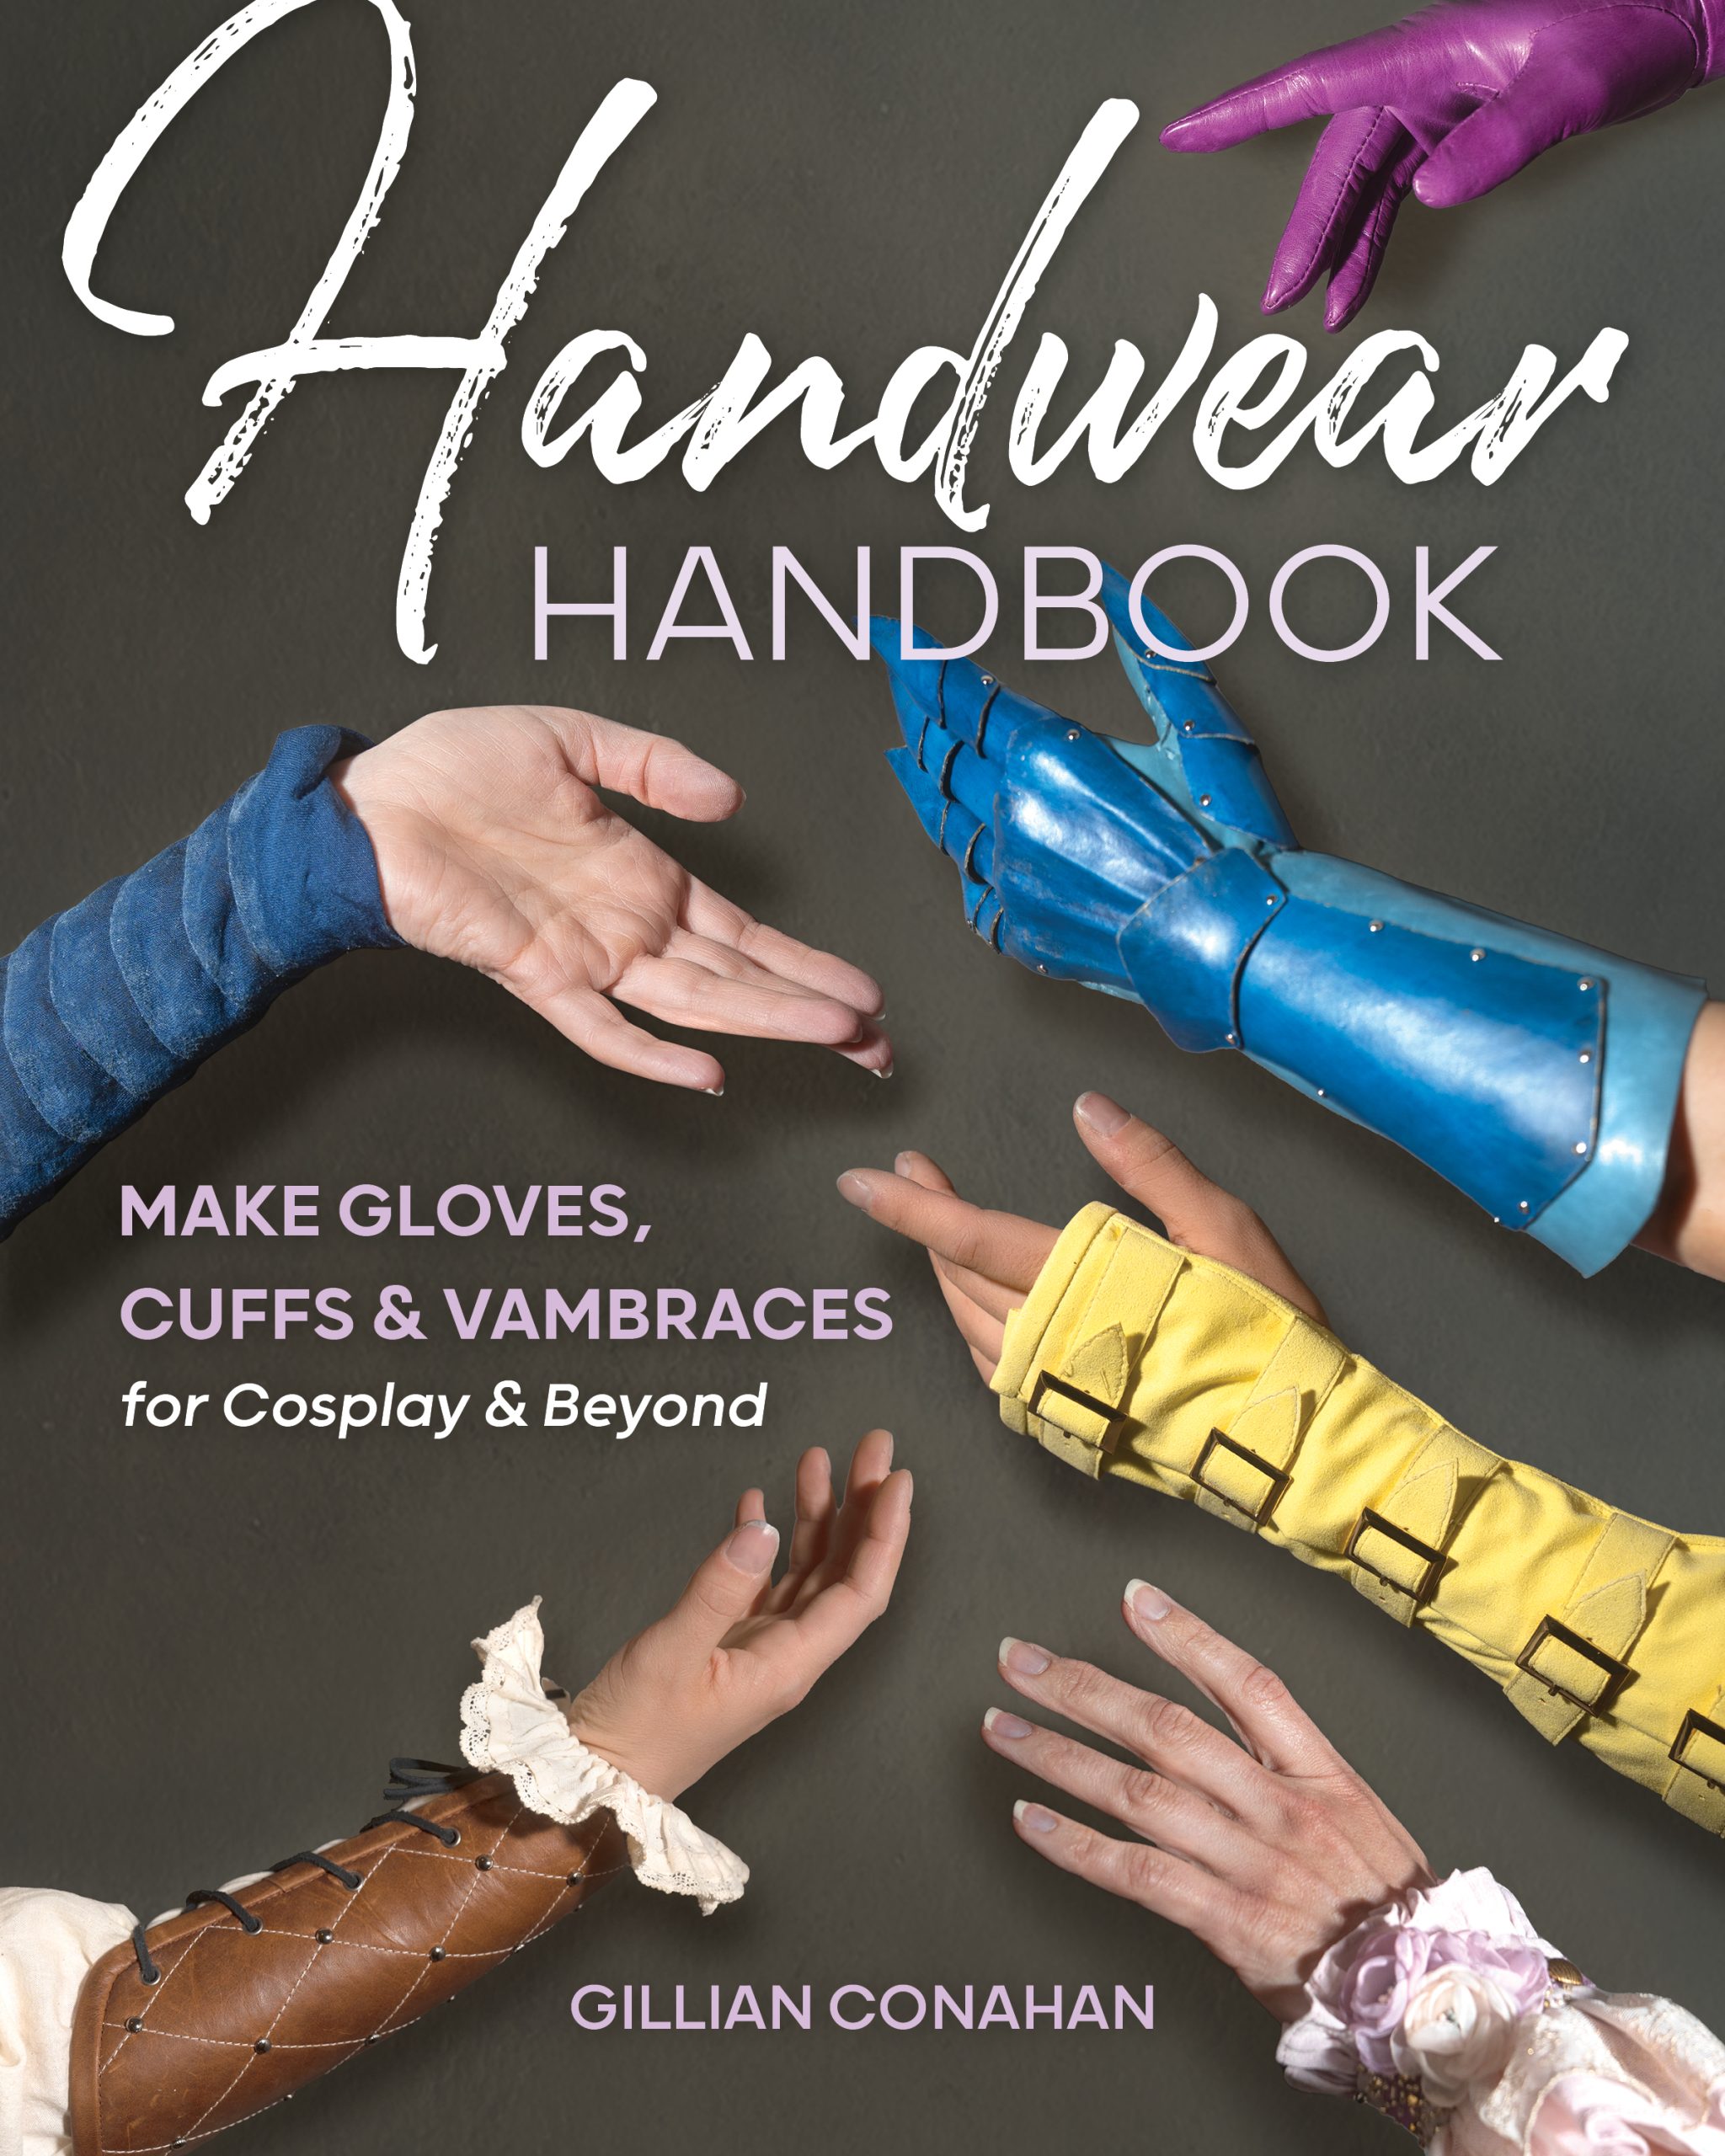
Sharp eyes may have caught this up for preorder already, but for everyone else: I have a new book coming in April! The lovely folks at FanPowered Press saw fit to indulge my interest in glovemaking, as part of their impressive and growing library of cosplay craft books. The market for cosplay crafting content has changed a huge amount since my first book came out five years ago, and many excellent creators have been venturing into the realm of print. So this was a wonderful opportunity to dig in on one of my favorite topics instead of feeling like I had to cover a bit of everything, because I’m in great company these days.
Glovemaking is a fun topic because although it’s a very specialized crafting niche, it’s one that touches nearly every cosplay genre. Superhero comics, historical epics, magical girl shows, high fantasy, and science fiction all feature interesting and specific handwear. I tried to include a little something for everyone in this book, which uses a couple of basic patterns (plus more that you can draft yourself) to create nine totally different looks, ranging from a simple ruffled cuff to a full armored gauntlet. I expect that all the cosplayers out there will immediately strip these projects down to their component parts and run away to make something completely different with them, which is one of the most magical things about cosplay and I wouldn’t have it any other way.
In addition to the projects, I poured in as much information as I could fit about glovemaking materials, hand and machine sewing techniques, useful embellishment methods, fitting and working with glove patterns, and more. There are tips for seamlessly incorporating gloves into bodysuits, for working with tiny pieces and tinier seam allowances, and adding straps and hardware details to your creations. So even if you don’t feel like diving into the full gusseted glove experience just now, I hope you’ll still find plenty of material that’s interesting and relevant to your own projects.
The brilliant Neil Bonabon did the photography for the cover and interior project photos, so I can crow about how beautiful they are because that’s the one bit I didn’t do myself. He’s added elegance and drama to this ambitious little craft book, and I hope you’ll find it as inspiring as I do.
The Handwear Handbook will be available April 25th, and can be preordered now at your local independent bookstore or your favorite online retailer!
Amazon • Barnes & Noble • Bookshop • IndieBound • Powell’s
]]>About ten years ago, fresh out of college and about to leap into a science writing program, I was home for the summer and looking around for ways to keep busy. A little sewing school had opened down the street from my folks’ place, and they were offering not only construction classes but pattern drafting. I’d been sewing for years, occasionally copying a pattern from an existing garment or making minor pattern changes like dropping a waistband or reshaping a neckline or skirt. The idea that I could instead create them from the ground up? Revolutionary.
A mere few weeks of workshop later, I was burning with newfound power. Flat drafting on paper isn’t the only way to create sewing patterns, but it clicked into my brain like a game expansion. Start by drawing up a properly fitted sloper or block, which is a pattern shaped exactly like your body that forms the foundation for anything else you might make. Learn a few basic manipulations like adding ease and transforming darts, add collar and sleeve drafts, and you can create nearly any pattern. I was unbound by trends, no longer limited by what the pattern companies thought would sell, free to rip off the designer stuff I couldn’t afford and all the steampunk gear my nerd heart could want. (Yeah, I know, but it was 2010.)
Patternmaking was also a road into good fit, which had eluded me for years. I grew up using commercial patterns, which are a bit like flattened-out ready-to-wear clothes but based on fit standards that have been frozen in time for decades (not that they were ever designed to fit square-shouldered teenage gymnasts). I attempted to make my own jeans once in high school, and was utterly thwarted by bizarre fit problems. But through trial and error, a lot of detailed measurements, and plenty of failed muslins, I gradually learned the shapes that worked for my body. Now they’re so ingrained that I can freehand a crotch curve or sleeve cap from a few reference lines.
An obsession was born. I collected tools and reference books – the photo above isn’t complete, but a rough approximation of where ten years of library-building has gotten me. I bought rolls of tracing paper and started experimenting, making patterns for pants, dresses, shirts, jackets. I bought commercial patterns and international pattern magazines to study the shapes, building a whole vocabulary of style lines, silhouettes, and proportion.
But also, patterns for everyday clothes could only hold my interest for so long. Real clothing is largely designed by people who went to fashion school, who know where the seams of a garment conventionally go and how they fit together. The kind of patterns that are widely available reflect that, and the pattern pieces are predictable enough that an experienced stitcher can often leap right in without any need for instructions or even labels. Compare that to the joyful anarchy of translating garments that sprang whole from the brain of an artist who’s barely heard of zippers, and you can see how cosplay changes the game for a patternmaking enthusiast. There was something deeply satisfying about puzzling out Ezio’s hood from Assassin’s Creed 2, or Garnet’s weird jumpsuit from FF9.
So, where to start? Assuming you have a basic idea of how to put garments together, nearly any patternmaking textbook will do the job. (If not, a basic sewing book or commercial pattern is a great place to start!) Many of the books I learned from are now out of print, but there are so many others out there that it doesn’t matter much. As long as you find one with a communication style you like, that shows how to draw up a basic block, fit it to your body, and transform it with dart rotations, ease, and detail variations, it should do the job just fine. Most pattern books also contain some number of basic garment drafts, but while they’re useful examples you shouldn’t feel limited to what’s shown in the book. The basic principles are what you’re really after, and the rest is up to practice, experimentation, and learning the proportions that work for your body and your preferences.
Flat drafting systems are always going to be an approximation of a 3D body, and in order to achieve that approximation they’re always going to have some assumptions baked in. Depending on how your personal dimensions interact with these, you may end up with some weirdness in the initial block. A good fitting book should be your next stop, as you troubleshoot the draft and make any alterations necessary to customize it. Really take the time and make the block fit as perfect as you can get it, because any patterns you make from it in the future should inherit this same fit.
Very few patternmaking books also discuss construction (the Bunka Garment Design Textbook series in the picture above are some of the only ones I’ve found) so you need to be able to puzzle out assembly order on your own. This is where it helps to have made garments before, or at least have a good general sewing book at hand. For figuring out the finer points – this needs to be finished before that piece goes on, etc. – nothing beats making a mock-up before you move on to your real fabric. This is a good practice anyway, because sometimes a proportion that looks good on paper lands badly on a 3D body, and sometimes a mistaken measurement or other error leads to a non-obvious flaw in the draft. Any problems or construction challenges you can discover in this test run will save you lots of grief in the final garment, so even a very bad mock-up can be a worthwhile experience. Additionally, you should expect a bit of tinkering on any new pattern to accommodate the specific properties of the fabric you plan to use. Is it a thick, stiff material that makes everything feel tighter than it would in muslin? Is it something floppy and fluid, that wants to sag away from the shape you put it in? In the end, fit is a three-way conversation between the pattern, fabric, and the body inside, and even more so when you get into making patterns for stretch fabrics.
For cosplayers especially, I recommend learning the basics and then checking out some of the patternmaking books that deal with more unusual ideas and transformations, like the Pattern Magic series by Tomoko Nakamichi, Antonio Donnanno’s books on patternmaking for haute couture and accessories, and Stuart Anderson’s Pattern School page for stretch pattern drafting. Since cosplay is so full of odd silhouettes and unusual materials, you want a broad and varied pattern vocabulary in able to accommodate this variety.
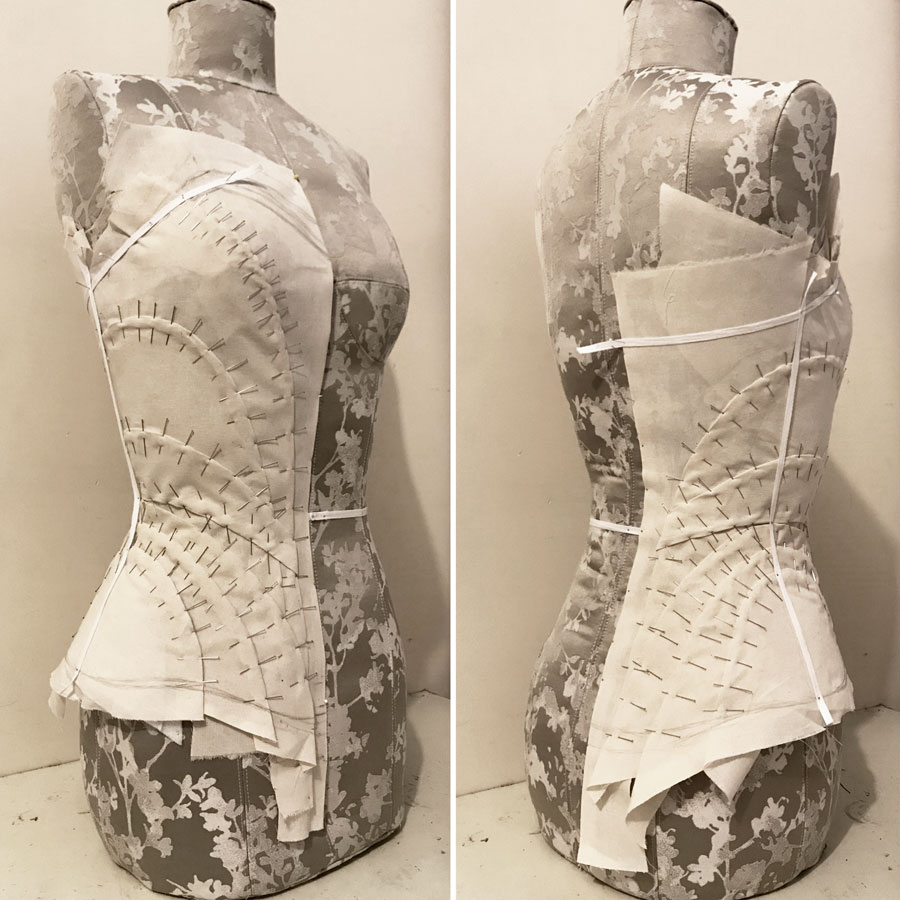
Much more recently, I decided I needed to add draping to the repertoire. Lots of people start with this method, and I’d done enough reading to grasp the basic idea, but I didn’t have a dress form that really matched my shape until the end of 2018. Since the entire point of draping is to create patterns directly on a body, it wasn’t very practical before that. When I acquire a new tool though, I go looking for a way to use it.
My longest-term project is the Shaman Empress from Monstress. Basically none of whatever the Empress wears under her robes is visible in the reference materials we’ve seen so far, so I’m making something up based on the available information. Most importantly, the full-length embroidered panel at center front needs to hang from something that isn’t the floaty gathered blouse – ideally a structured bodice or corset with lots of boning to prevent distortion and sagging from the weight. I drew up this paneled bodice with lots of seams wrapping around at weird angles, strongly influenced by Maika’s armor from the Monstress issue 13 cover, which I built back in early 2018 and still love. The neckline is shaped to match the upper edge of the embroidery panel, and will be refined in mockups to play nicely with the blouse underneath as well.
I spent a couple days trying to do the pattern flat, but a major weakness of paper drafting is that every time you change one piece, you need to trace the effects across all the other pieces it touches to ensure that they’ll still match up. I’ve mostly been a flat patterning partisan thus far, but trying to lay out all these curvy seams while preserving fit was not a fun time and after a deeply mediocre first muslin I needed to try something different.
This bodice has been on extreme slow cook (that post was fully a year and a half ago, with only intermittent progress since) but I’m happy with where it’s going, and it’s a nice reminder that if one tool isn’t doing the job, there’s usually something out there that will work better. Learning new skills is always worth it.
]]>
I didn’t expect to get into another competitive sport after I quit gymnastics, but I’ve found myself getting hooked on cosplay contests. I’m not the winning-motivated kind of competitive, but I’m definitely the kind where if you lay down a challenge I’ll go to excruciating lengths to meet it, and the challenge of creating a competition-worthy costume hits me right in the obsessive tendencies. The competitive community is also a really fantastic concentration of interesting and innovative creators, and there’s nothing I like better than talking shop with other overambitious craft nerds.
If you’ve competed in cosplay lately, or even just watched a competition or two, you’ve probably encountered some kind of attempt to divide cosplay up into categories. Needlework and armor are typical, sometimes bolstered by a larger-than-life, fx, or catch-all group that accounts for specialized techniques like wing building, body paint and prosthetics, or lighting and electronics. The reason for grouping entries this way is straightforward: cosplay is a multi-faceted hobby drawing on a wide range of skillsets, and to judge a giant foam robot against a hand-sewn historical gown isn’t so much apples to oranges as elephants to race cars. Categories make it easier to compare like to like, so that both judges and audience can more easily see how the entries stack up. They also present a way of organizing the contest, with natural breaks that help to keep the show feeling fresh.
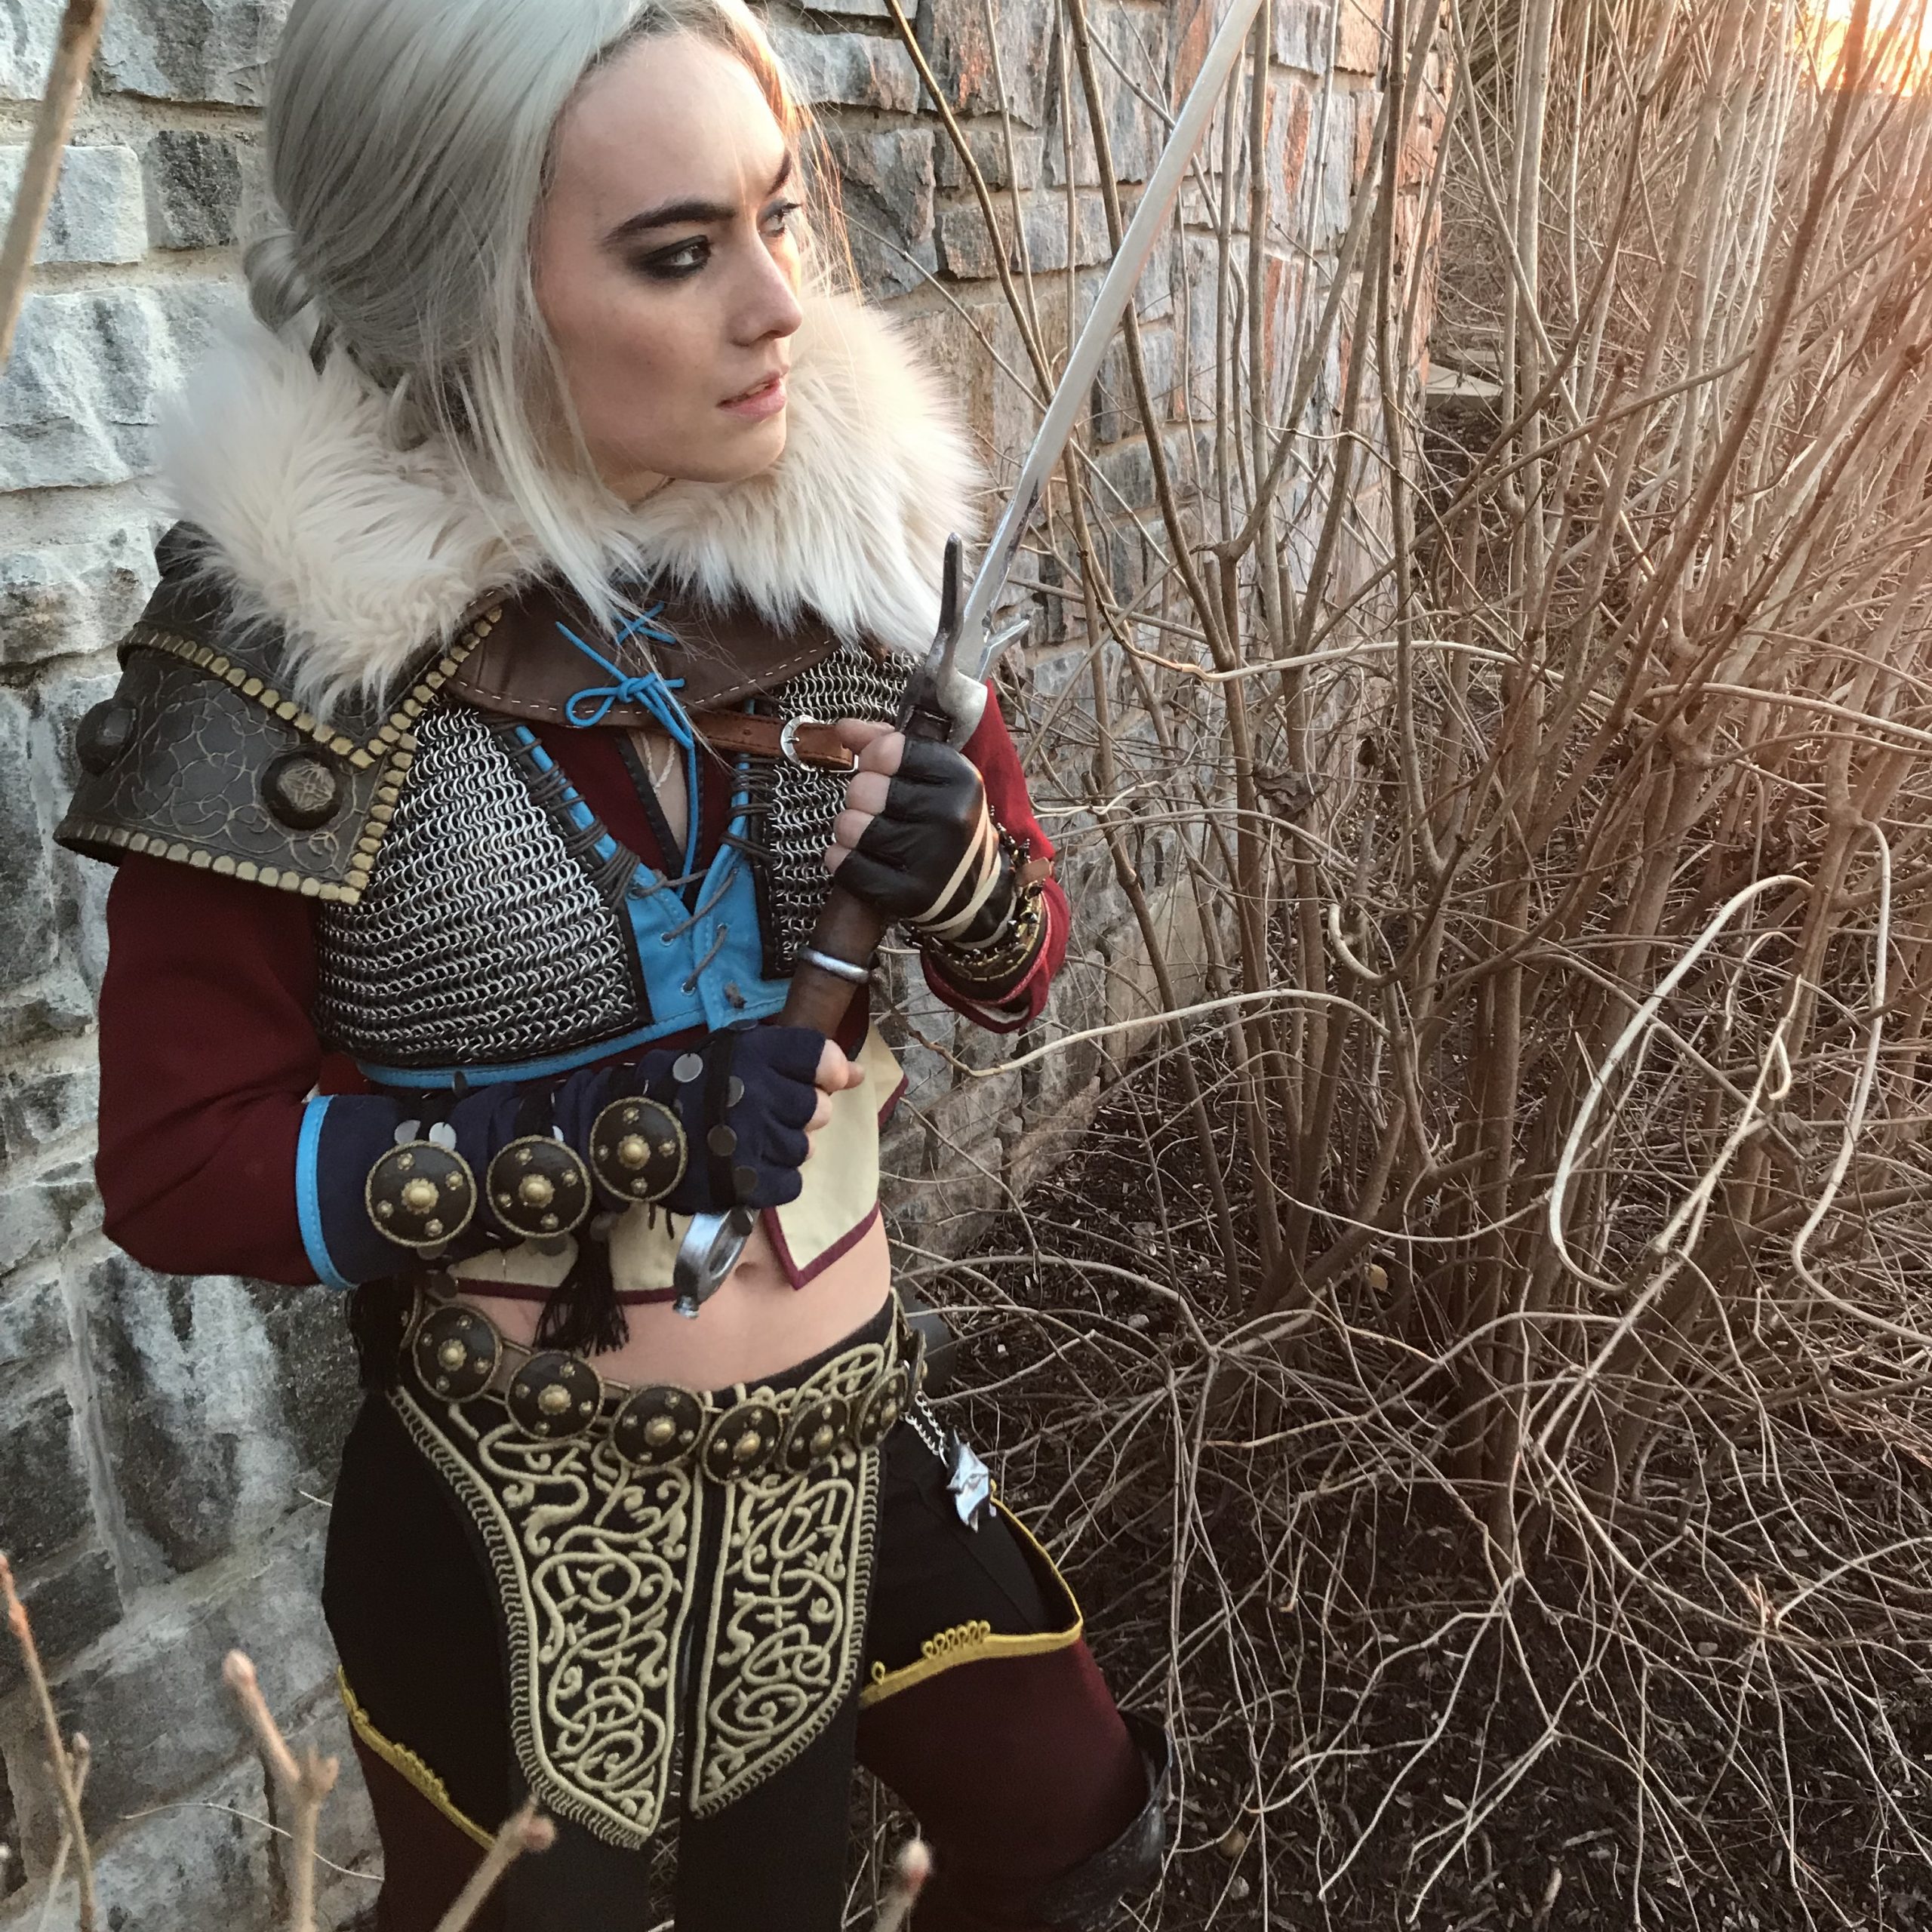
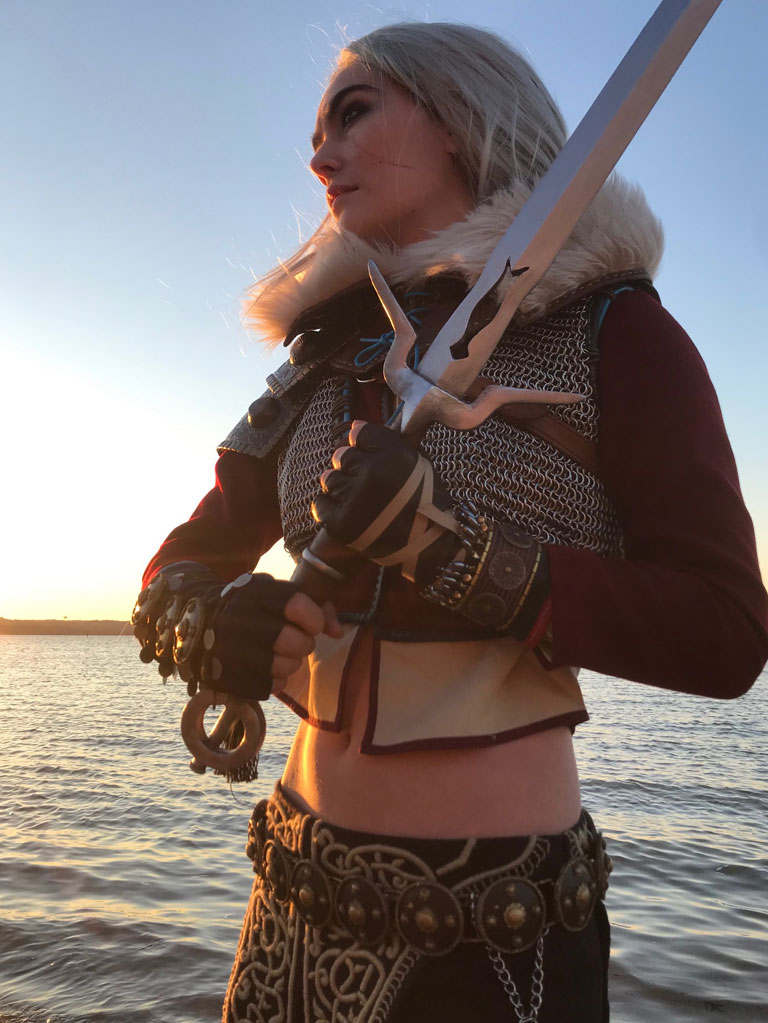
But in practice, choosing what category your costume fits into can cause a lot of angst. Where do you enter the half-and-half design so common in fantasy and game designs, which pairs an ornately embroidered robe or skirt with a breastplate, pauldrons, and light-up wizard staff? Even my Ciri costume challenges categorization. To most people it probably reads as an armor build. But if you compare the time I spent on the various components, it probably has less than 200 hours of work on the ‘hard’ chainmail and worbla pieces and 400+ hours on hand embroidery, boots, and miscellaneous sewing and leatherwork. On the other hand, my pal Cornetto Cosplay is working on Nyx from Hades, a character who wears a loosely draped gown with elaborate jewelry and over-the-top hairstyle. The costume is mostly fabric, so it looks like a needlework build, but in fact the sewing part is relatively simple while a huge amount of work goes into the 3d-printed jewelry – a technique more typical of armor.
It’s actually more common than not for a costume to pull elements from more than one skill domain, so how do you choose which category to enter? Do you pick the largest fraction of the costume, down to counting components or surface area? Do you pick the area that displays the most technical skill? Some contests will even move people between categories, because the organizers or judges disagree about which is the best fit or simply to balance out numbers, which is a recipe for confusion and disappointment if they don’t have all the information about what went into the build.
If the goal is to avoid turtle-to-piano comparisons and ensure everyone is being assessed against comparable skillsets, then this premise also runs into trouble within the categories. Leatherwork is often lumped in with the sewing category, which is sensible on the textile-meets-thread face of it but can result in weird misjudgments because they draw on very different craft traditions. A maker of historical gowns does not necessarily know what goes into wet molding, stamping, and carving leather, and an adept leatherworker can still be baffled by corsetry or padstitching. Within armor you have foam, thermoplastics, moldmaking and casting, and 3d printing, which are all wildly different processes with their own challenges and techniques to master. That’s not even getting into such classic genre-defiers as animatronic wings and creature makeup, which are often lumped into the same third category despite having even less in common than sewing and foam.
A distinction that I don’t often see addressed in contest categories is between manual and digital fabrication. How do you weigh the relative quality of hand embroidery versus machine embroidery? How do you assess a worbla component or one hand sculpted in clay and then cast versus a 3d-printed one? On the one side, you have difficult manual skills that can take years to develop through exhaustive practice. On the other, you can more readily replicate the crisp surface and perfect symmetry of a manufactured item, and the speed bonus can allow for additional detail in the overall build. Flame wars I’m sure have raged over which method is technically superior or more difficult, but of course the answer is neither. They’re just different, and a fair judging system has to weigh each independently on its own merits. Making this clear in the categories instead of leaving it implicit or at the discretion of the judges might be one way forward.
But on another level, I think this whole category business might be a lost cause, and the reason is the best in show award. Nearly every contest has one, and by collapsing all the categories into one podium of overall winners it demonstrates that in the end you’re going to compare pineapples and starfish after all. So how can we acknowledge this while still promoting fair and meaningful competition? I think it starts by accepting that cosplay is an inherently interdisciplinary craft, encompassing many different skillsets. Each competitor brings some subset of these skills to the table, and each judge is competent to assess some other subset, and hopefully by spelling out the variety of techniques on offer you can present a diverse and interesting pool of costumes to a group of people who know what exactly they’re looking at, without forcing people to pigeonhole themselves.
Competitive gymnastics also has the problem of how to objectively compare routines that don’t necessarily contain the same skills. It deals with this through the Code of Points, which is a comprehensive listing of all the documented skills grouped by apparatus, type of movement, and difficulty rating. So instead of requiring every routine to be the same, they can establish guidelines for the number of jumps, turns, and flips and assign points for difficulty and quality of execution. Although still sometimes subjective and subject to infuriating politics, the Code allows routines to be customized for each athlete’s skills, preferences, and creativity to a much greater extent than would otherwise be possible while allowing meaningful competition between them.
This doesn’t translate directly to cosplay contests because we’re a collection of hobbyist nerds with no governing body to establish such a code or train judges to interpret it. Cosplay contests are hosted by a hodgepodge of volunteer and commercial conventions with no incentive to coordinate on such a level, and the entire enterprise is too niche and too low-budget to justify this amount of organization. But I think that anybody putting together a rubric for contest scoring could take inspiration from the general approach, and maybe we can move toward a structure that reflects the multifaceted reality of cosplay.
Imagine if a contest entry form presented a list of categories, and instead of shoehorning you into one it asked you to pick the three areas that you’d like to be judged on. So maybe the contest is looking at sewing, armor, electronics, makeup/prosthetics/wig work, and engineering. You’ve got the classic light-up giant robot, so you check armor, electronics, and engineering for the rigging and stilts. Next to you is a cosplayer in an embroidered ballgown, who checks engineering for the hoopskirts but also sewing and wig work for their towering 18th century coiffure. The judges have a score card that tallies points for each category, based on the difficulty and execution of the techniques, and every category is worth the same number of points overall. So you’re rewarded for a diverse skillset, but because you can pick and choose the areas where you’ve made the best showing, you don’t necessarily have to be good at everything or incorporate more techniques than the particular build calls for.
I’m not a contest organizer and event planning is the opposite of my cup of tea, so I’m flinging this out into the universe as a challenge and hoping that the community will pick it up and run with it. If none of us know how to categorize our costumes, then maybe it’s the structure that’s the problem. What can we build that will be clearer, fairer, and more attuned to the needs of the community than what we’ve seen so far?
]]>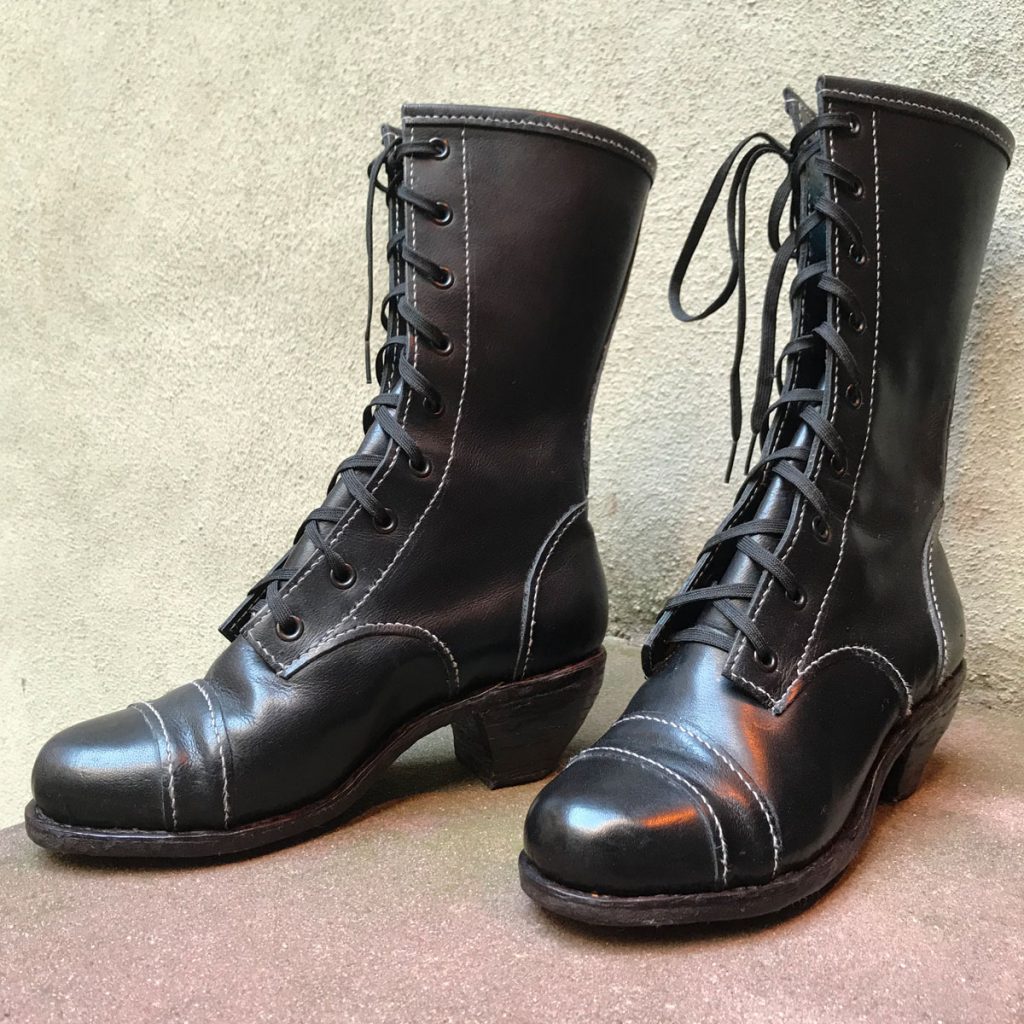
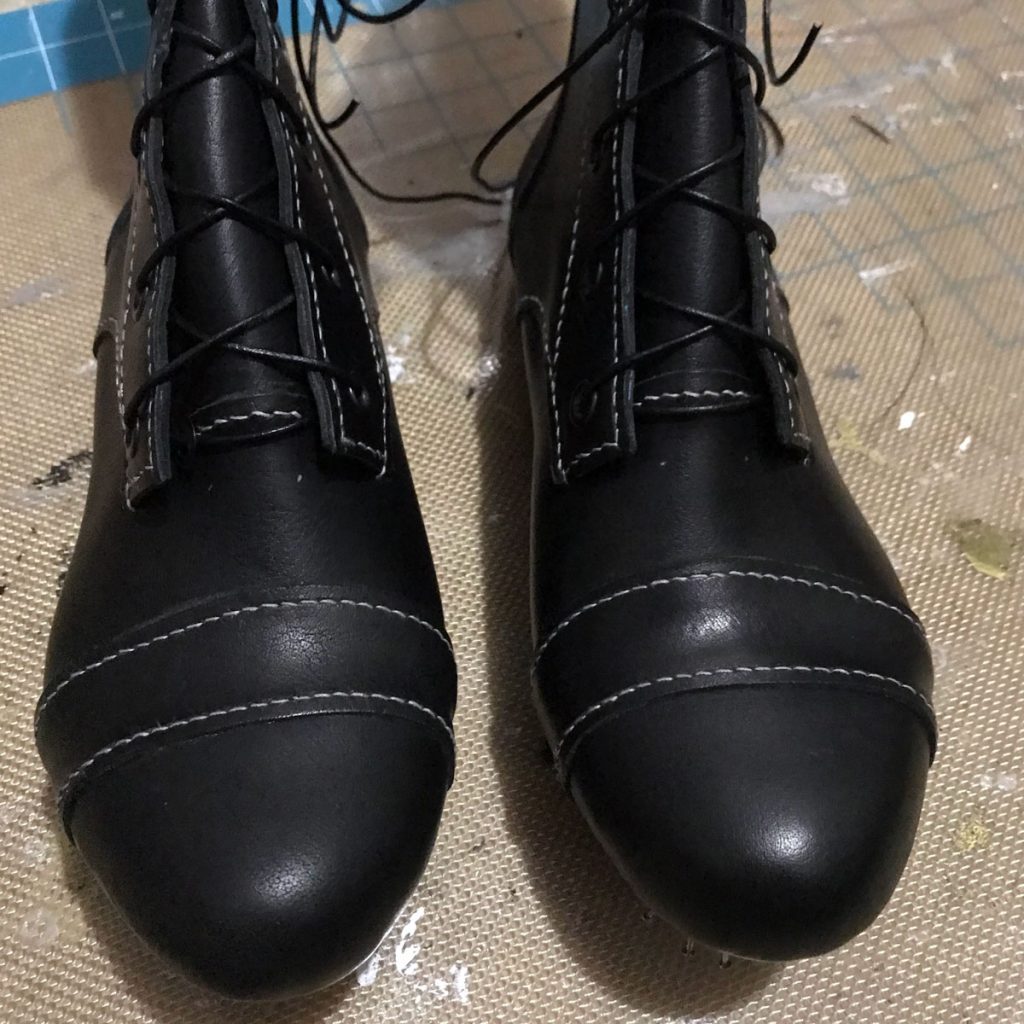
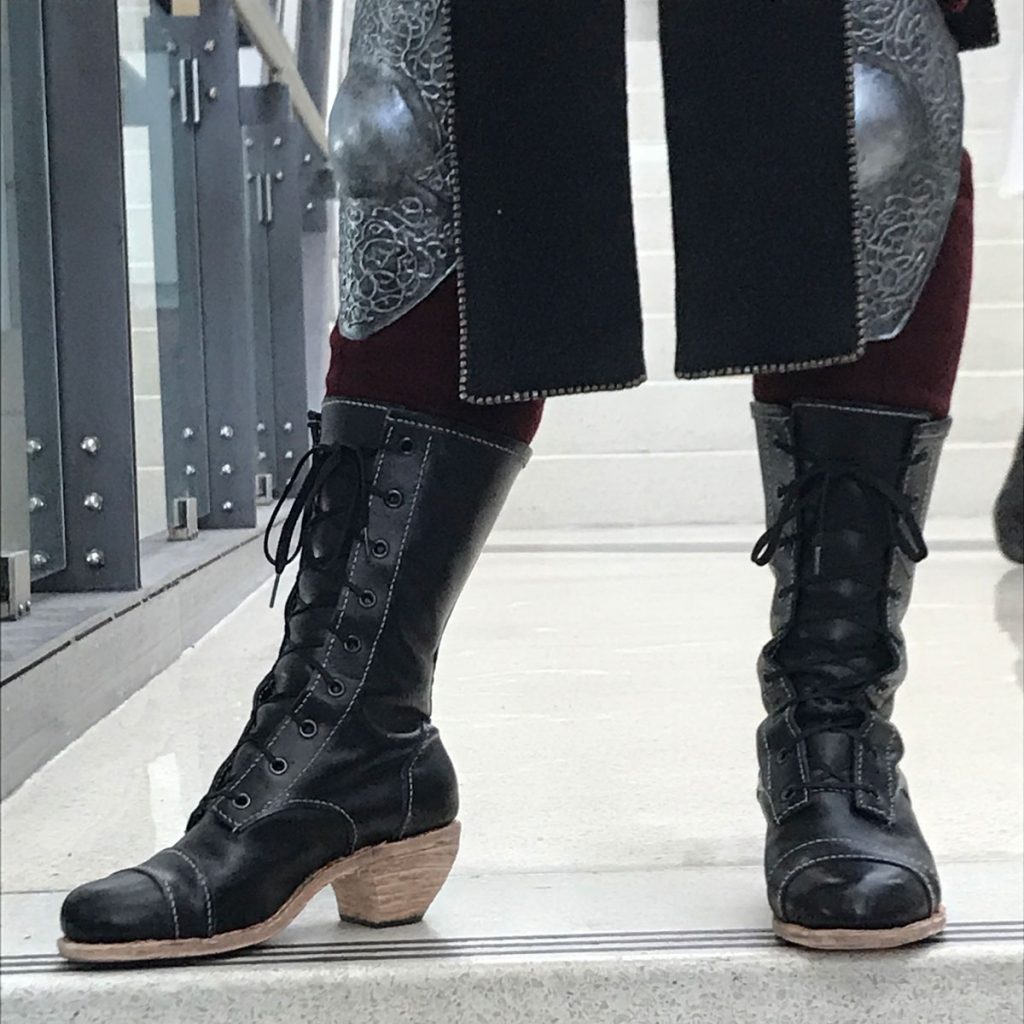
Jumping ahead a bit in the Ciri build diary to talk about the very last piece, because I just finished them and I WANT to. I decided early on that I wanted to try to make fully accurate boots to go with the rest of the costume, and the first couple steps here were actually accomplished way back around October of 2018. That said, I made a poor leather choice my first time around, and ended up with thin, floppy uppers that looked wrinkly and didn’t seem like they would hold up for long. So I restarted from the beginning about a month and a half ago, and after some 85 hours of intense and physically exhausting work I had a wearable pair of boots to show off at C2E2.
Let me say before I dig in here that I am not at all an expert, and I’m sure that at some point a real shoemaker is going to wander in and cringe at all the stuff I’m doing wrong. Someday maybe I’ll be able to afford a real class, but in the meantime I’m learning and experimenting and breaking a lot of tools (rip at least four specialty awl blades, oops.) If you want to learn to do this yourself though, I highly recommend going straight to the experts at I Can Make Shoes, Brooklyn Shoe Space, Marcell Mrsan, Bespoke Shoes Unlaced, etc. That last blog in particular is a fantastic trove of information, and if you read back through the archive you’ll know about as much as I do about this whole business.
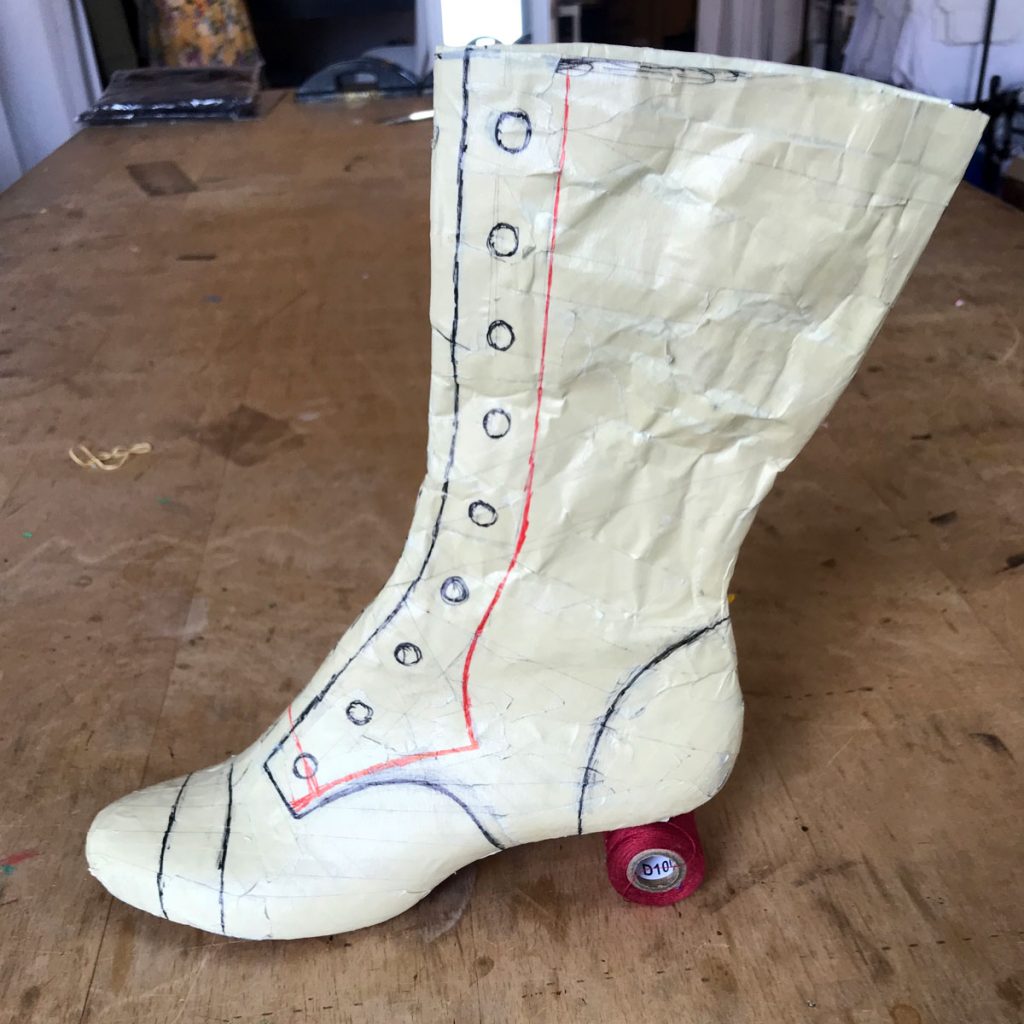
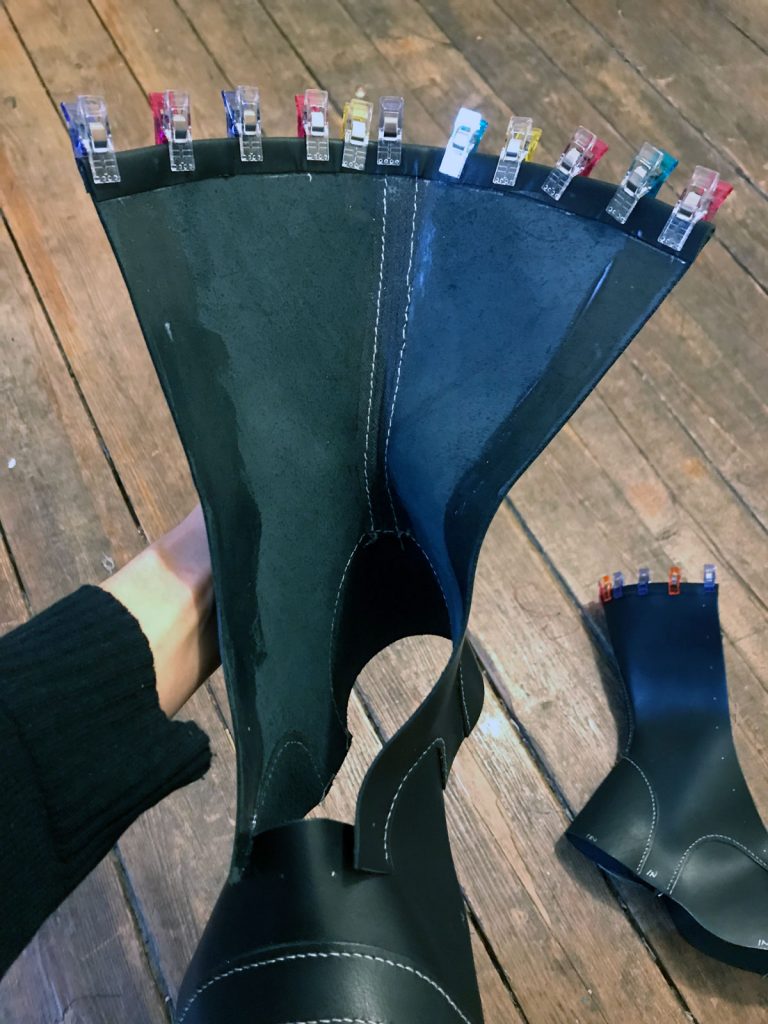
Now, on to the boots! The first step in most shoemaking projects is to find a suitable last, and I was very lucky to find a vintage pair in the right size, shape, and heel height on etsy. I created the pattern by taping over the boot, using tinfoil and more tape to extend the shape up to the appropriate boot height.
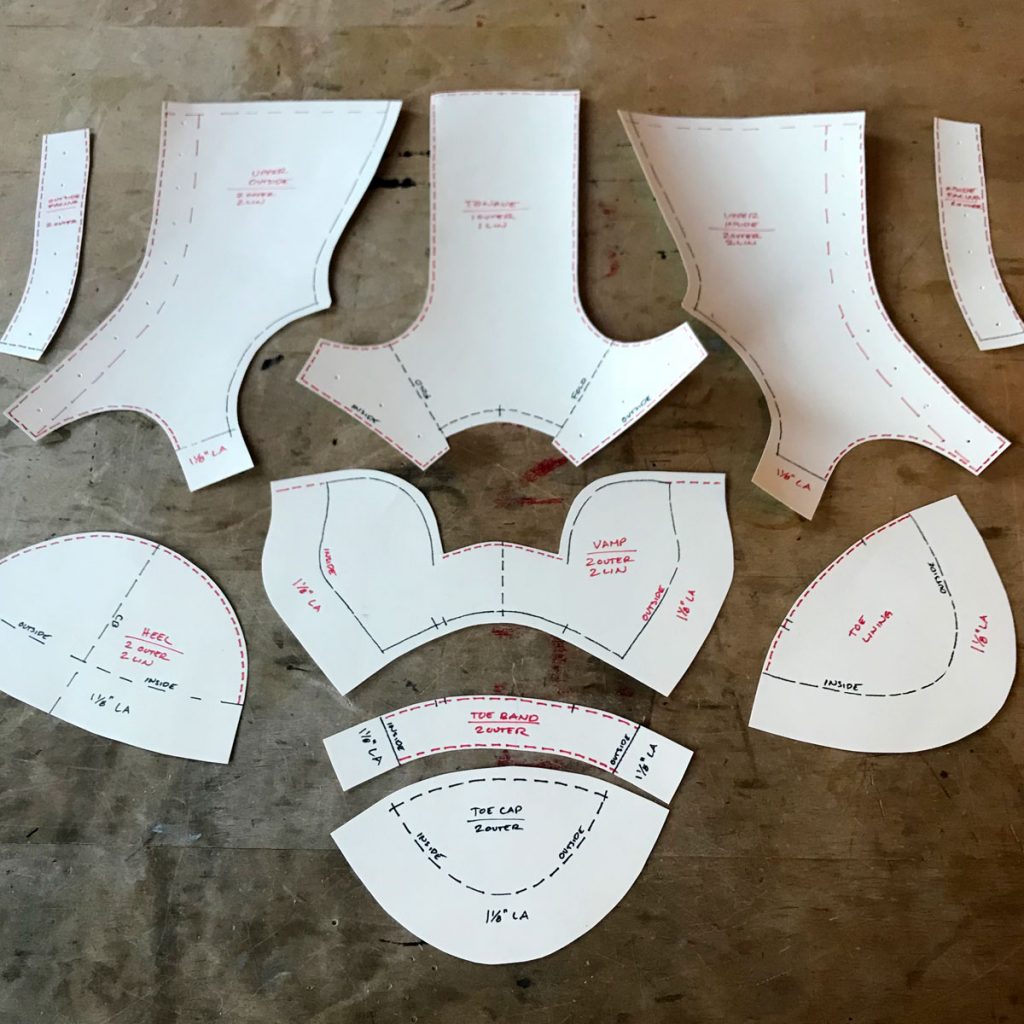
I drew in the seamlines as well as the outlines of the internal facings, cut along the lines to remove it all from the last, and copied it onto oaktag with appropriate seam allowances. I decided to use lapped seams for most of the construction, especially on my second time through when I was using a thicker leather that didn’t crease well. I also allowed about an inch and a half around the lower edge as a lasting allowance. (This allows the top of the shoe to wrap around to the underside of the insole and hold the shoe together.)
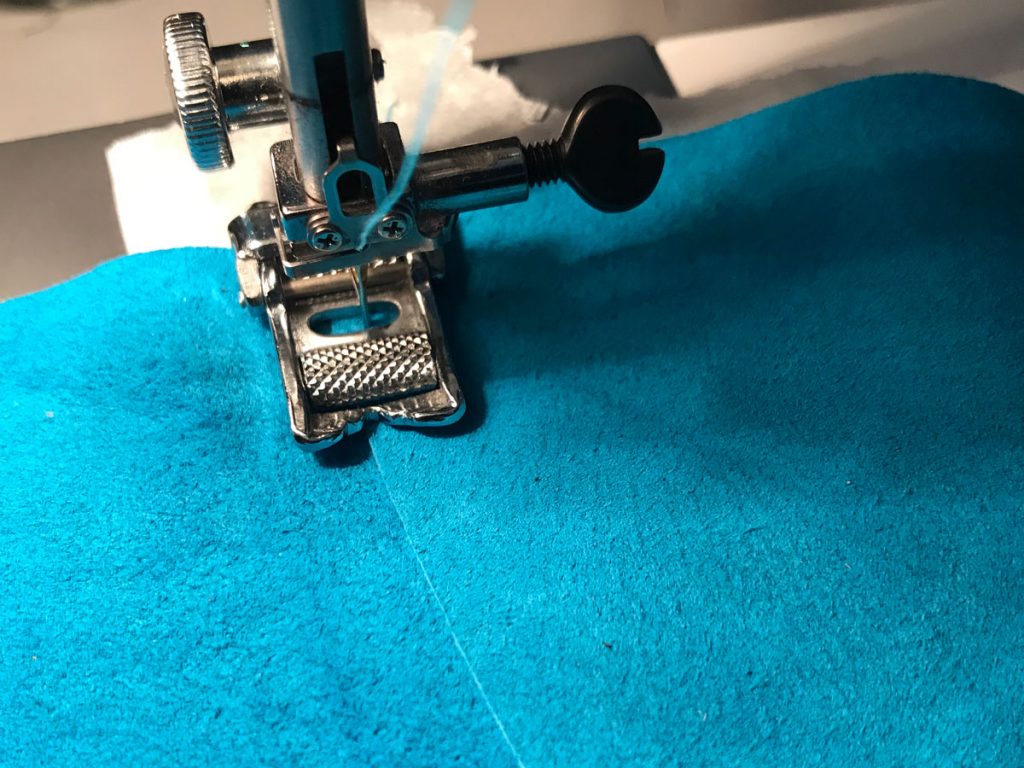
I cut my pieces out of a lightweight but stiff leather (I think I was told it was buffalo) and the same aqua pig suede that I’d already used elsewhere in the Ciri outfit. I planned to sew the outer layer by hand, but the suede wouldn’t be visible and wouldn’t really benefit from heavy thread so I sewed it by machine (after first gluing the lapped seams to hold them in place while I stitched.) Most sewing machines REALLY don’t like thin mushy sticky materials like this, and mine is no exception – I ended up using tracing tissue underneath the pieces and a roller foot on top to make it behave.
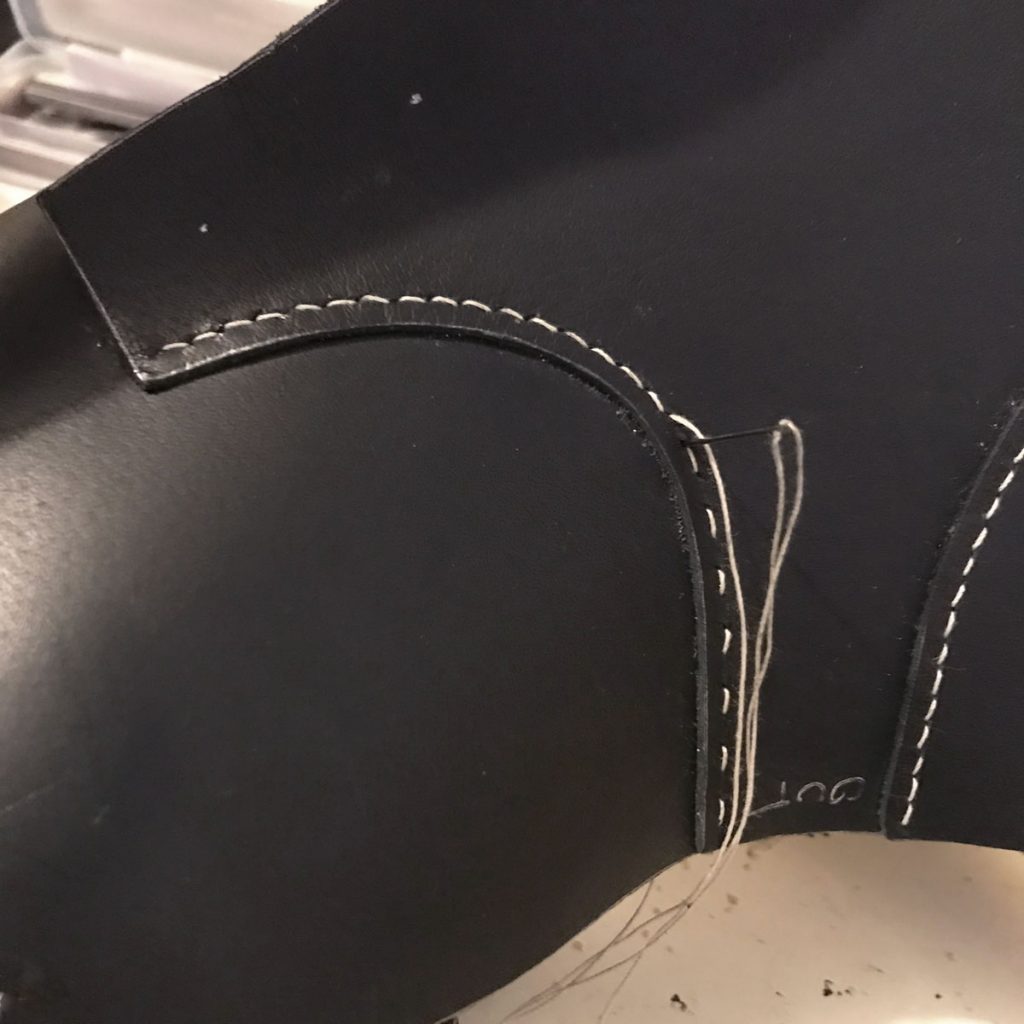
Because I hand sewed all the other visible stitching on Ciri, I wanted to use a hand saddle stitch for the main assembly of the uppers. I secured the overlaps with a water-based leather glue, used a set of 4mm stitching punches to create evenly spaced angled holes, and stitched up and back with light warm gray topstitching thread. I’d done samples with white thread the first time around, but felt that it was a little too harsh against the black and didn’t make much sense in the setting anyway. It’s more conventional to use two needles at once for saddle stitching, but I found it was faster for me to get into the rhythm this way and it ends up looking the same as long as you keep the thread crossings consistent.
I spent some time studying my favorite purchased boots, and one of the details I noticed was a kind of mock binding at the upper edge. It wraps around the edge of the outer layer of boot leather, but it’s shaved thin on the inside and passes underneath the lining, I assume because it helps to reduce rubbing at the ankle and maybe makes the lining a little easier to insert. So I glued on the binding first, before inserting the lining, and left it clipped to dry in shape.
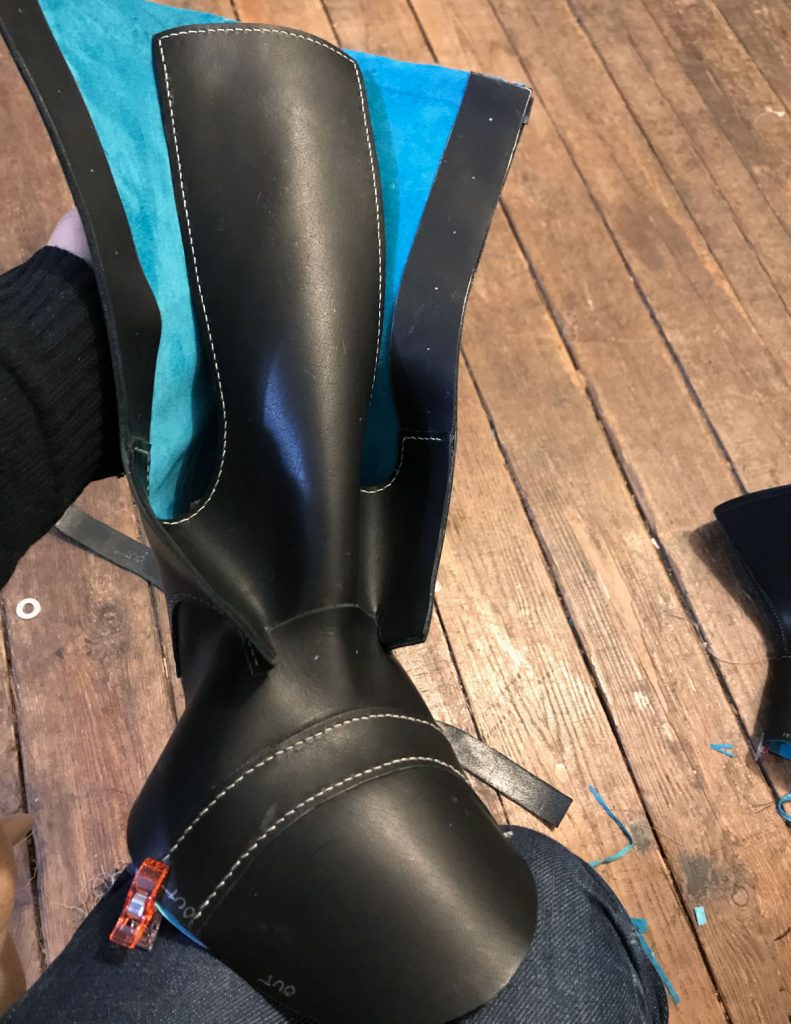
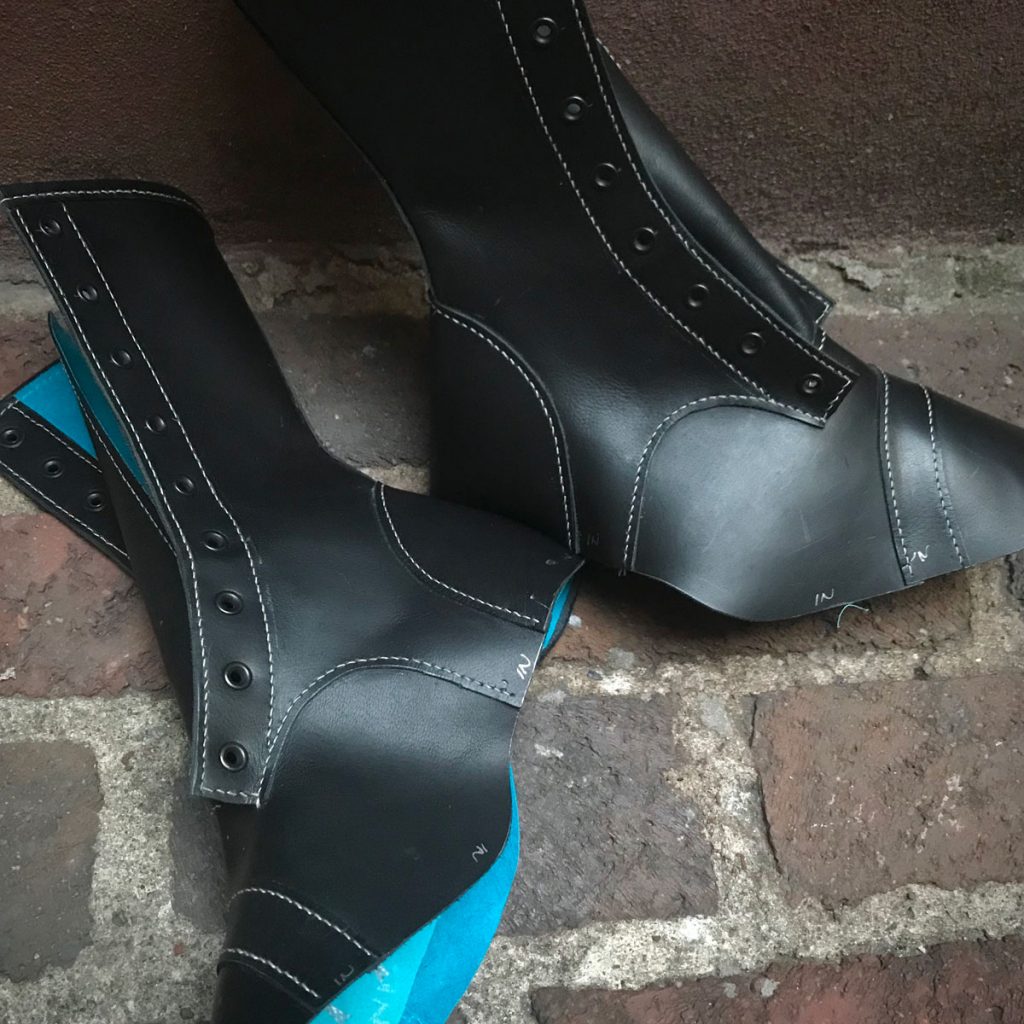
The lining is cut nearly the same as the outer layer, but with a plain toe cap seam instead of the band across the toe. It’s glued to the upper along the lacing edge, but trimmed back slightly to keep it from showing between the layers. The tongue, which extends at the sides to join into the front facings, is lined separately and then inserted between the outer layer and the lining with a little bit of glue and stitching at the base. Then the facings are turned back and glued on top of the lining at the lacing edge, and everything is secured together with topstitching around the top and front opening. Grommets are the last thing, and I would have liked to get longer ones to get through the thick layers but after some strategic hammering these seem to have mostly done the trick.
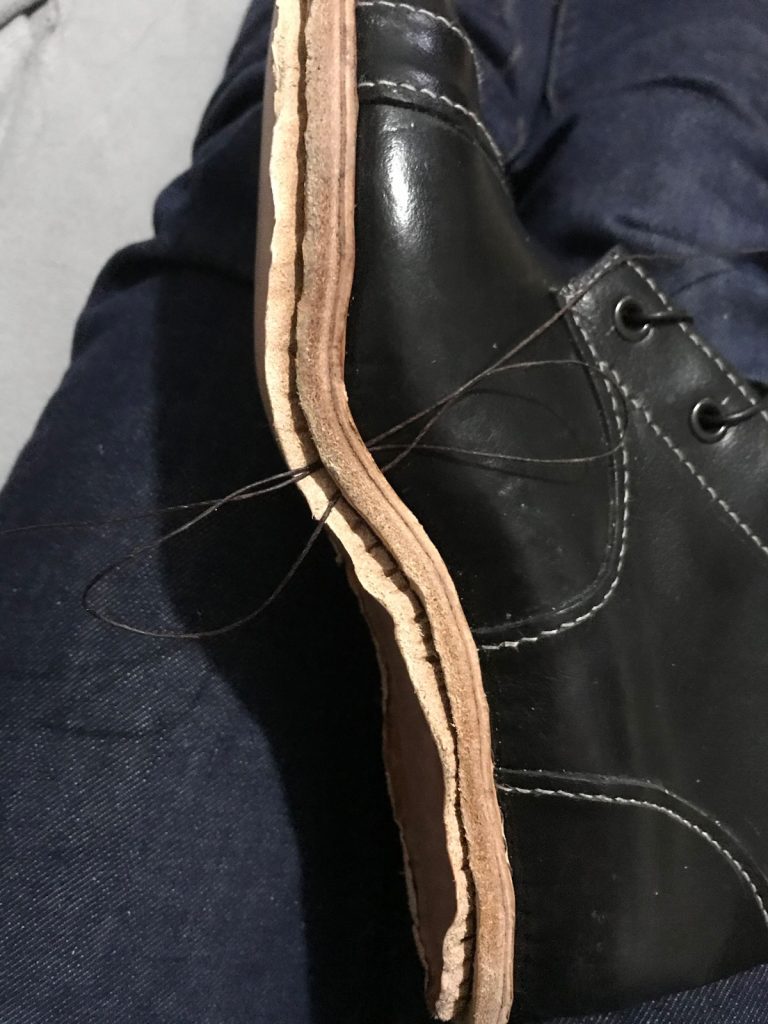
All of this so far would be more or less the same for various boot construction methods, but here I diverge from the techniques that would be conventional for most shoes you can find in stores today. Commercial shoes are made using a cemented process, which basically means they’ve got a shitload of nasty solvent-based contact adhesives holding them together. I work in a small apartment with no meaningful ventilation, so solvents are a big nope for me unless I can use the fume hood at work (though I don’t love them even then.) That leaves a much older and more difficult method, hand welting, which today is used mostly on very high-end and custom work but would be perfectly normal in the kind of fantasy-medieval villages Ciri tromps through. I am Not Good At This Yet but I sure learned a lot from struggling through it!
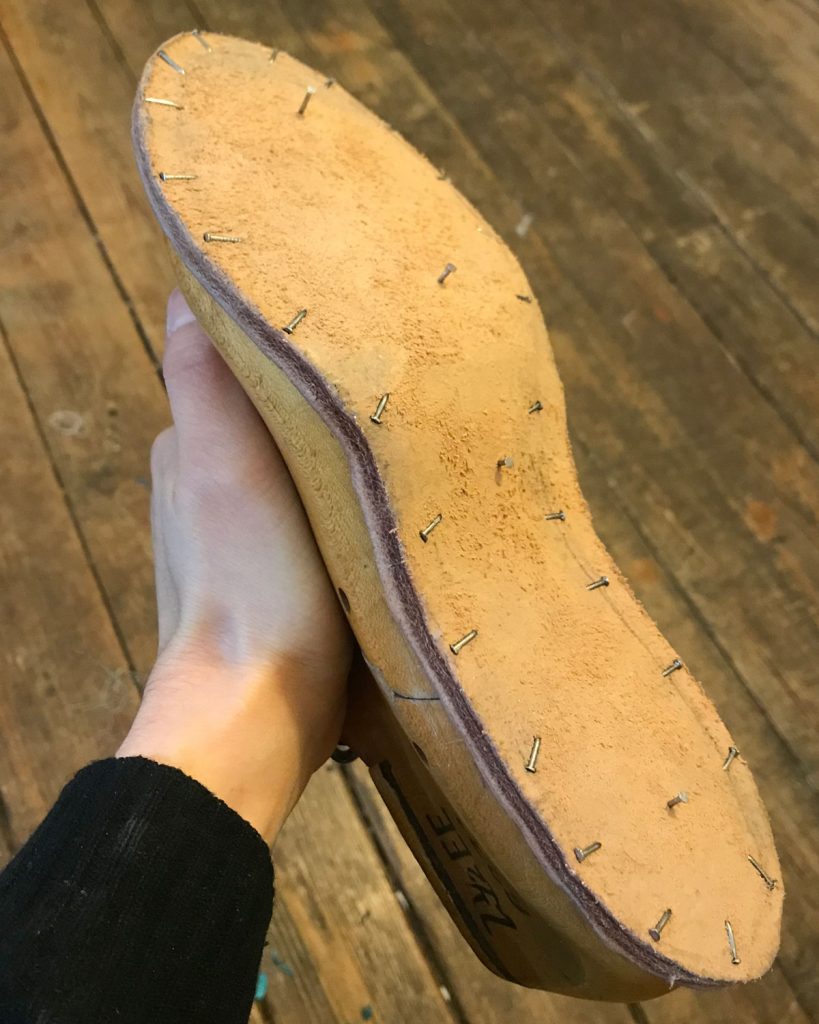
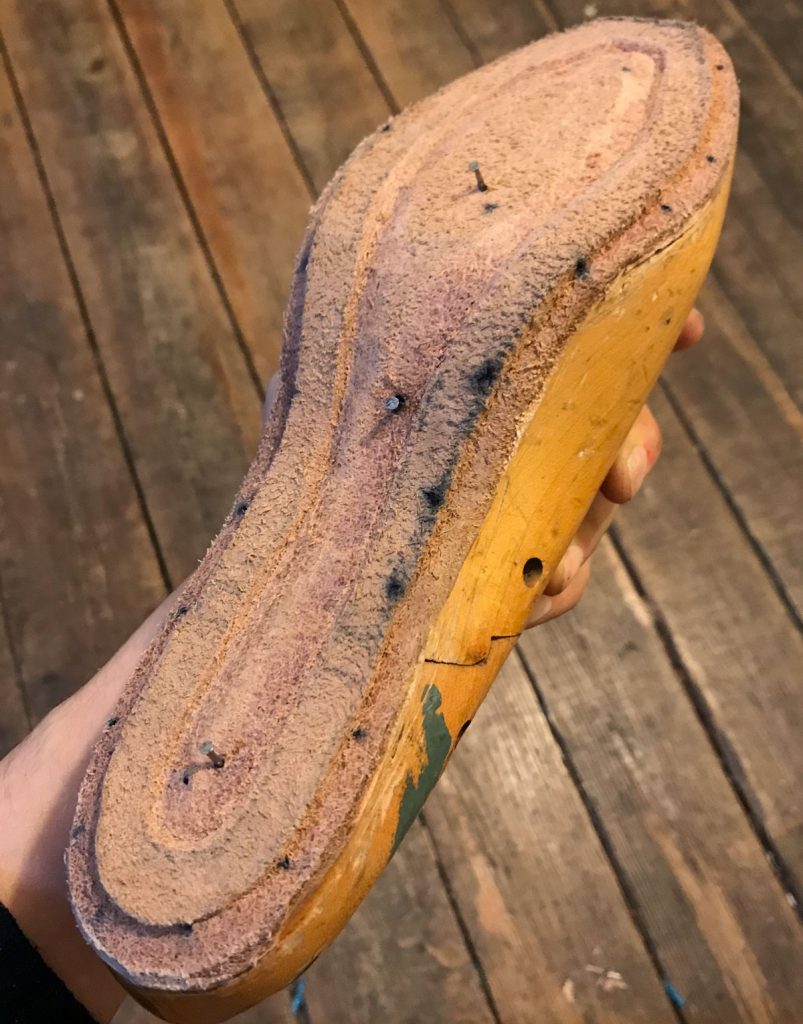
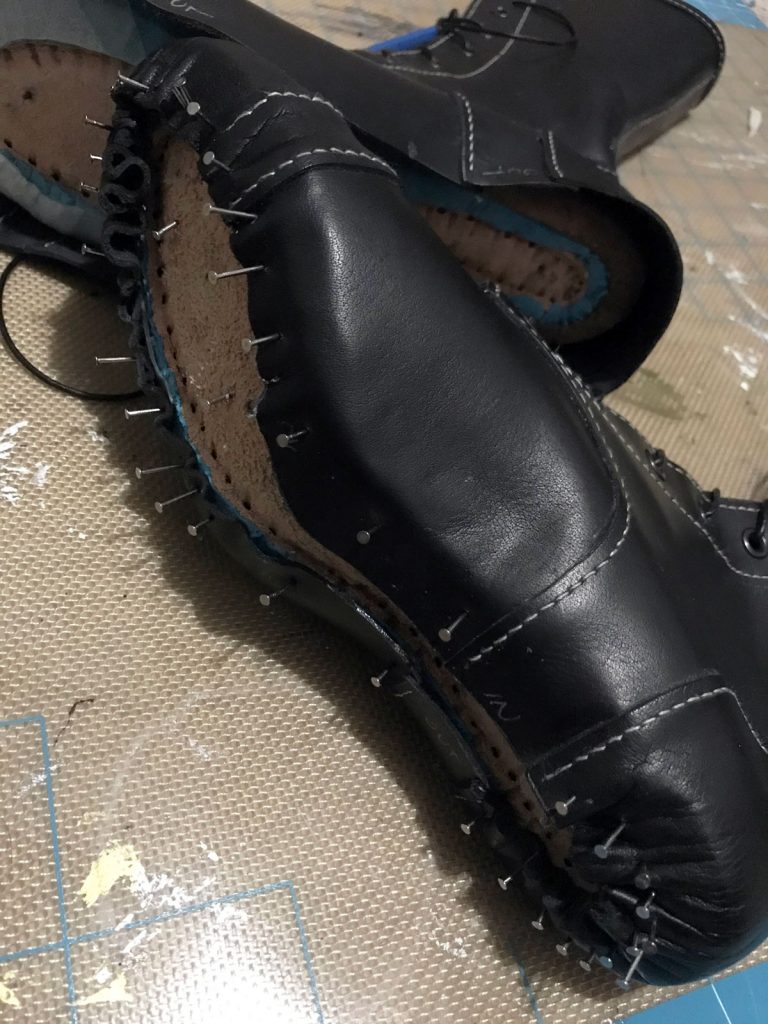
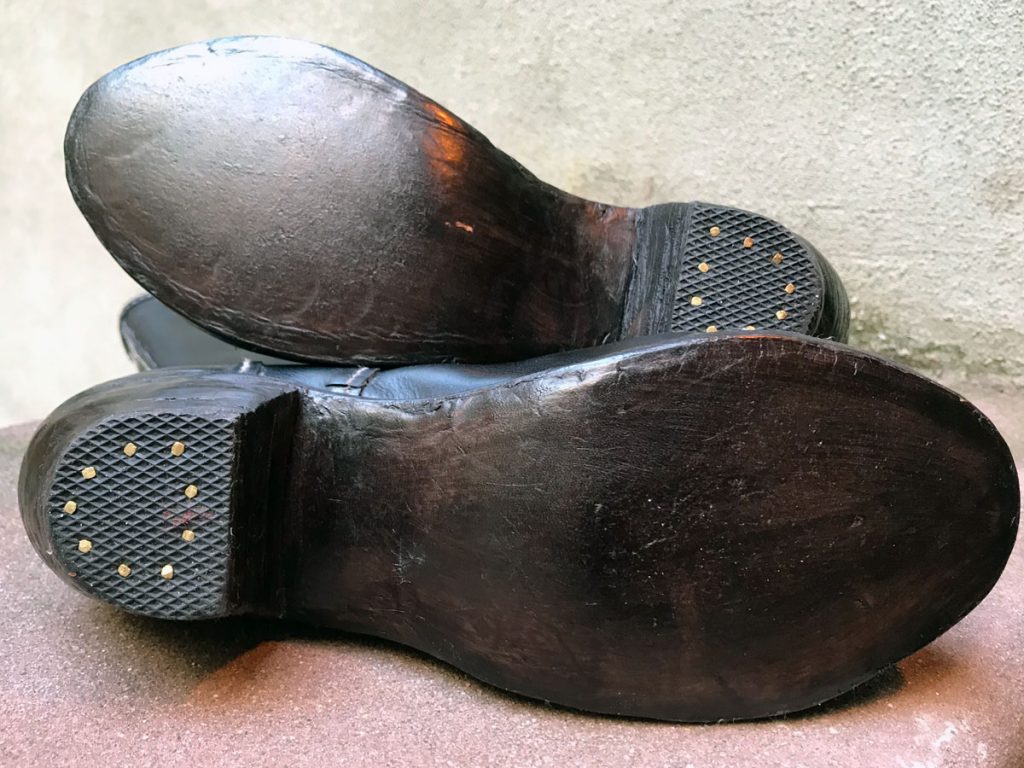
The first step is to soak the massive thick insole leather, then let it dry until it’s workable but not soggy and nail it to the bottom of the last to dry fully. This basically forms the backbone of the shoe, and everything else will be sewn to it. After drying the nails around the edge are removed so it can be trimmed to size, and then the real fun begins.
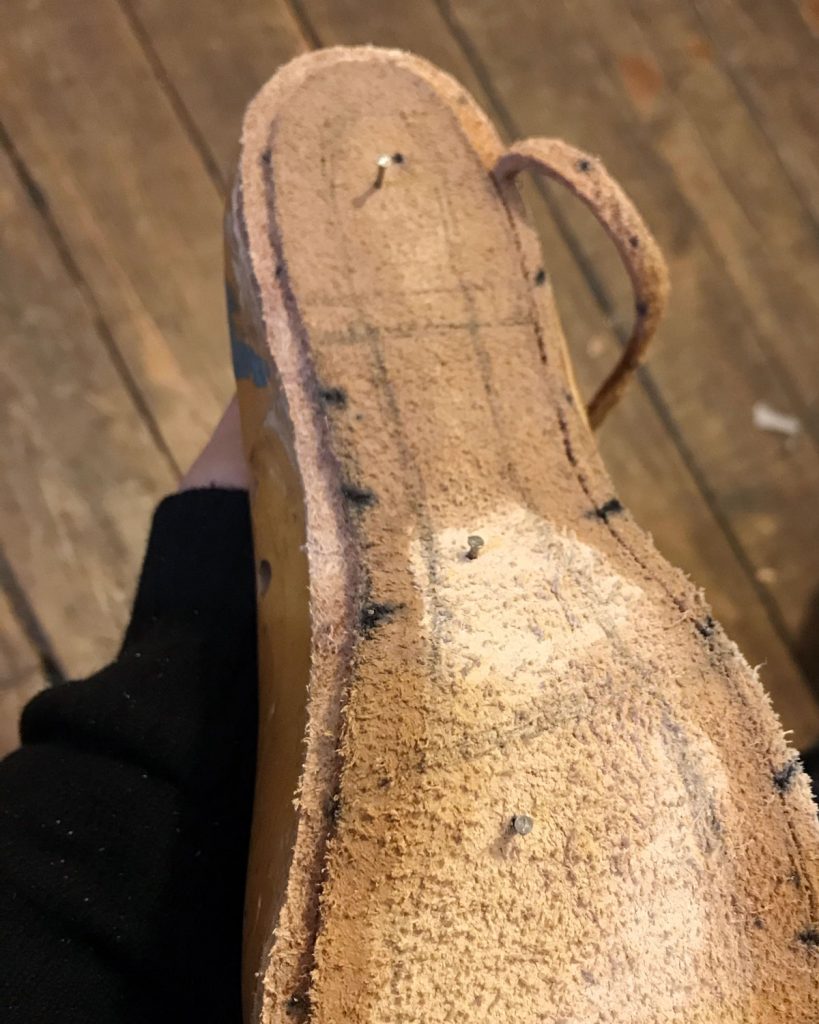
First I carved a little step into the edge of the leather. This doesn’t go all the way through, just part of the way, and it’s less than a quarter inch wide. It basically makes a little shelf for the welt to sit in. It also doesn’t always go all the way around the heel; sometimes only the front is sewn to a welt and the heel is just held on with nails. This method gives a slightly chunkier result but it seemed appropriate for these particular boots.
Next step is to carve a groove around the inner part of the insole, leaving this sandcastle-looking ridge of leather that the stitching holes are poked through. This bit is a little trickier, because the cuts are at angles so it’s harder to tell how deep you’re going and if you cut all the way through by accident you basically have to start the insole over. Also, these last couple steps took me about three hours and I’ve seen dudes on youtube do it in like a minute flat, so that’s a thing.
The REALLY fun part is poking these sideways holes with a curved awl. Yes, that’s me shoving a curved awl through about a half inch of rock-hard leather, over and over again. Big ol’ awl bruises in the palm of my hand. I had to do this over a couple times on my first time through this process, either because I tore through or because I’d discover the earlier channel cuts had weakened the insole too much, and I broke at least two awls before I got my technique mostly figured out. It helped a lot to hit the awl with a lump of beeswax between each hole, sometimes more than once per hole if I hit a dense spot in the leather.
Now here’s where the thin, squishy lining suede worked to my benefit. I laced up the uppers and placed them over the last and insole, making sure to get them lined up as straight as possible. Then I stretched the lining layer around to the inside, making it as smooth as possible and sticking it in place with some of this fabulous stuff – a fume-free water-based contact adhesive that’s maybe not quite as secure as the nastier stuff but definitely works to hold these leather layers together temporarily. (I recently found out it also works on foam.)

The next step was to apply stiffeners to the toe and heel to preserve their shape. I used a thermoplastic toe puff, which is basically the same as the thermoplastics cosplayers are familiar with but made with very thin edges to avoid showing through the outer layer. For the heel I used a shaped leather heel counter, which is basically the same thing but without the malleability or self-adhesive properties of thermoplastics. I don’t know enough about how they behave over time to give pros and cons, but both seemed to work fine.
Next up was lasting the uppers. The important thing here is to make sure all the wrinkles are pulled all the way to the underside, so that once it’s stitched the edge of the shoe will be nice and smooth. First time around in the thin leather this went fine with hand pulling and a bit of glue, but it was quite beastly in the stiff leather.
I eventually pretty much pulled it off through a combination of wetting the leather to make it more malleable, pliers to pull it tight, and both glue and nails for a secure hold while it dried. I also ran out of nails, and since it was crunch time I had to make a 10pm run to the creepy empty home depot so that I could keep working.

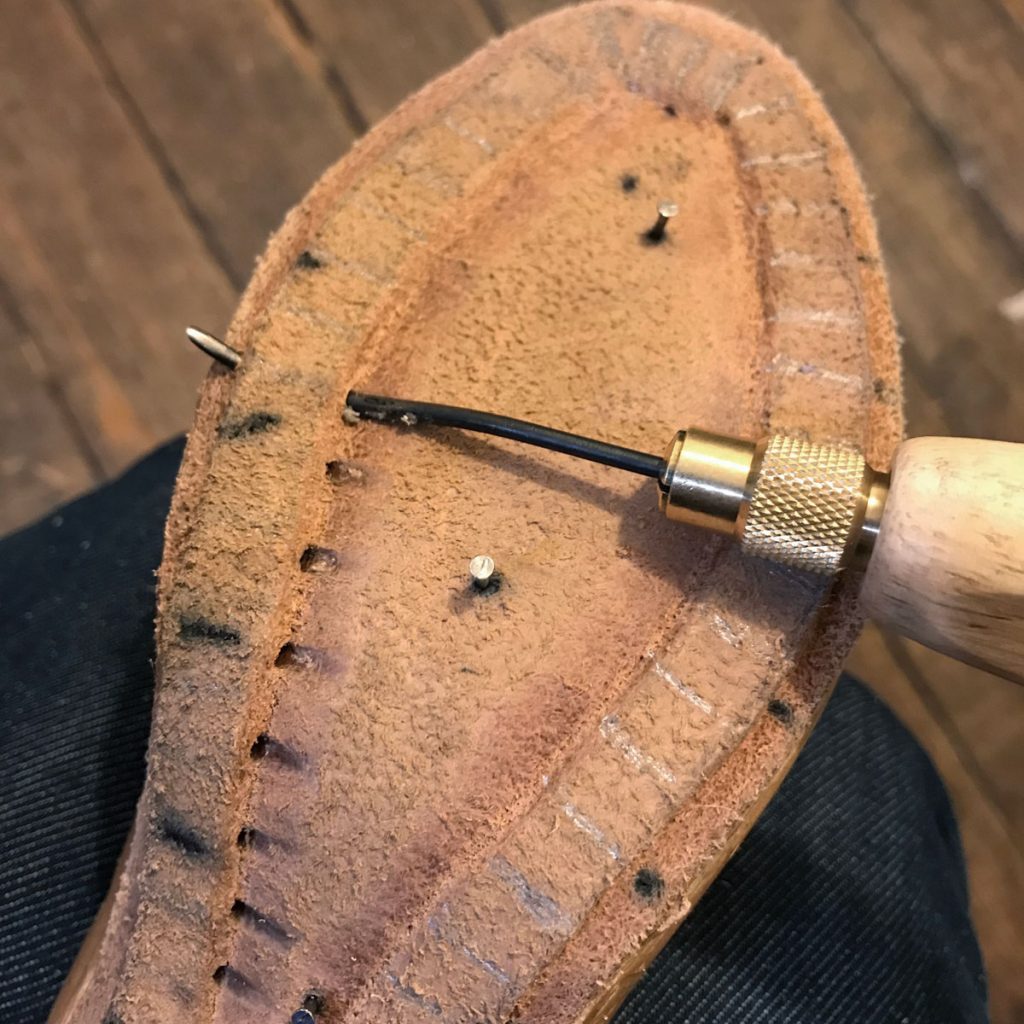
The welt is a strip of leather that bridges the insole and the sole of the shoe. It’s sewn to the insole first, and the stitching passes through the upper, lining, and stiffeners as well, so it pretty much holds the whole business together. This is what makes this type of construction so convenient if the shoes ever need resoling – the welt stitching holds everything together even after the sole is removed. It’s also QUITE DIFFICULT. I don’t have any needles that would both accommodate the heavy linen thread and fit through the stitching holes without tearing anything, so instead I used 6-inch loops of floral wire to pull the thread through. These were flexible enough to scoop through the curved stitching holes, and they passed pretty smoothly if I threaded them in loop-end-first to avoid catching on all the layers. But at two loops per stitch it was slow going, and it took me 15-16 hours to do both boots.

The other thing that goes in during this step is the shank, which is a shaped piece of steel that supports the arch of the shoe. I ordered these online, and although they were already slightly curved when they arrived they really need to match the shape of the last as closely as possible. They’re quite difficult to bend, since they need to support body weight, and the internet seemed to think I should just hammer on them until they fit. However, I work in a costume crafts department and we have TOOLS for this. I made a cardboard template from the bottom of the last, took the shanks in to work, and fussed over them for about a half hour until they were perfectly matched. Easiest part of the whole process! (And now I want to save up for a metal bender of my own.)
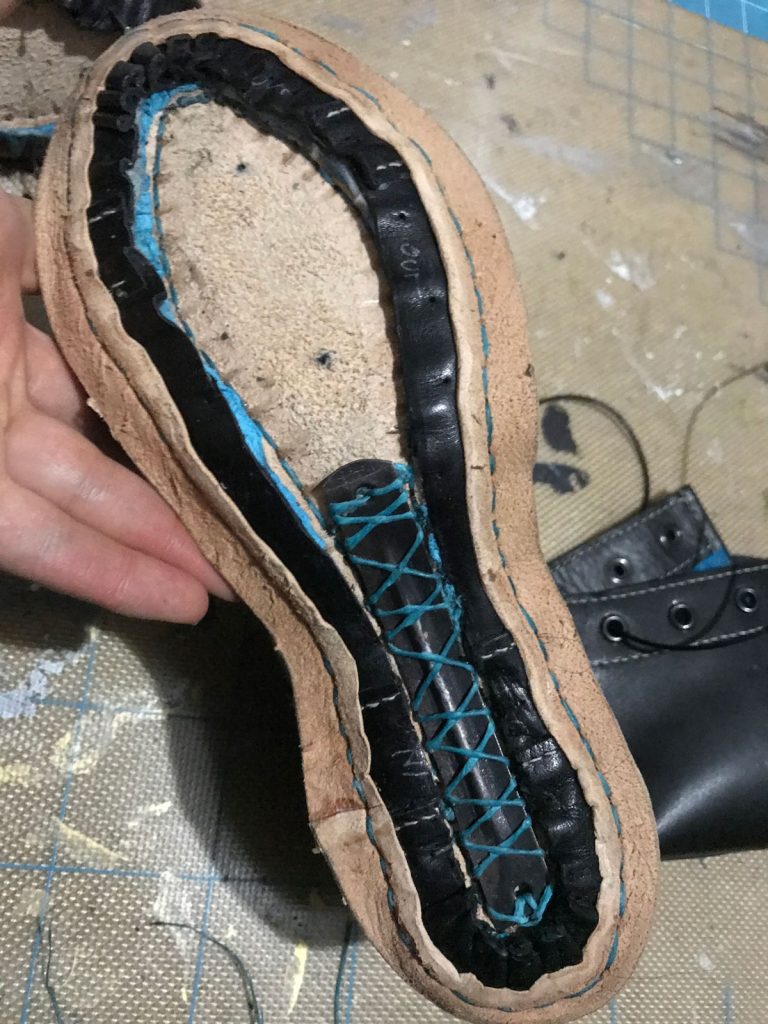
I used my same curved awl to punch eight holes in the center of each insole, then prethreaded each with a loop of wire going in each direction. This made it easy to sew the shank in without having to fish around underneath it for the stitching holes. Then I filled the remainder of the insole cavity with a sheet of cork cut and shaved to size.
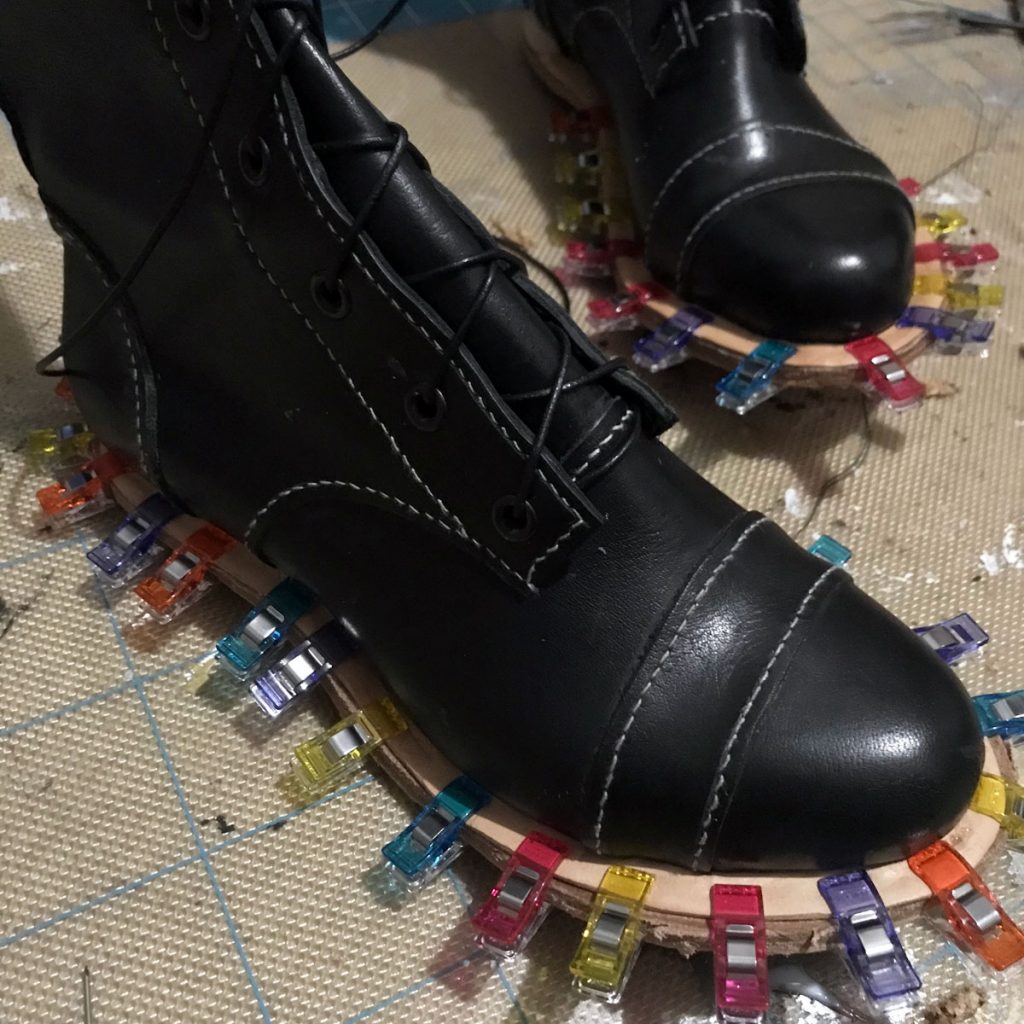
Next I had to soak the soles, glue them to the bottom of the shoe, and trim to size. This was a bit tricky because the water-based glues don’t hold very well on wet leather, but it needs to be damp enough to conform to the bottom of the shoe or else it won’t stick anyway. A bit of hammering, my entire box of wonder clips, and an overnight rest did the trick.
I really wanted to try the soling method used by the fancy bespoke dudes, where you cut a channel in the bottom of the shoe and then stitch into the base of the groove. This way there’s no exposed stitching on the sole of the shoe, and they can take a lot more wear before you start grinding through the thread. It’s complete overkill for a pair of costume shoes that will mostly see infrequent indoor wear, but maybe this way I’ll be good at it by the time I actually need it. The tricky bit is not cutting the channel too shallow or too deep, so it protects the stitching without excessively weakening the sole itself. I goofed up one sole doing this and had to recut, but managed some kind of approximation after that.
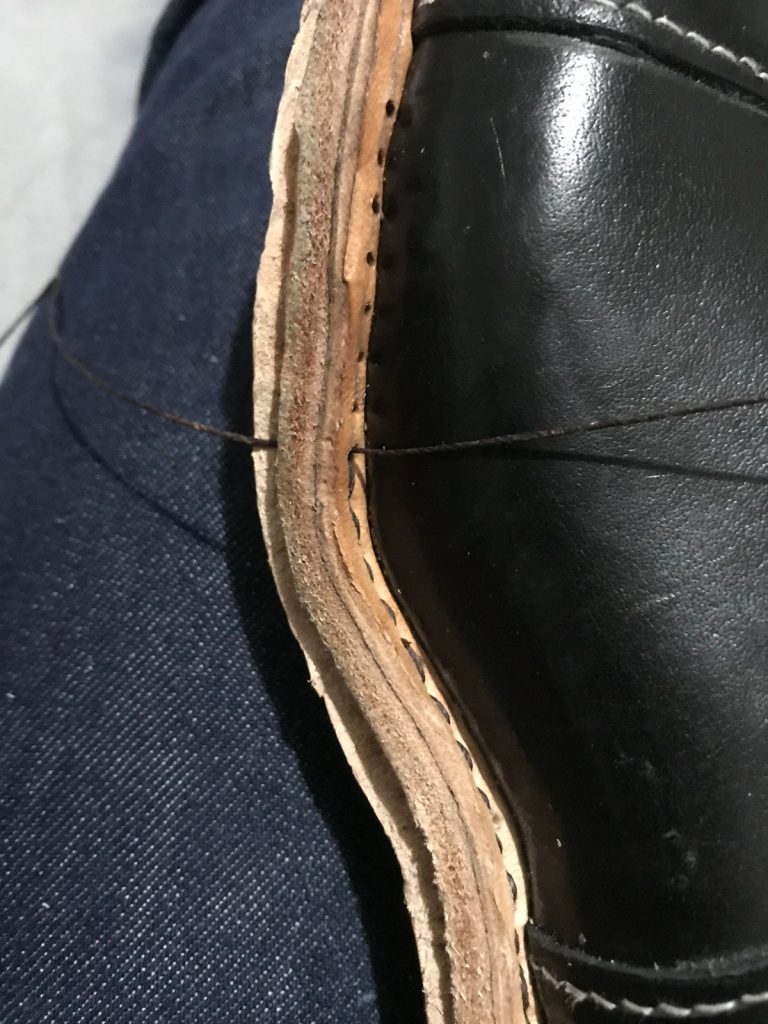
There’s a different curved awl used for this step, even smaller and thinner than the other one, so naturally I made it most of the way around the first shoe and then broke it with two inches to go. I had no time to order a new one, so after a day of panic I took the sad remains over to Westpfal and they were able to put enough of a point on it that I could go back and finish. Yikes!
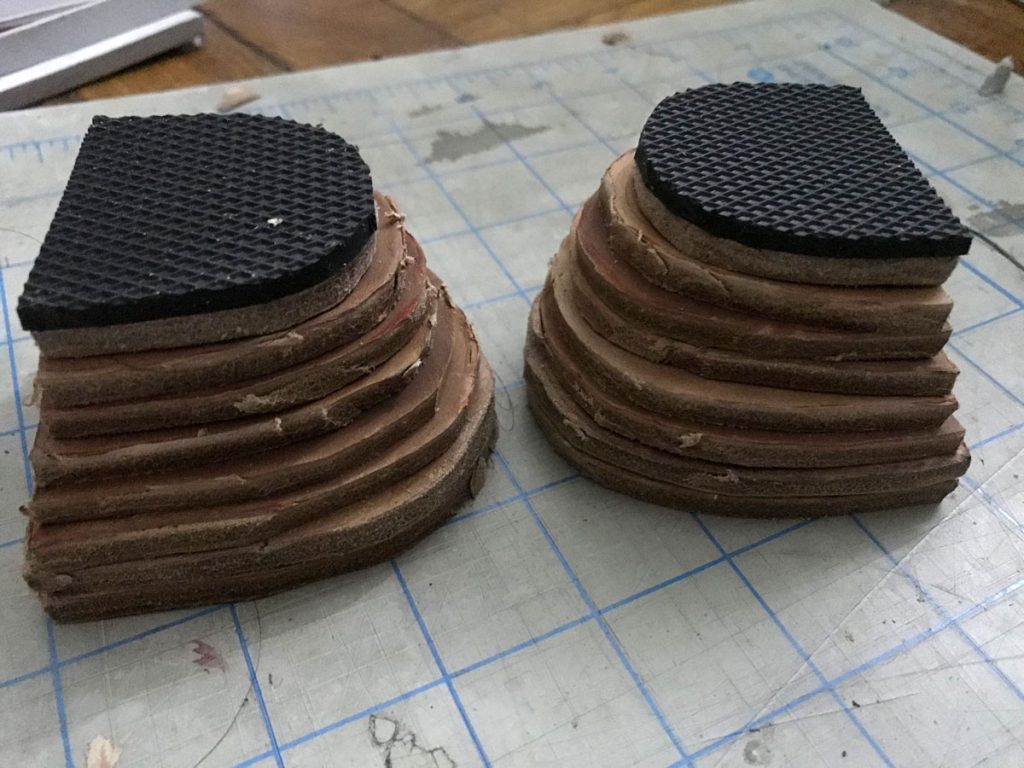
A stacked heel, as it turns out, is just a big ol’ sandwich of leather, held together with a lot of glue and nails. I soaked a chunk of leftover sole leather in the sink and cut out little heel cookies in graduated sizes. For the last layer I made a cap with a small scrap of sole rubber, which I had pre-glued to a scrap of leather at work so I could use a stronger glue in the fume hood.
The stack is built directly on the shoe, layer by layer, with nails pointing up into the solid half inch of leather that is the insole and sole. The tricky bit is carving the heels into shape, because you have to bevel and smooth the stepped layers into one graceful block. I basically whittled the stack down into the final shape, working carefully with a fresh, sharp utility knife blade. The results are…rustic. I think it works just fine for that village cobbler feel, but I’ll have to do a lot more smoothing if I do anything that needs more refinement. And yes, that picture was on hotel room carpet because at this point I was completely out of time!
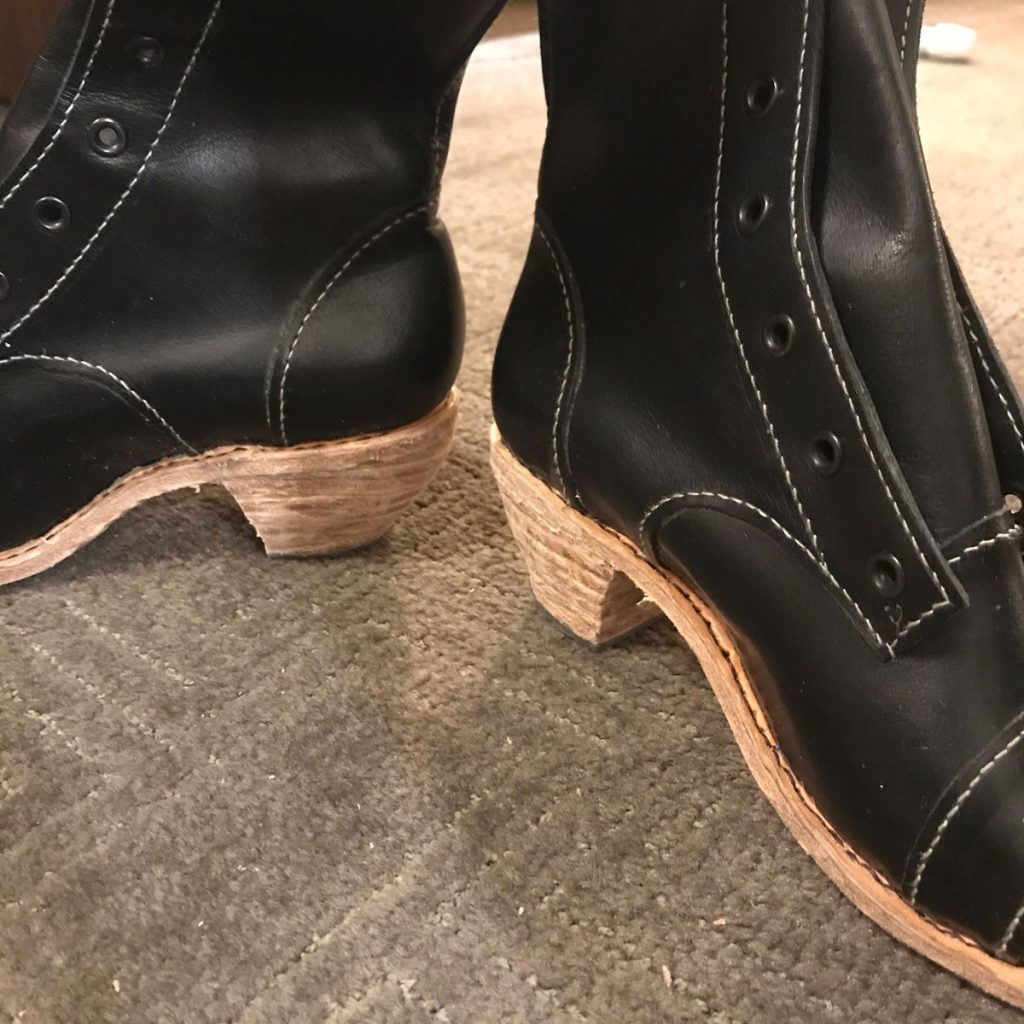
I hit the all-important ‘wearable’ mark and finally got the lasts out at 9pm the night before the crown championships. The boots got a full workout the next day, and I’m happy to report that I wore them for a good ten hours with no discomfort beyond a bit of stiffness at the ankles (and I do think the wrinkles there will relax a bit once they’ve stretched and conformed to my ankles a bit more.)

When I got home, I did a bit more sanding and smoothing and dyed the soles with my favorite water-based leather dye in chocolate brown. A bit of polishing and they were finished!
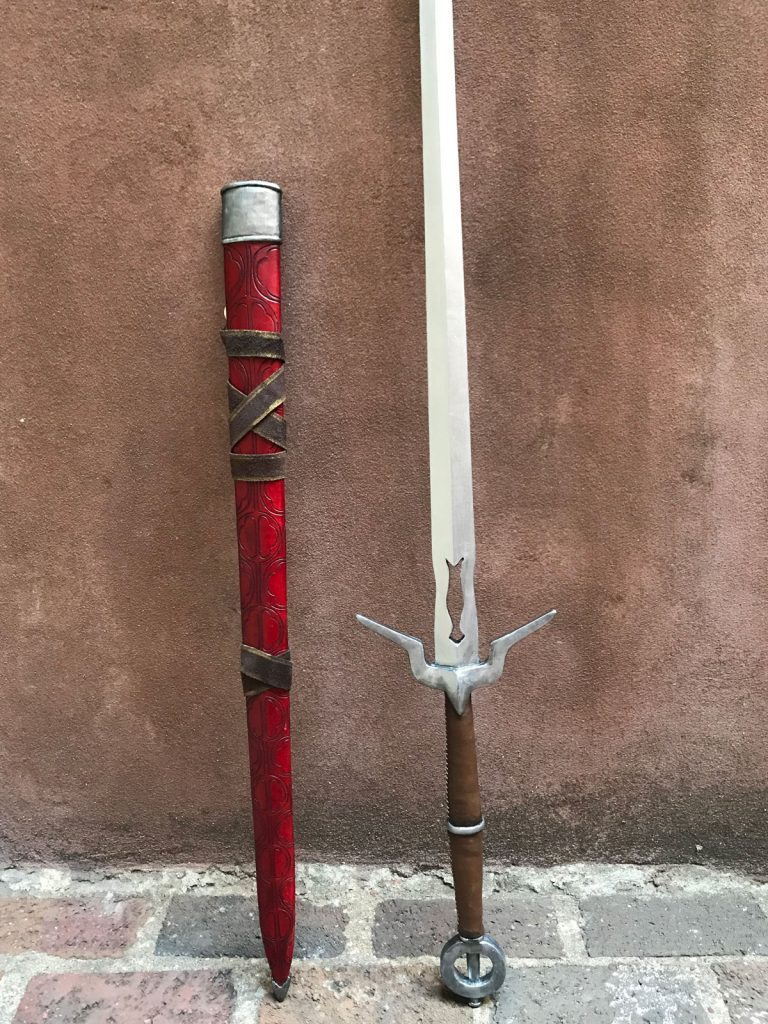
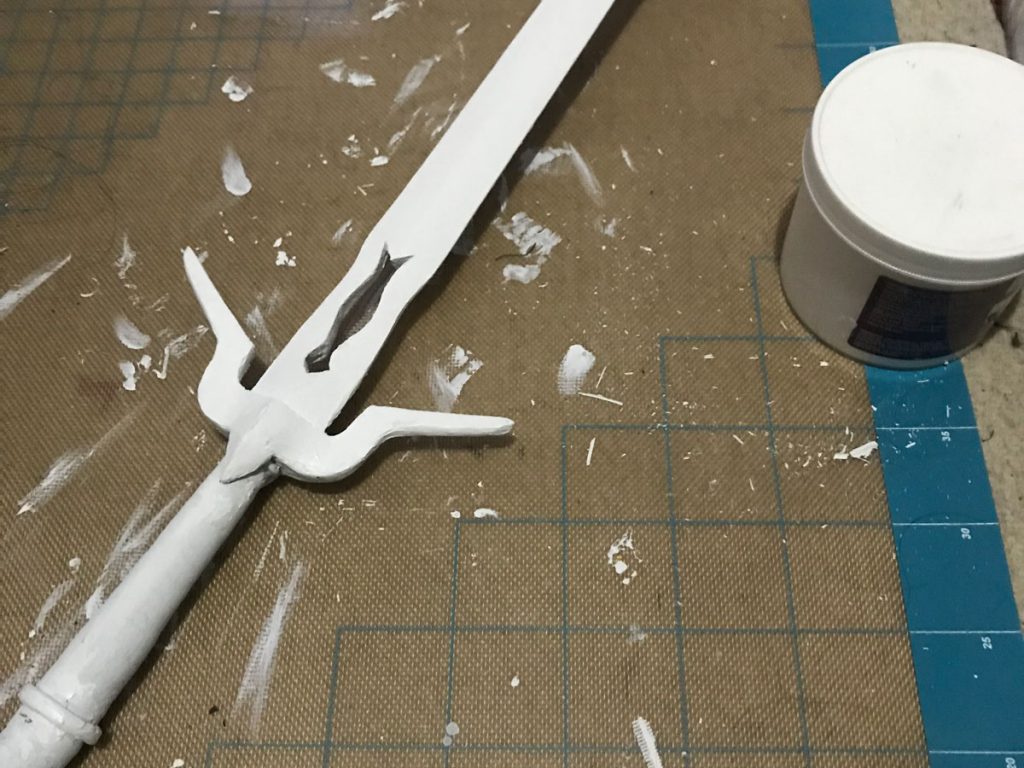
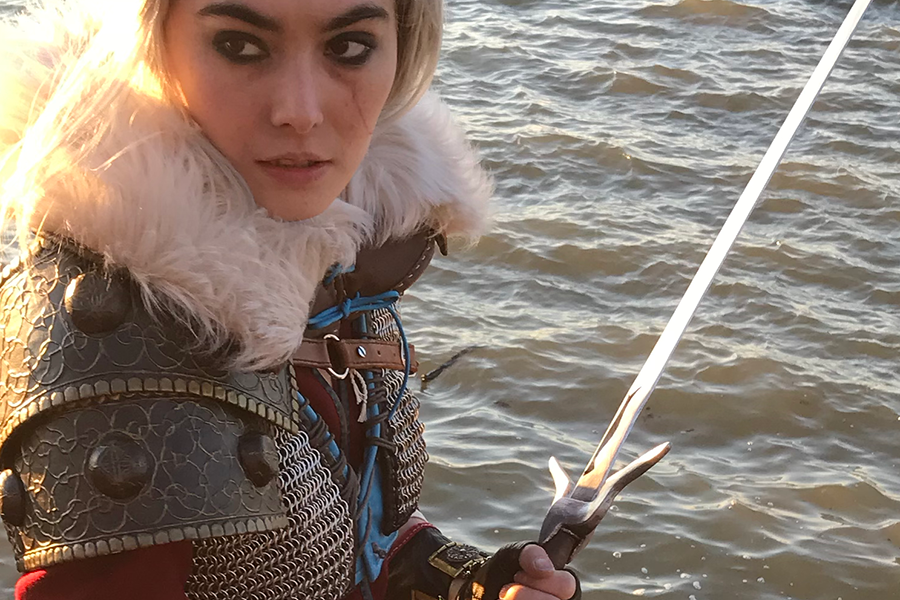
I’m a bit of a contrarian when it comes to props. I live in a small, badly ventilated NYC apartment, and although this hasn’t been a major obstacle on the sewing side of things it effectively rules out a wide range of common propbuilding techniques. But I’m sometimes not very sensible, and I was determined to come up with a way to make Ciri’s sword, so I cobbled something together using about eight different building materials.
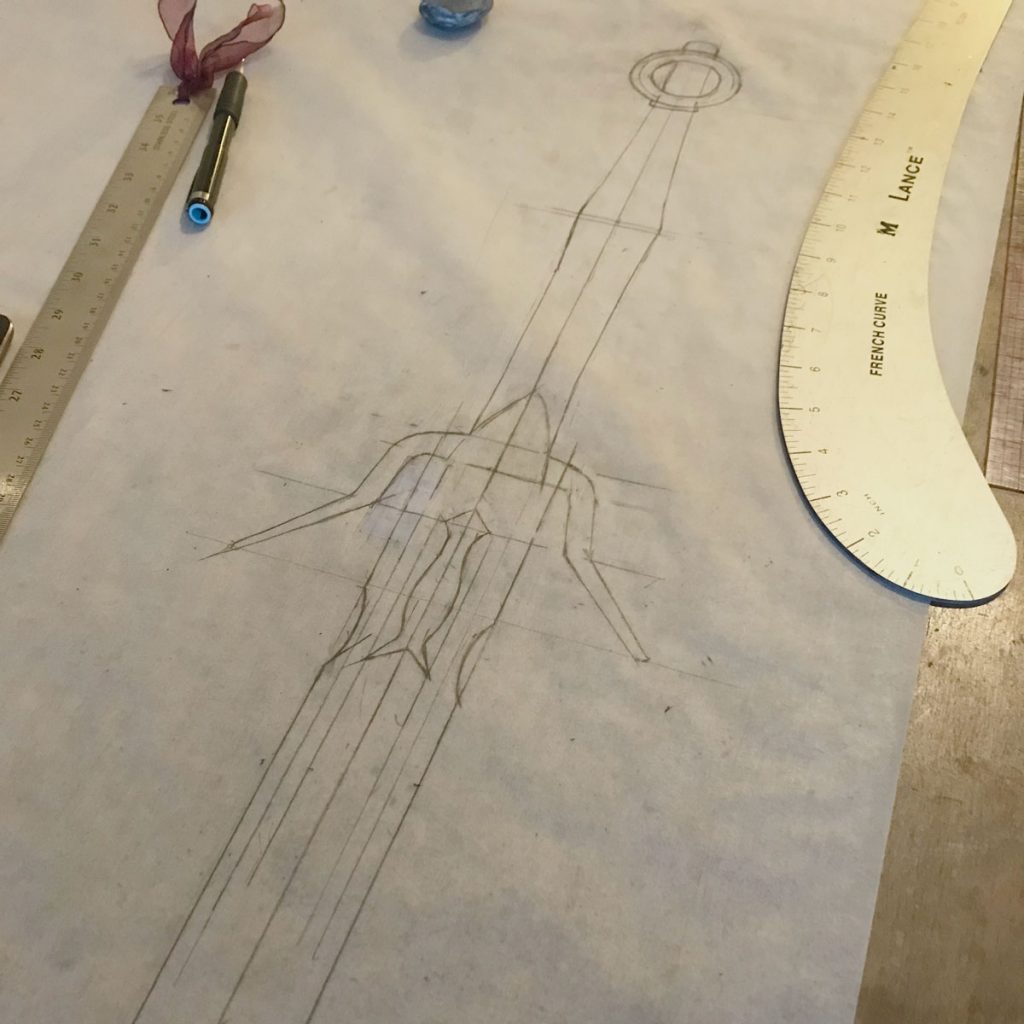
The most distinctive feature of Ciri’s sword is also why I went a bit overboard on the engineering: that stupid cutout in the blade. Even in metal that’s an obvious weak spot; in convention-safe materials it seems preposterous. So my first step was to find a material that would support that cutout while remaining thin, clean-lined, lightweight, and flexible. I didn’t want the sword to end up too heavy, or hard enough to spook convention security, so I consulted with Becka Noel at MWS and she suggested I use Kobracast as my main structural material. That proved to be exactly the right balance of lightweight, springy, and crush-resistant. The other main part of the solution was 1/8″ carbon kite spars, which I ran up the inside of the blade on each side of the cutout to add some rigid support.
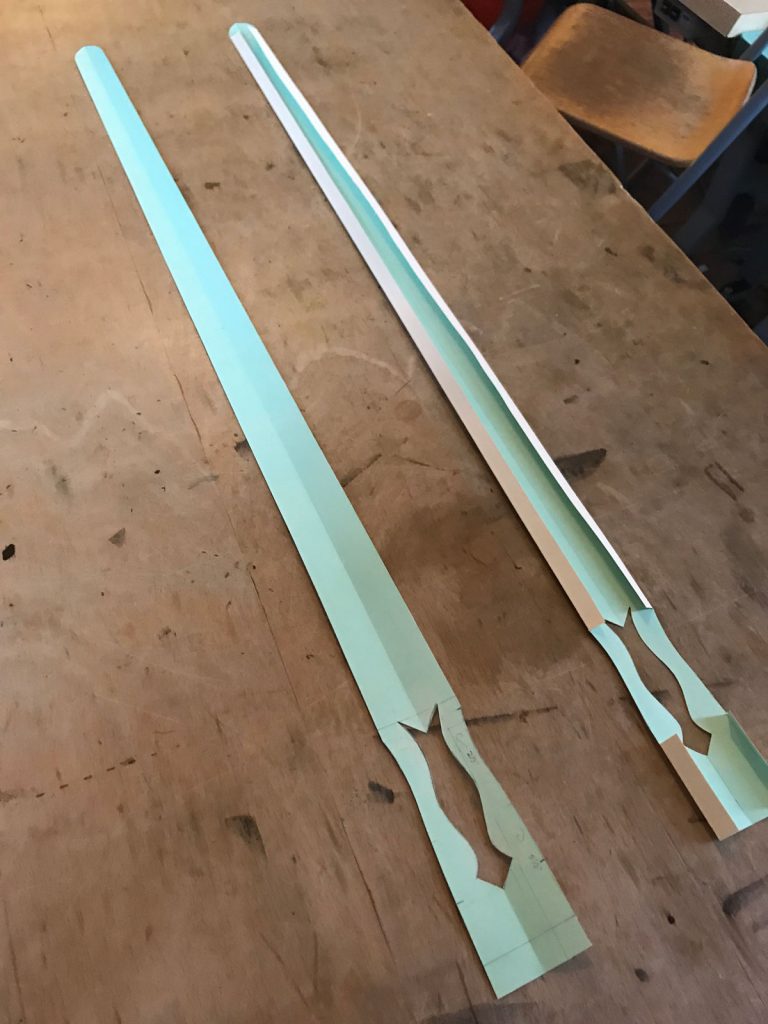
For the outside shell of the blade I used oaktag, which is easy to work with, stiff enough to hold its shape when creased, and thick enough to smooth over the texture of the kobracast. I really like the idea of papercraft for making prop blades, since a creased edge can be perfectly straight and add a lot of rigidity without much weight. The one big drawback to this scheme is that you can’t un-crumple paper once it’s bent, so the backing material needs to be sturdy enough to prevent any buckling.
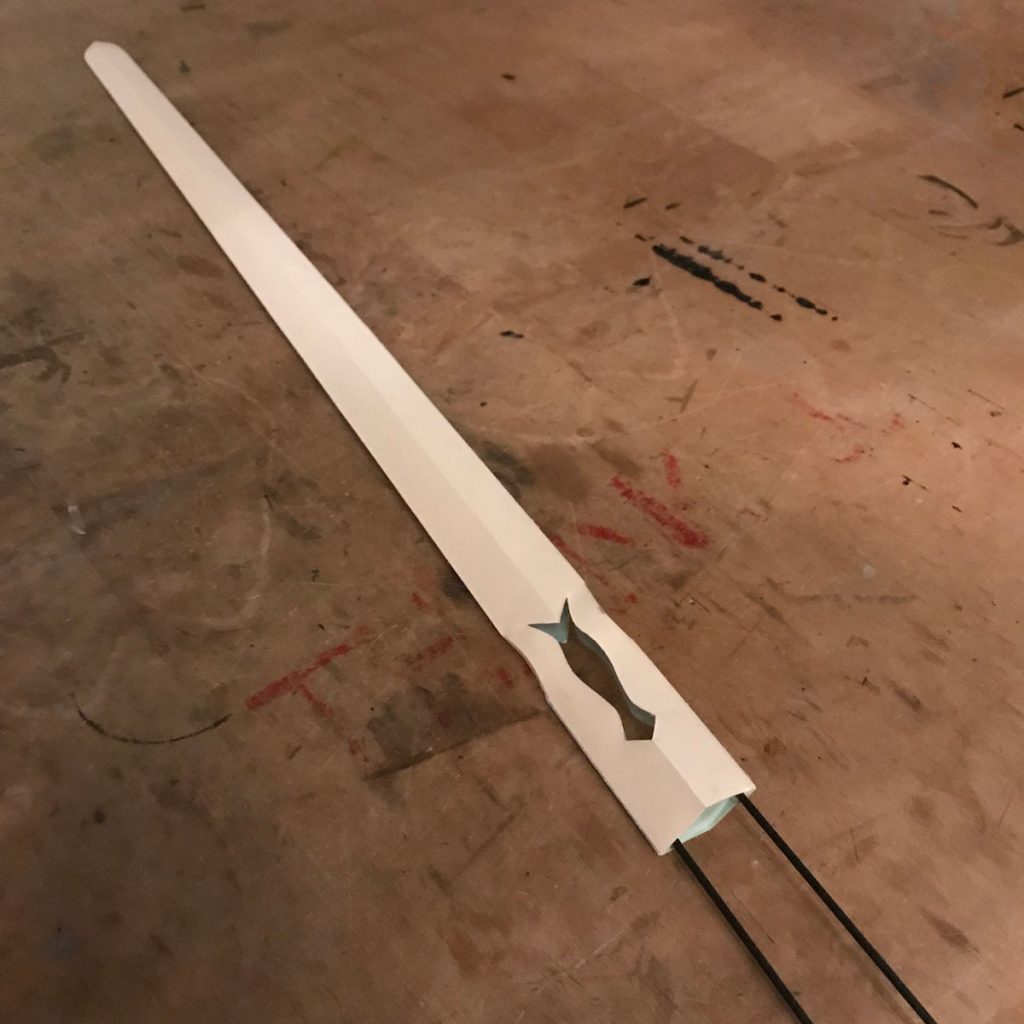
After a bit of experimenting, I ended up using a single layer of thermoplastic for most of the blade, and doubled up around the cutout and the tip for extra support. The blade was cut out in two halves, each lined with thermoplastic. The kobracast is self-adhesive, so I just nestled the kite spars into one half of the blade and then stuck the other half down on top of it and it held together beautifully. Once it was all cool, I lightly sanded the edges of the blade in order to clean up the lines and reduce the risk of papercuts.
Kobracast does have one significant drawback, which is that it tends to contract slightly as it cools. This can cause it to peel away from surfaces it’s applied to, or force the paper to curl (though the creased edges do a pretty good job of counteracting that.) I had one or two areas of the blade where the kobracast bubbled away from the paper a little bit, and those ended up giving me some trouble when I got to the finishing stage because the unsupported paper warped when I tried to prime it. You kind of have to keep a close eye on it, and avoid reheating the blade once it’s assembled because it’s very hard to repair any internal bubbles at that point.
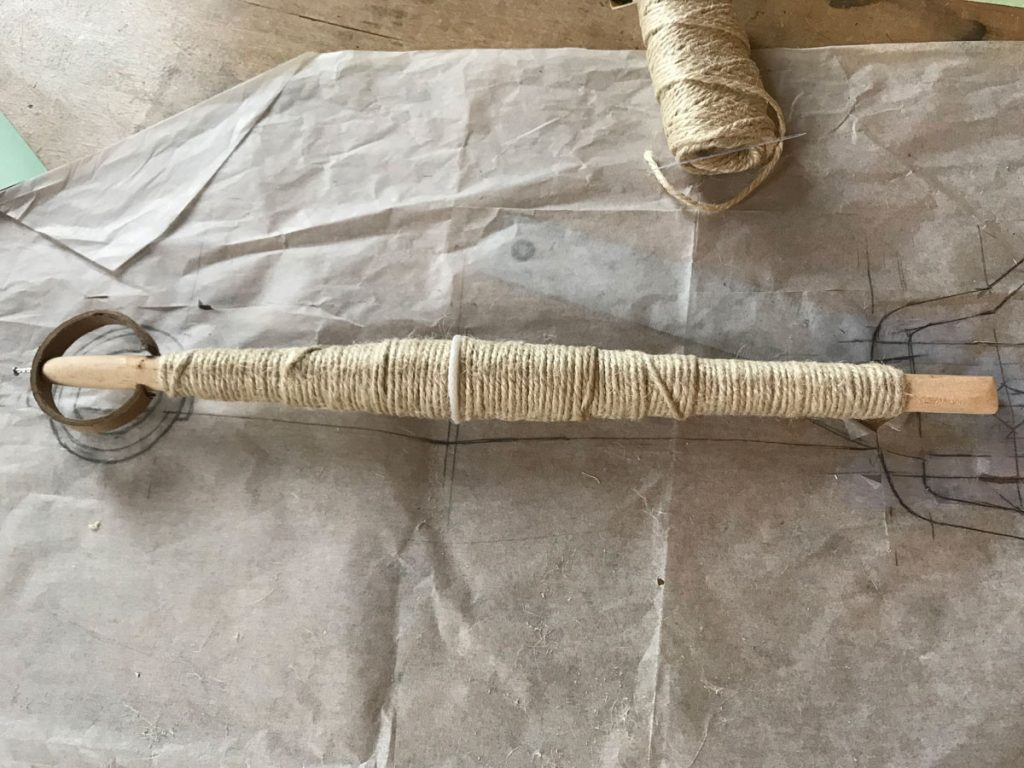
To make the hilt of the sword, I used a wooden dowel cut so that it extended into the blade as far as the base of the cutout. I built up the handle shape by wrapping twine around the dowel, so that I would only need a thin shell of worbla to smooth it out in the end.
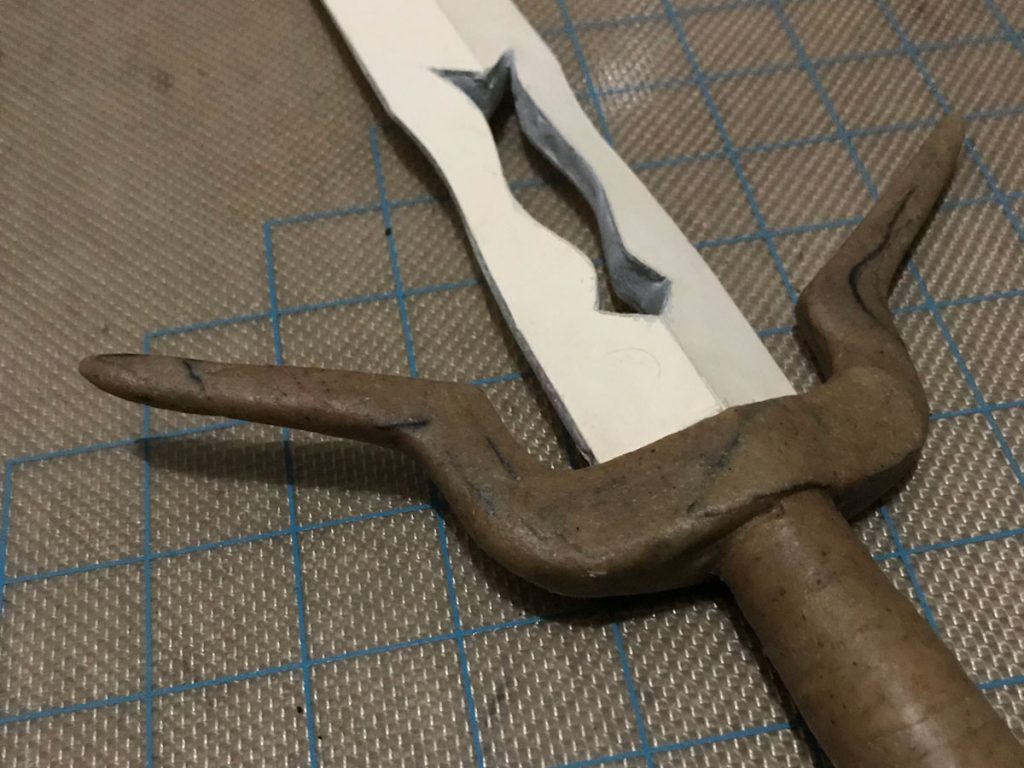
There isn’t a ton of overlap between the cutout and the base of the blade, so I wanted something really solid to reinforce the joint between the blade and the hilt. For that I used Apoxie Sculpt, which is a two-part sculpting compound that sticks like crazy to most materials (at least in the early stages of the curing process) and dries rock hard and pretty darn sturdy. I mixed the Apoxie by hand (with gloves,) packed it into the base of the blade around the dowel to give it a nice solid connection point, and used the extra to fill in around the cutout to give it a nice smooth face. Then I sculpted the pommel and cross-guard by hand from wads of worbla scraps, which requires very little explanation but lots of time and burnt fingers (farewell, fingerprints.)
Finishing the blade posed another puzzle. I knew that any wet primers would risk warping the paper, but spray primers were out due to the aforementioned ventilation issue. I ended up settling on gesso, which is more paste than liquid and sets up semi-flexible and sandable. It still caused some slight ripples in the areas where the kobracast had given way, but I was able to mostly smooth this back out with a few extra coats and some sanding. I might experiment with a metallic vinyl wrap or something on future projects.
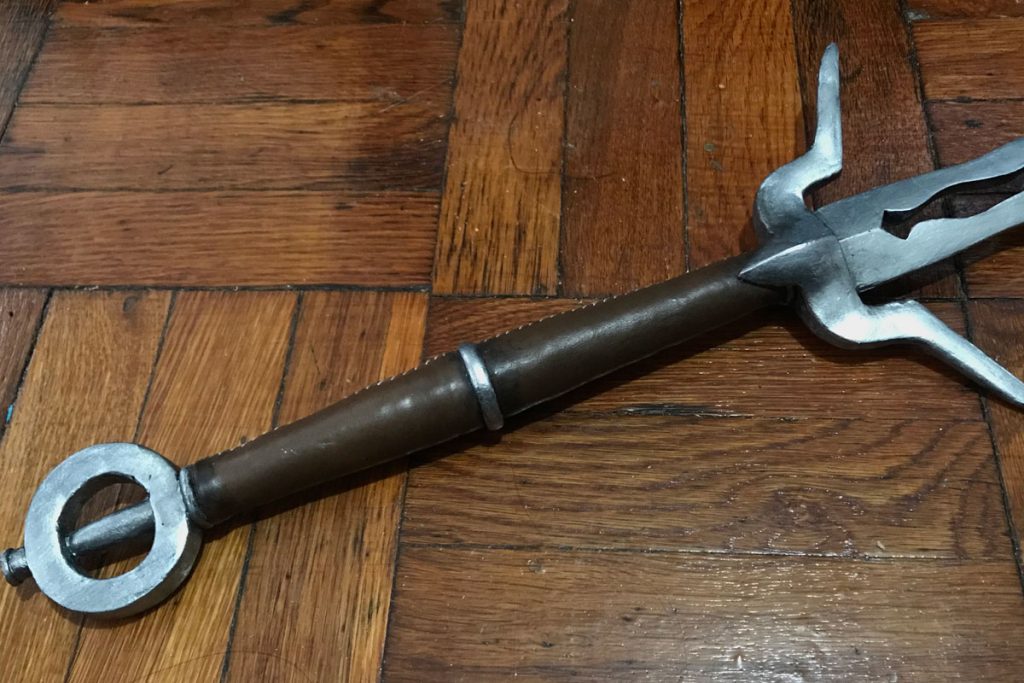
Once the painting was complete, I finished the hilt off with a leather wrap. This needed just a little bit of water-based glue to secure the edges, and was hand stitched to snug it up nice and smooth. I used acrylic paint to give it a little grimy depth around the joints and the sword was done.

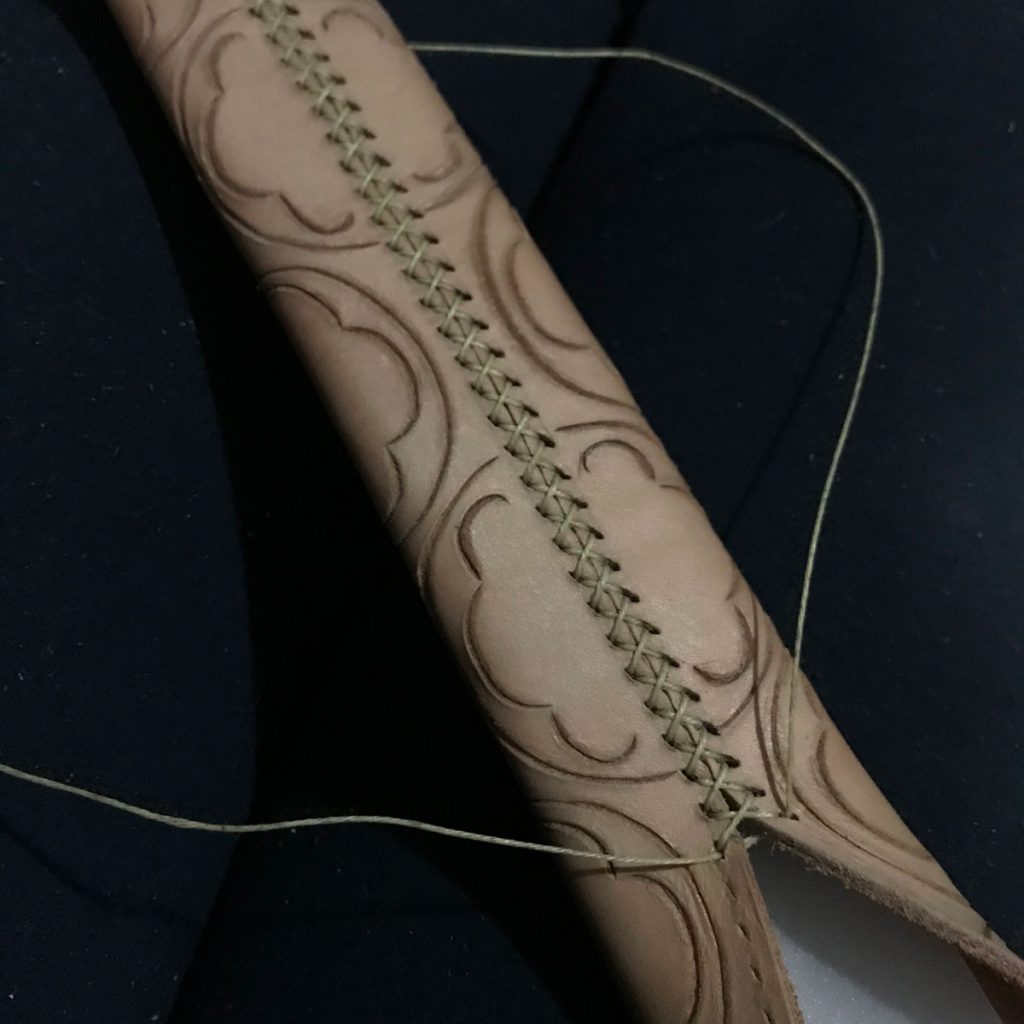
My first attempt at the scabbard was a one-night crunch build, and I was never very happy with it. For the competition at C2E2 I upgraded to a tooled leather scabbard, which was more or less my first attempt at tooling but was pretty successful considering!
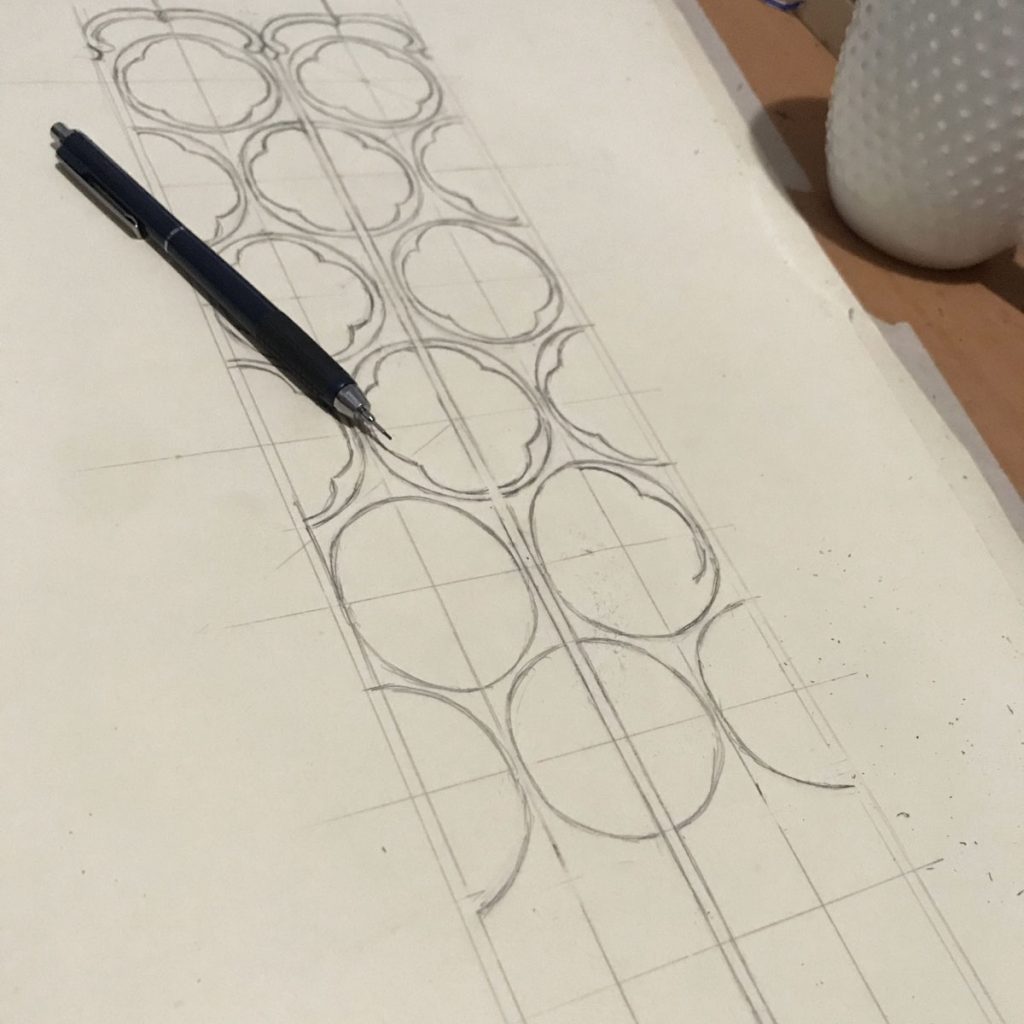
I created the pattern by wrapping the sword in foil and masking tape, then opened it down the back and transferred it to oaktag. I drew out the tooling pattern by hand, using a rough grid to guide the scaling of the design from top to bottom and then freehanding the actual shapes. I copied this to the veg tan tooling leather by rubbing a soft pencil on the back of the pattern, then taping it down and drawing over the design with a ballpoint pen.
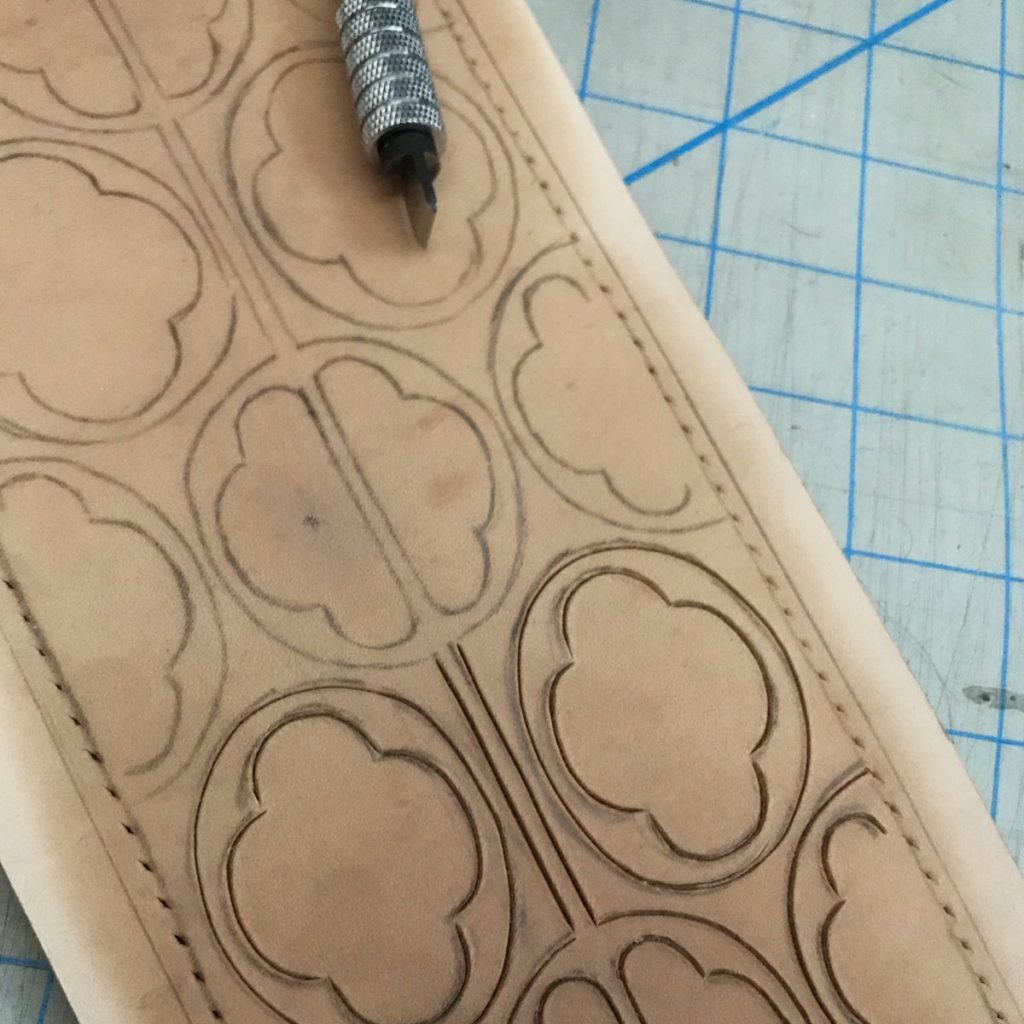
Next I wet down the leather and carved the whole design using a swivel knife. The hardest part was keeping the blade vertical throughout all the rounded cuts, and my first full attempt was a no-go but the second one seemed workable.

The pattern in the art is basically just linework, but I wanted to define the cuts a little more and make them look more polished so I went over each one with a modeling tool to give it a bit of a bevel. I’m still getting a feel for how much moisture to keep in the leather for this sort of thing, but it seemed to work out okay.
To wet-form the leather, I cut two templates for the finished shape from a sheet of flexible plastic and stitched the center back seam closed over them. Once this was finished, I wedged a dowel between the plastic layers to open up the shape (I’d shaved the end of the dowel down into a flattened point to get a nice smooth taper down to the end.) I also added a couple scraps of cardboard to ensure the finished shape would be open enough to fit the sword smoothly.
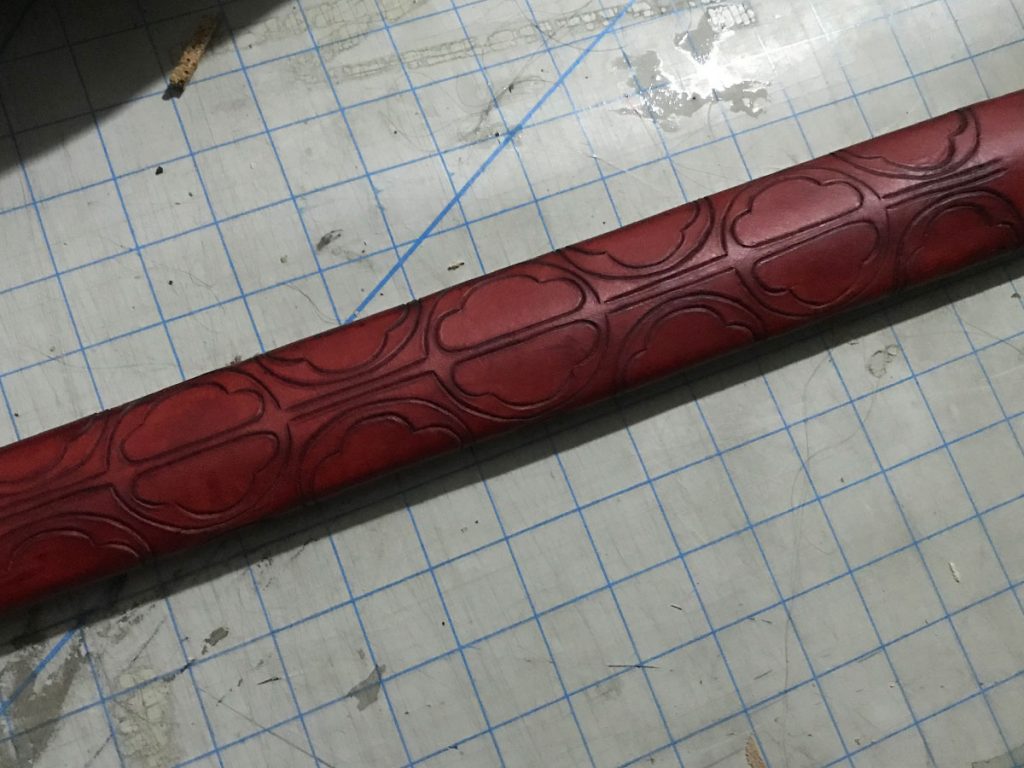
After the scabbard was completely dry, I re-wet the surface lightly and brushed the whole thing with water-based leather dye ordered from Lisa Sorrell. I’m kind of an impatient dumbass so I dove right in without even testing on a scrap, but I’m happy to report that these dyes RULE and I got a super rich deep color with one and a half coats and pretty economical dye usage. I let the dye dry then finished it with a light coat of wax.
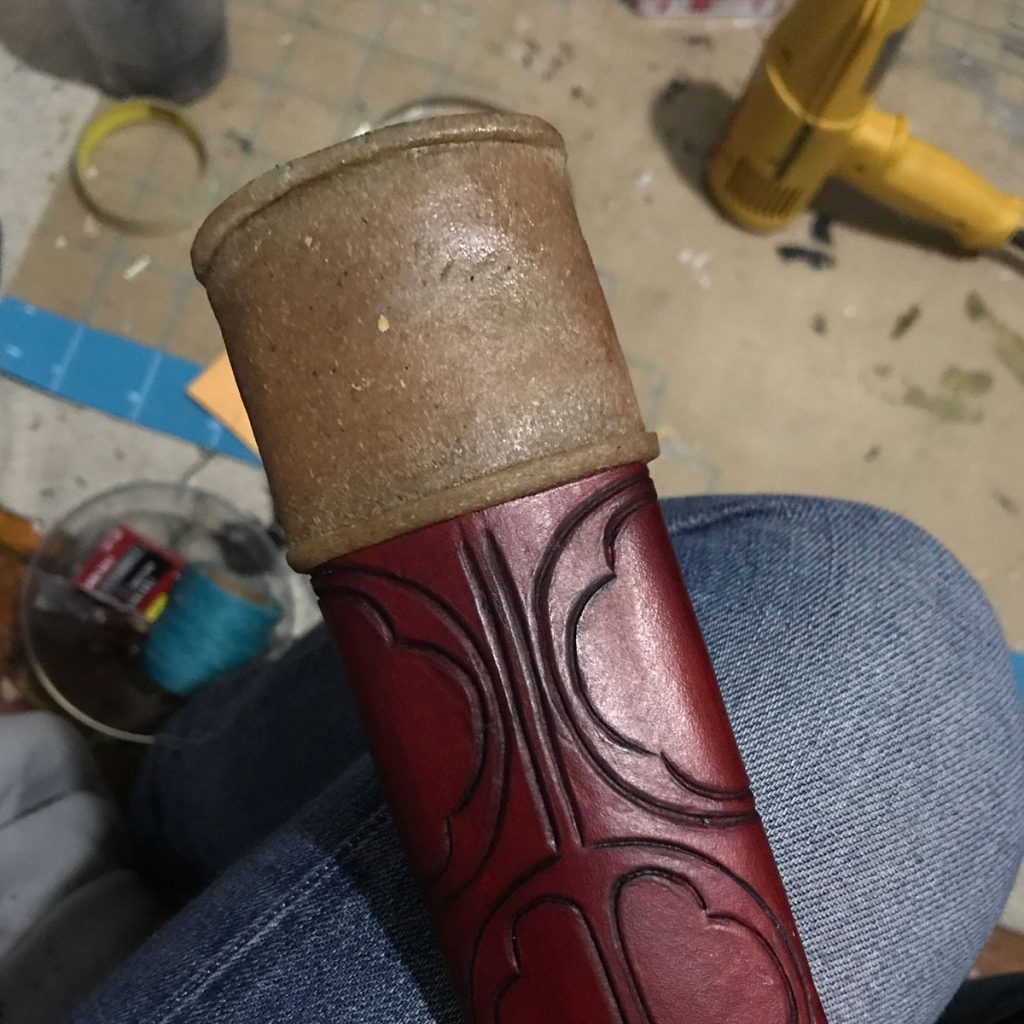
Interestingly, the shape of the scabbard end caps seems to differ slightly between the basic and dlc versions of Ciri’s outfit, although it’s clearly the same scabbard otherwise. I went with a not-very-successful hybrid for the first version, but this time I went with the look shown in-game for the DLC outfit. I roughed up the ends of the scabbard to help the worbla stick, sculpted the details by hand, then painted with flexbond and metallic acrylics.
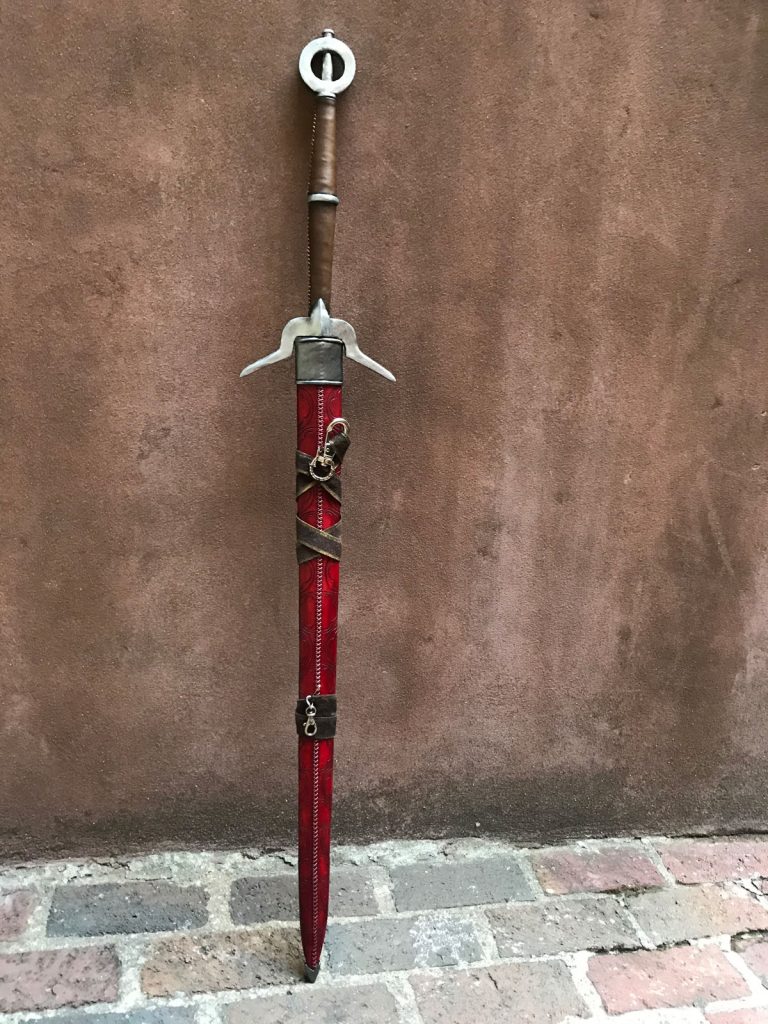
The attachment straps I created from leather scraps, highlighted at the edges with brass-colored metallic acrylic. I wrapped them and stitched the ends to themselves to secure the shape, then added clips to attach to the armor strapping and belt. This way the scabbard doesn’t swing when I’m wearing it, and it can be removed when the asymmetrical weight gets too uncomfortable (which it does, even though the sword is very lightweight overall.)
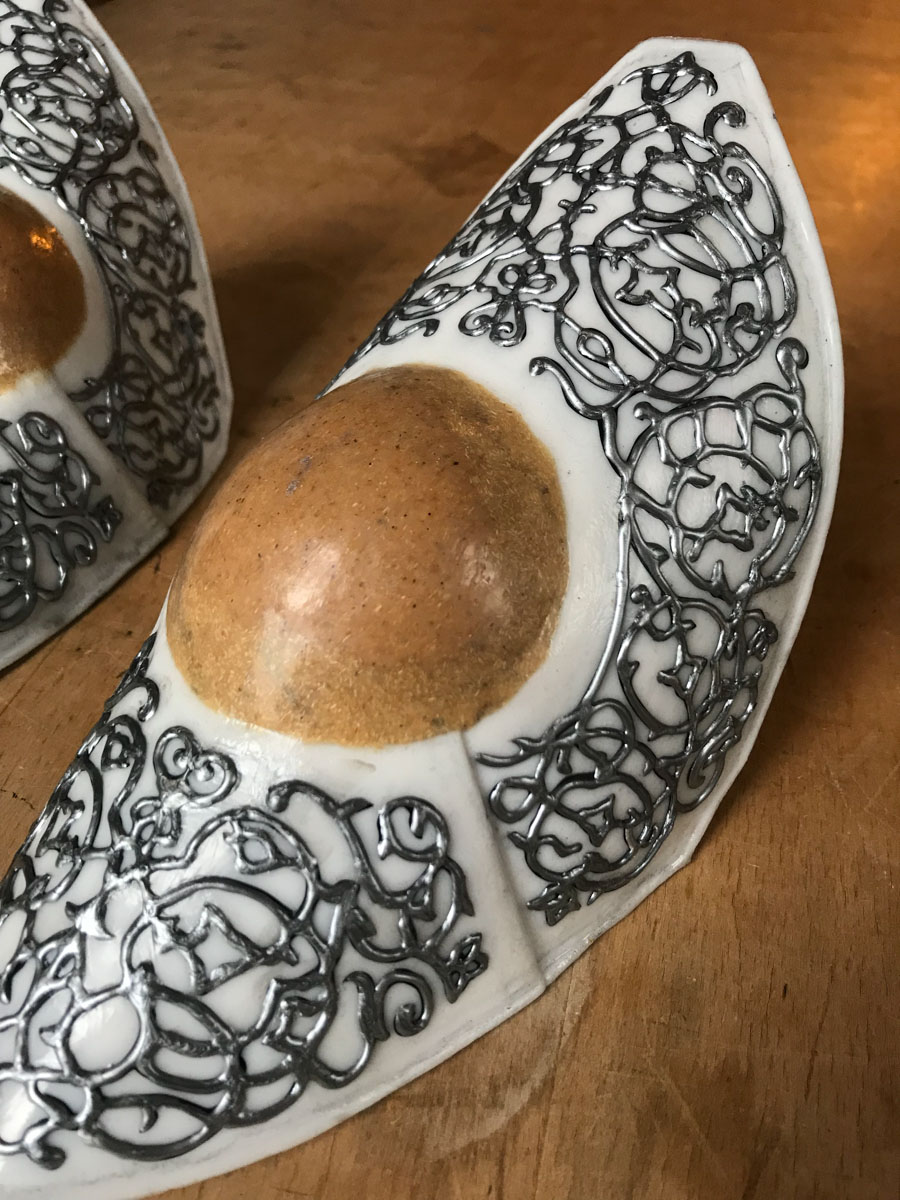
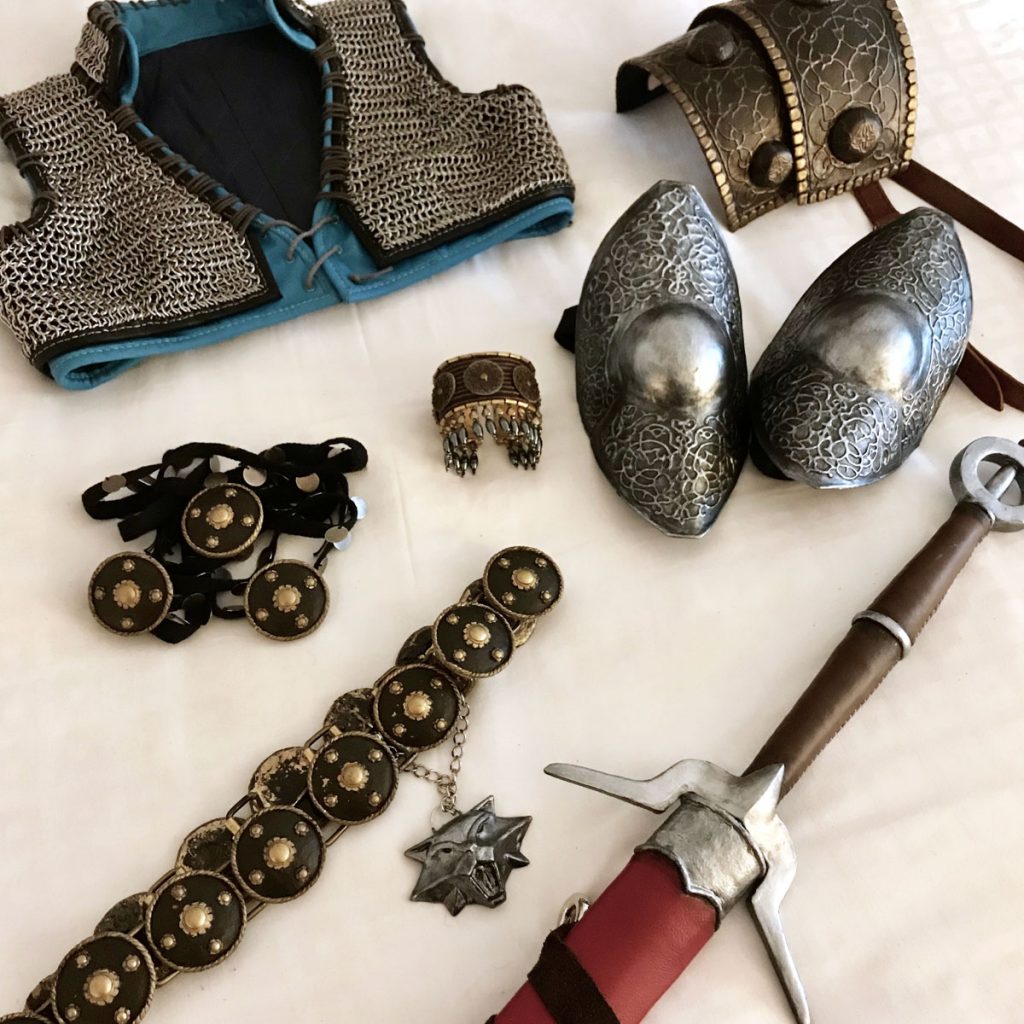
Ciri was one of those builds where each individual component I looked at immediately suggested a technique I wanted to try. In the case of the knee and shoulder armor, that was worbla detailed with puff paint.
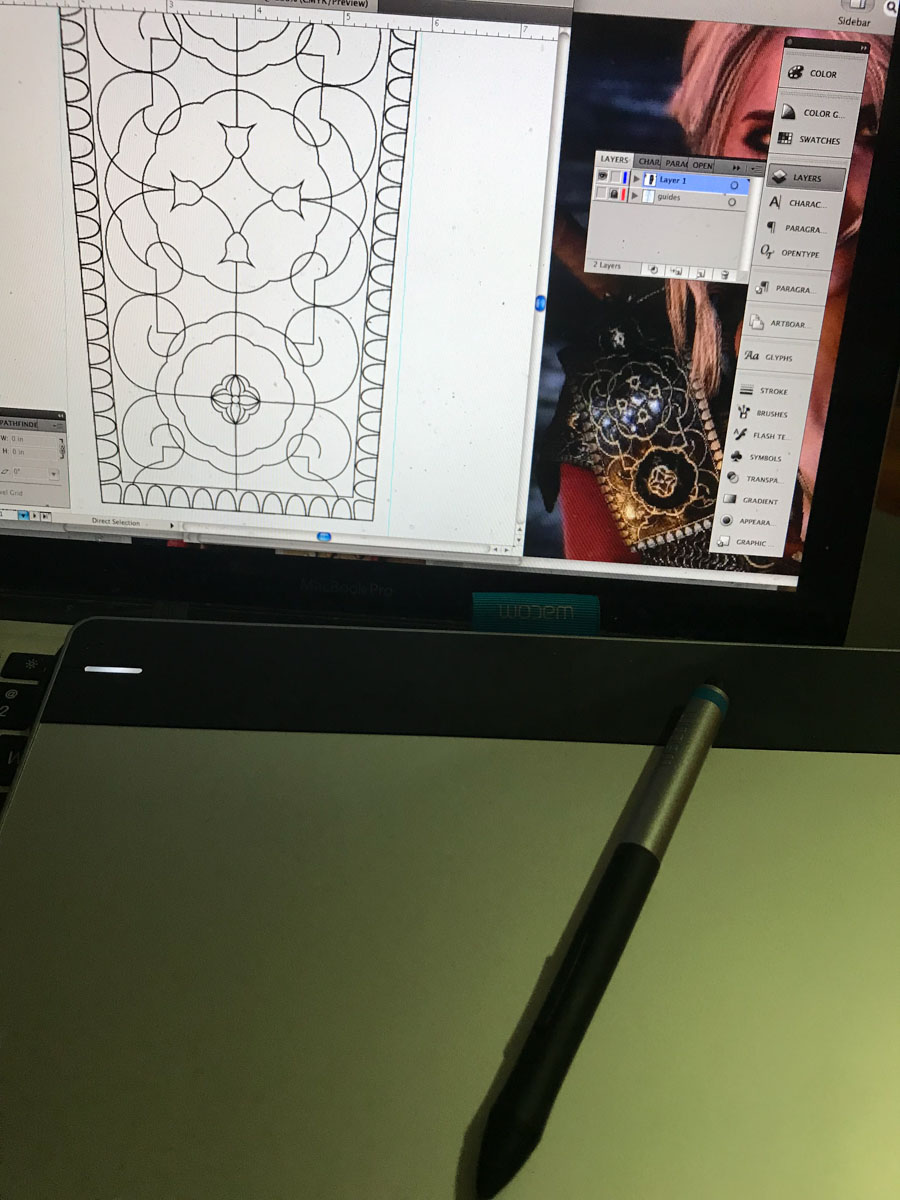
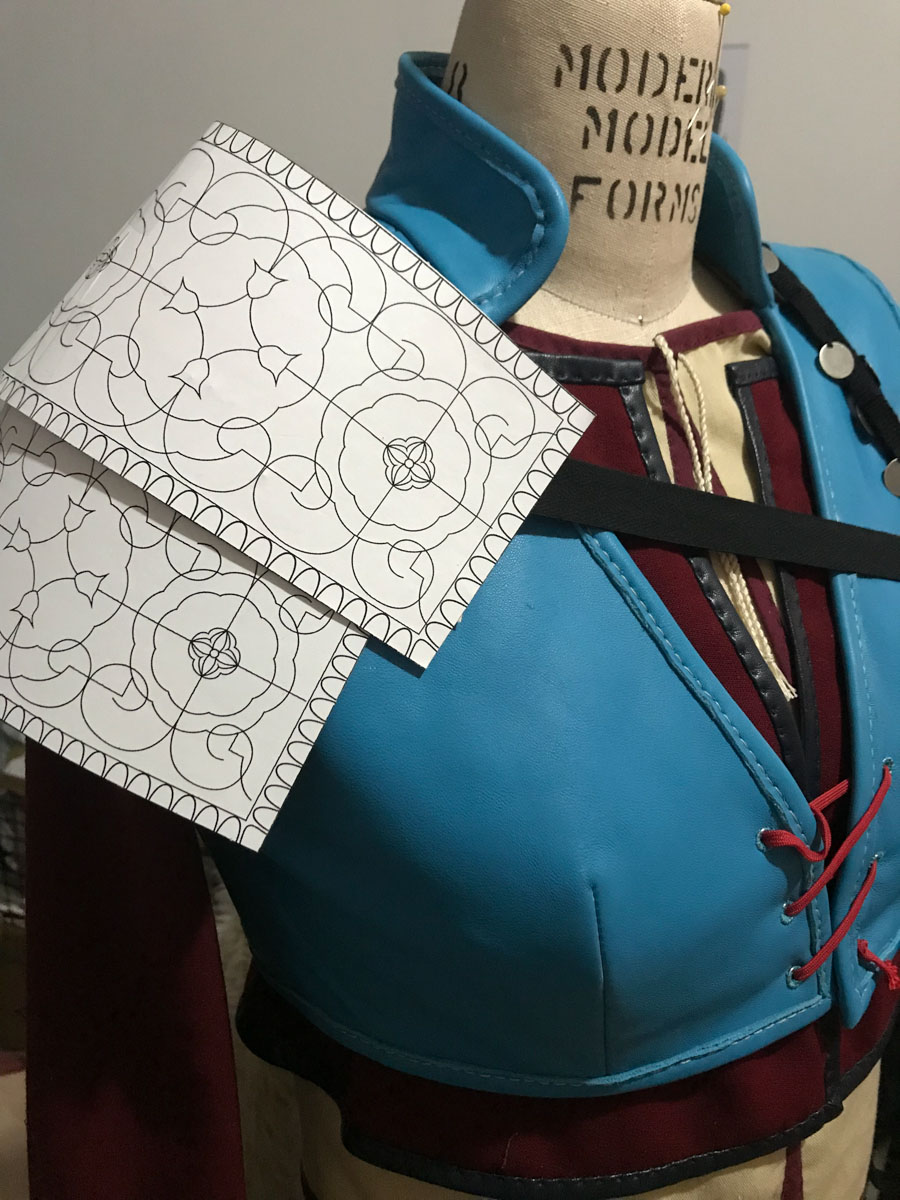
I designed the armor patterns digitally, because I knew the shapes would need to work with the detailed relief designs and I wanted the freedom to experiment with scale and proprotions. This enabled me to print out copies of the patterns at various sizes to try on and adjust until they looked right.
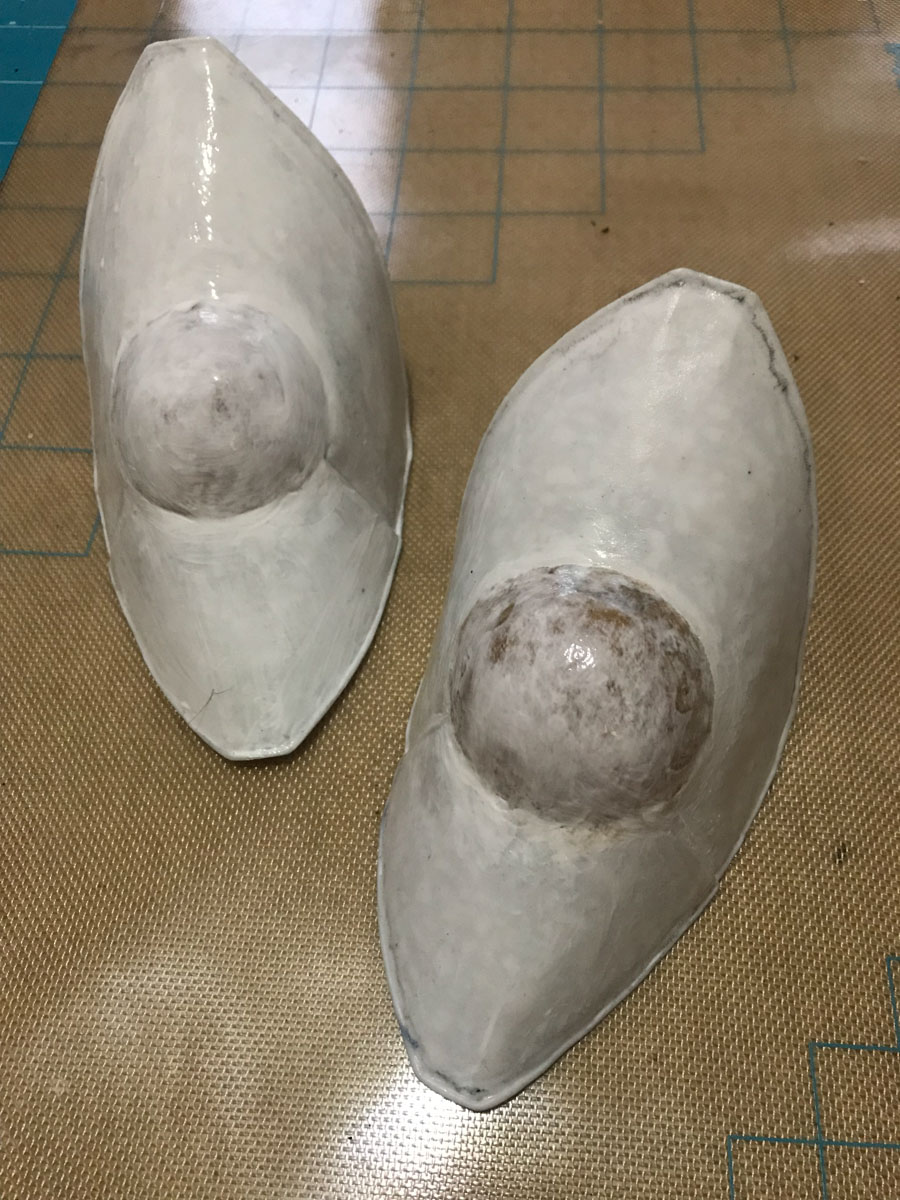
I dislike working with foam, so the pauldron is worbla reinforced with buckram and the poleyns are pearly worbla over cardstock with a double layer of regular worbla for the central dome (which was free shaped over a ball ornament).
Although the worbla work was relatively simple, both pieces have hand-sculpted edge details, which took some work to produce a smooth and even result. The poleyns have a very fine rim on the edge, which was shaped by hand sculpting the excess worbla around the edge of the pattern pieces and progressively refining it smaller and smoother over many hours.

The pauldron has this tabbed detail around the border, and since I didn’t want to sculpt it from a lot of little individual balls of worbla I instead cruelly abused my pattern notcher to rough out the tab shapes and then…sculpted them all individually to get the nice rounded shapes. Unfun, do not recommend, but I got there in the end.
I mocked up the pauldron straps in craft foam to make sure everything fit correctly. Here you can also see the Chicago screws used to hold everything together, which later got covered up by the little decorative nubs.
Both pieces were primed in flexbond, which can be a tricky primer to work with. It rewets basically indefinitely as far as I can tell, so you can coat and dry and then spritz with water to smooth, but if you use too much water then you can actually wet through all your coats and end up with big ripples. So it needs a light hand and the discipline to avoid screwing around with it when it’s still wet, which I am not at all good at. Sigh. It also peels off in huge chunks if something dings it hard enough, so I’m on the lookout for something better.
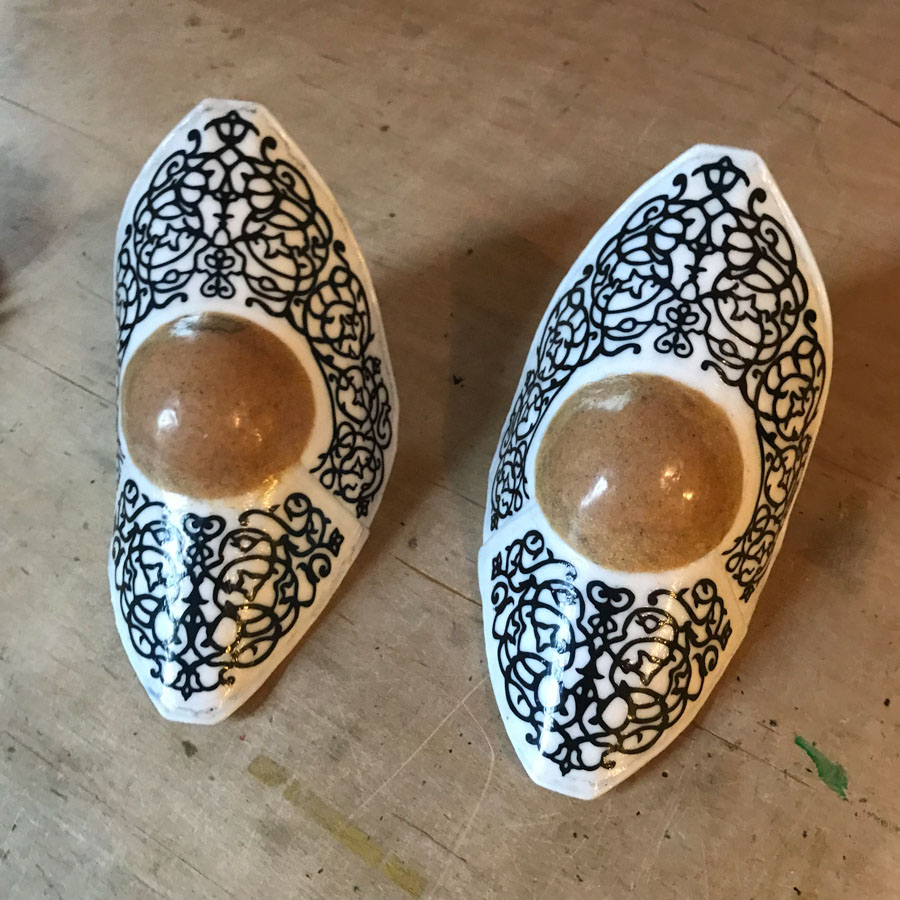
I detoured slightly here to try using self-adhesive vinyl for the filigree detailing. This may have been inspired by something Cowbutt Crunchies did at some point? In any case, it was a great experiment, and I was grateful to Pitchfork Cosplay for the loan of her Cricut, but it didn’t have the dimension I was looking for, especially once the primer was on. So I returned to my original plan, which was to hand apply the filigree in puff paint.
This was a bit of a slog, requiring steady hands and a lot of patience since the puff paint takes a surprisingly long time to dry and is soft and squishy and very easy to smear until it does. My best friend during this process was a small flat paintbrush, which I used constantly for cleanup and evening out the lines (and erasing my numerous errors and smudges.)
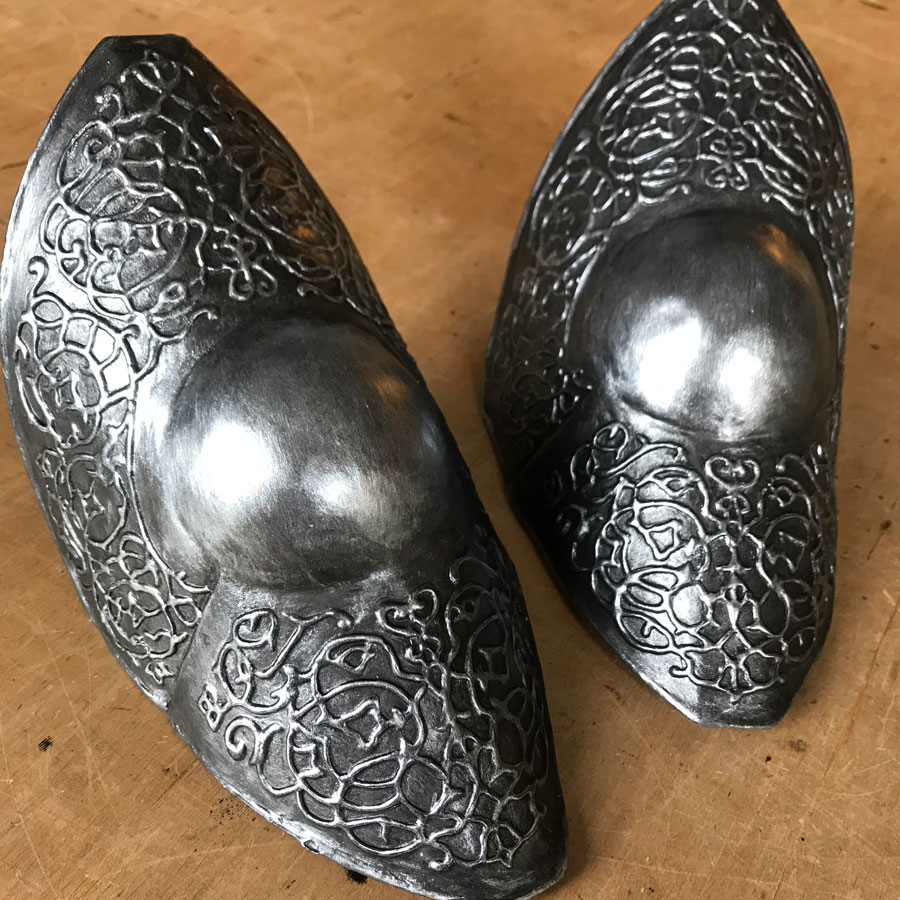
The armor pieces were painted in metallic acrylics, with a highlight shade brushed on at the end to pick out the relief detailing. This was easier for the poleyns, which have denser filigree and similar shades for ground and highlight, but I eventually got the pauldron highlighted and cleaned up as well. I also have very few pictures from this stage because it was done during the crunch for NYCC 2018.
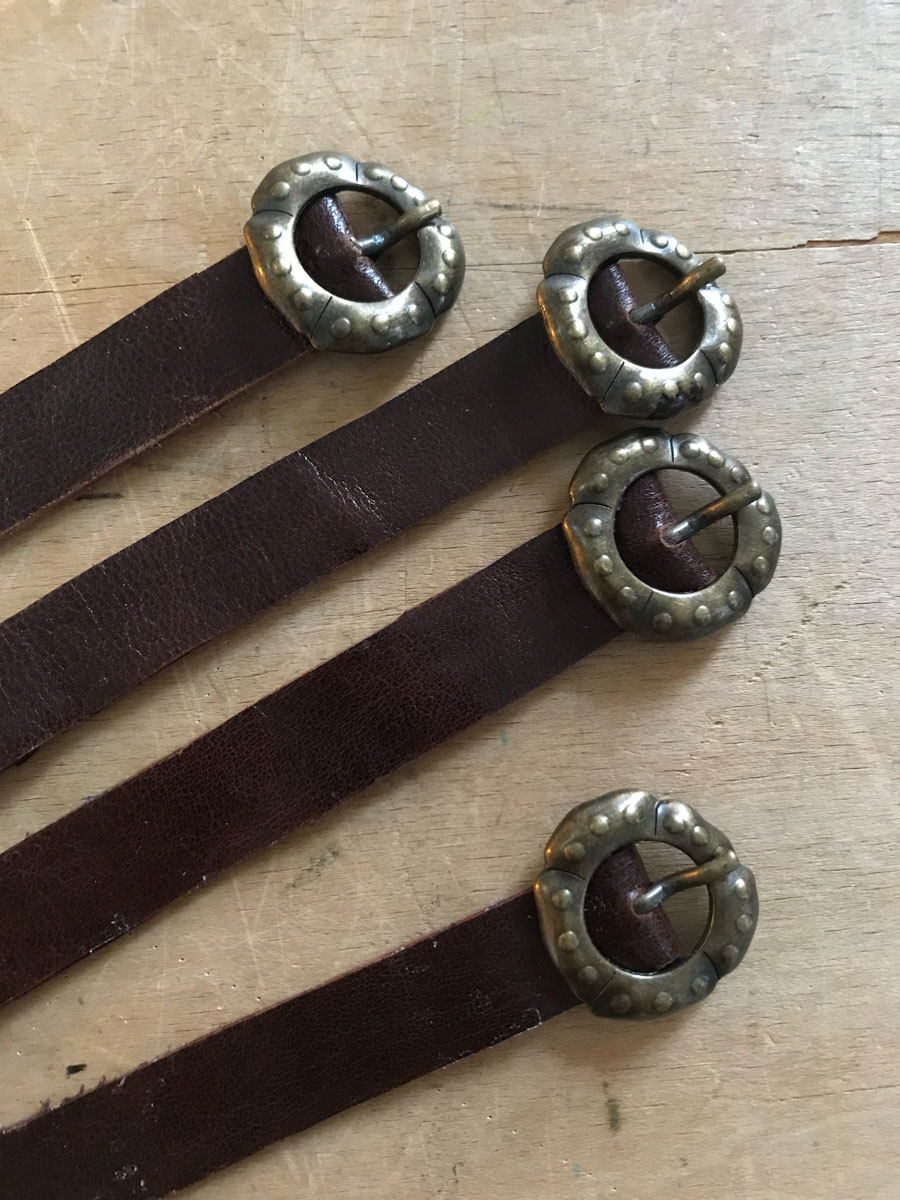
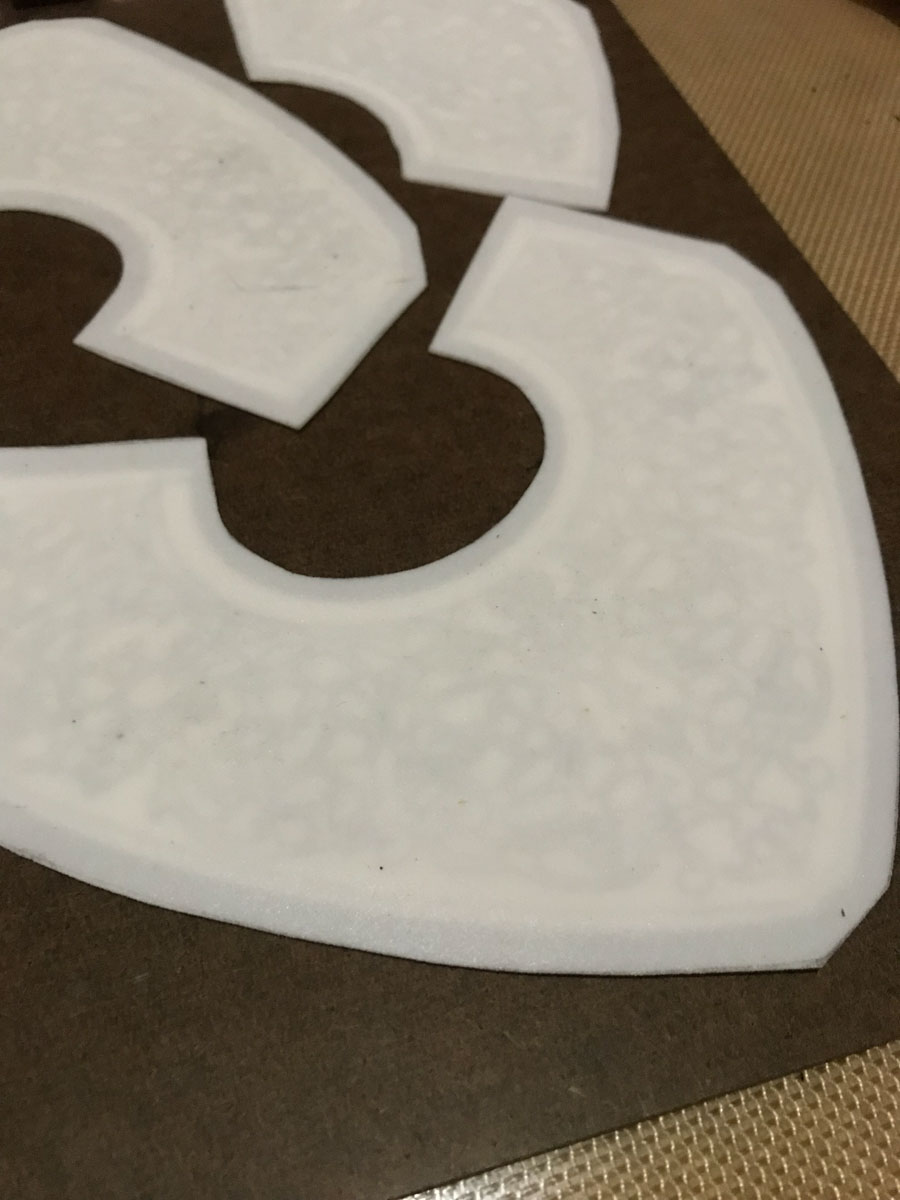
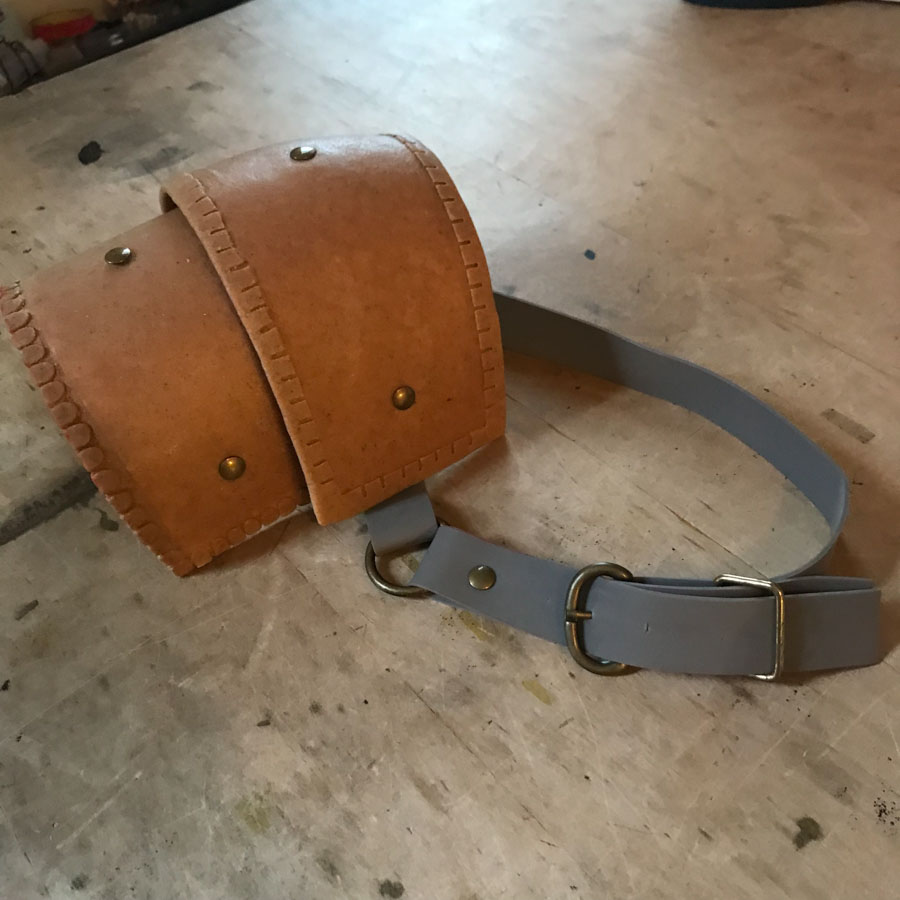
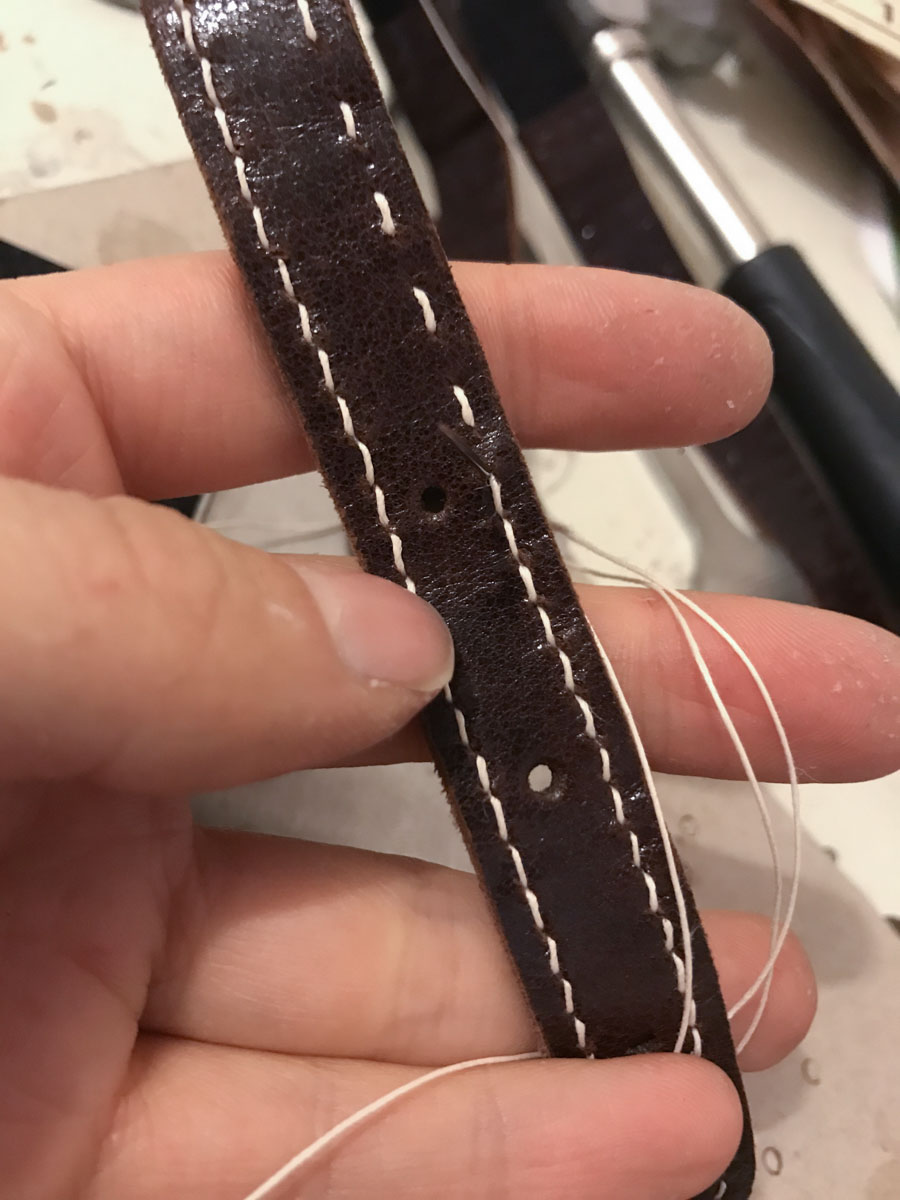
The first batch of knee straps I did were also a crunch casualty, because the leather I used was too heavy and wouldn’t go through the tiny round buckles. I eventually remade them with this thin, hard garment-weight leather, glued and hand saddle stiched with the one precious spool of genuine hy-mark thread I own. Not visible in the photos is the little bit of elastic I added to the middle of the strap, where it adds a bit of give for comfort but is hidden by the armor piece itself when worn.
I hadn’t done a ton of classic leatherwork before tackling Ciri, and between the straps, scabbard, and boots this costume was a wonderful crash course in hand stitching, tooling, wet forming, carving – basically the works. Of course there’s plenty of refinement to be done still, but it’s given me an excellent toolset that I can bring to future projects.
The pauldron strap was my single outing with Fiebings pro dye, which is based on some truly nasty solvent and stank for ages after applying. I’ve since found water-based dyes that I’m happy with, (used for the scabbard and boots) which are absolutely worth the higher price in order to avoid that nightmare. Like everything else, it was saddle stitched by hand.
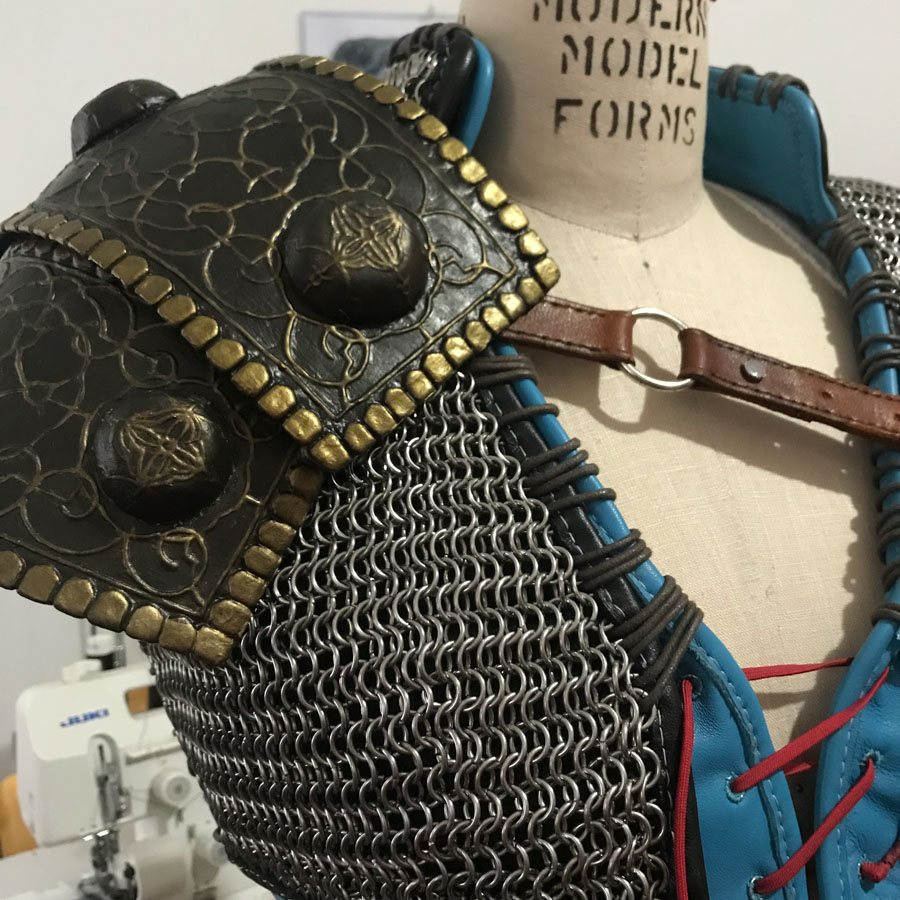
Once the screws were in and the straps were all assembled, I could finish off the pauldron with its little decorative nubs. These were formed over little blocks I made with Apoxie Sculpt, then detailed and painted individually along with the rest of the pauldron. I stuck them on with hot glue, being careful not to deform anything while it was softened by the heat.
]]>
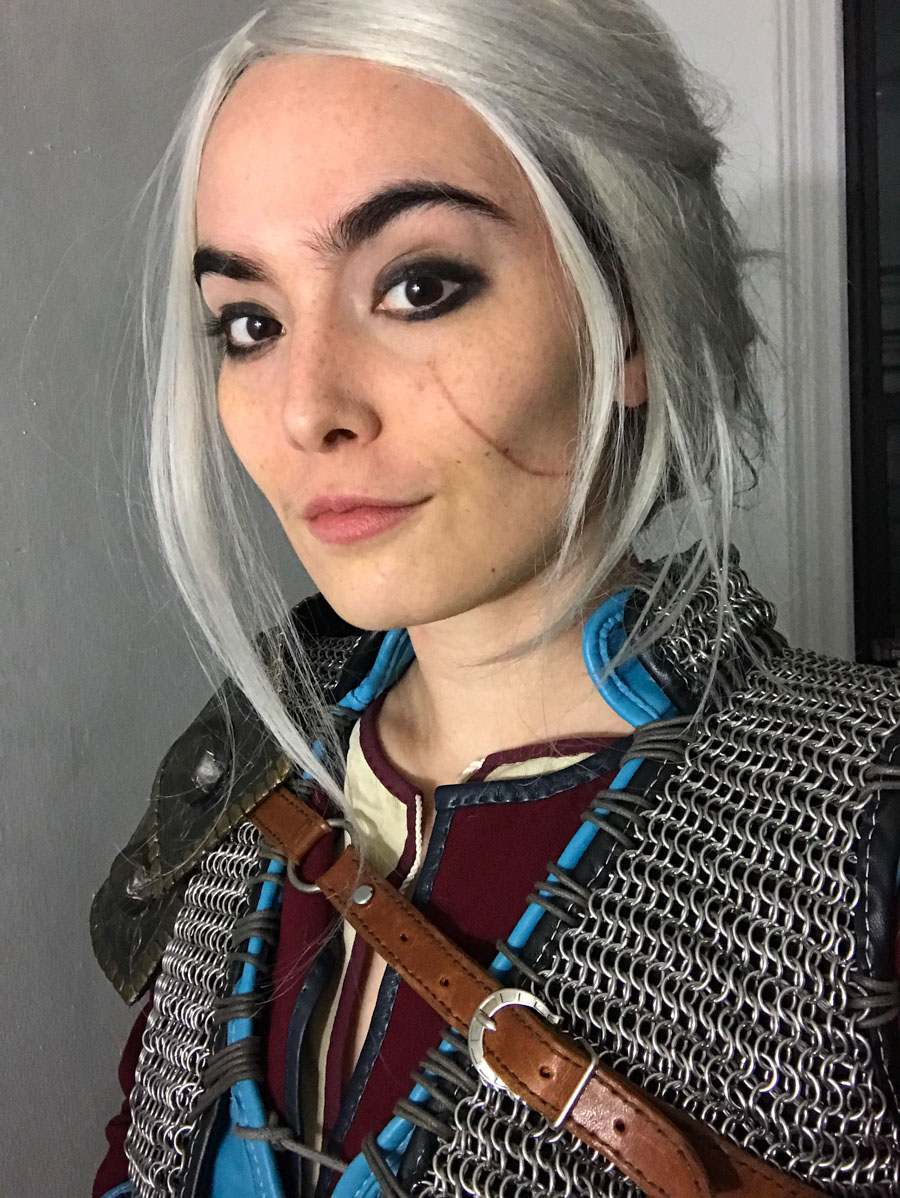
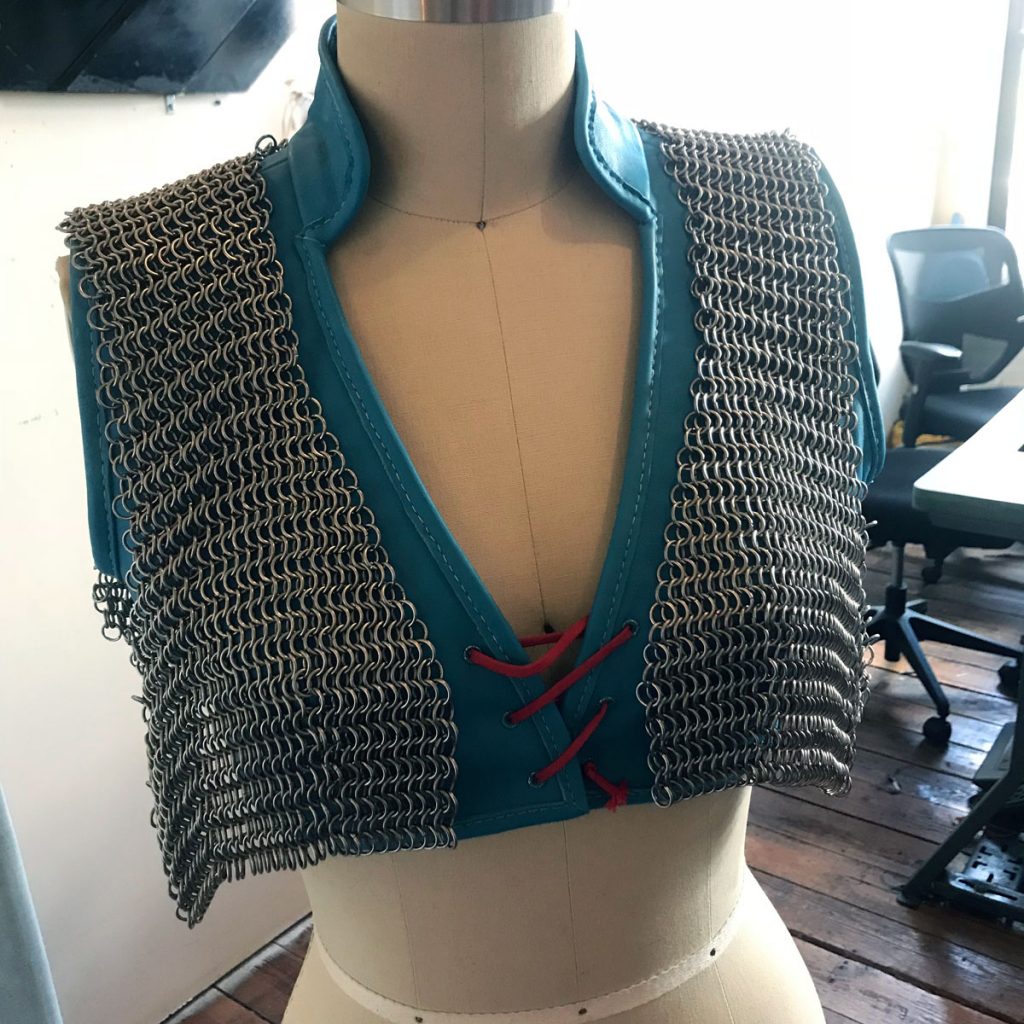
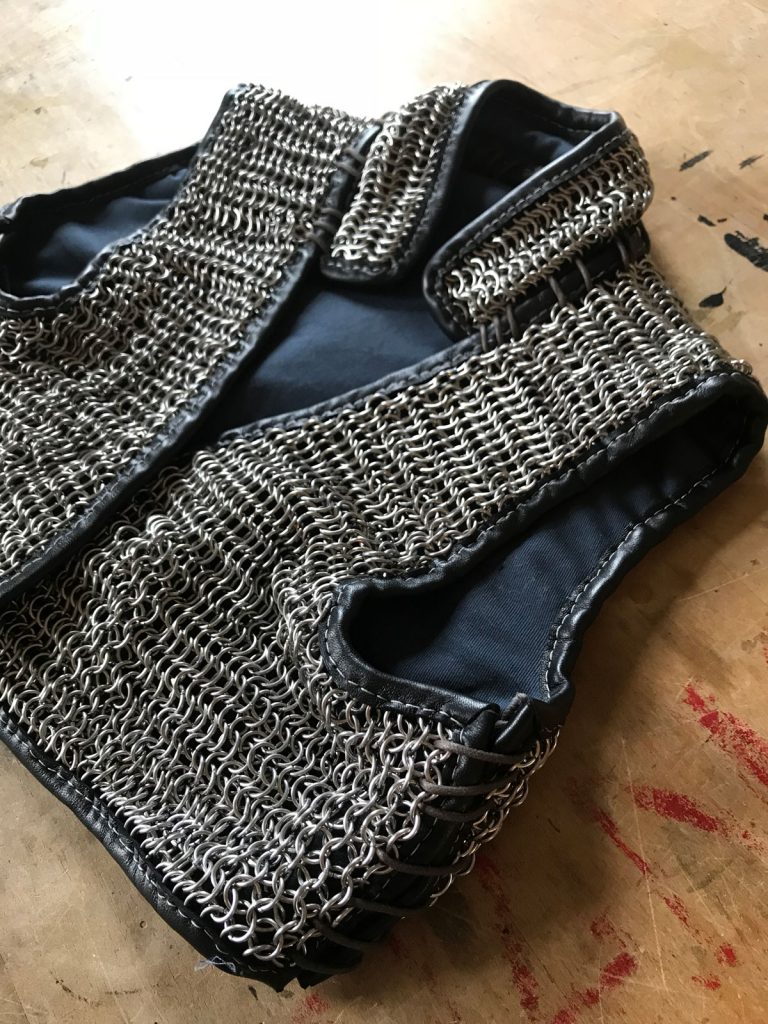
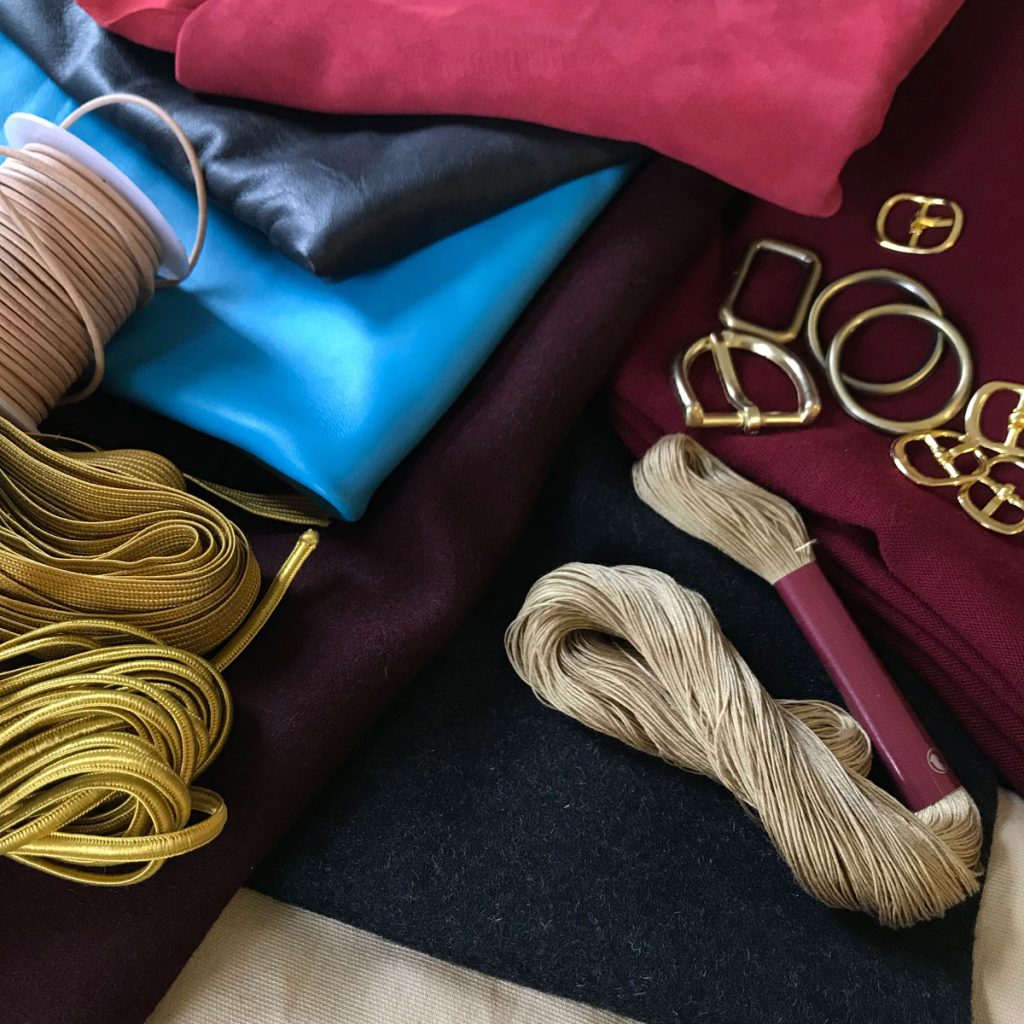
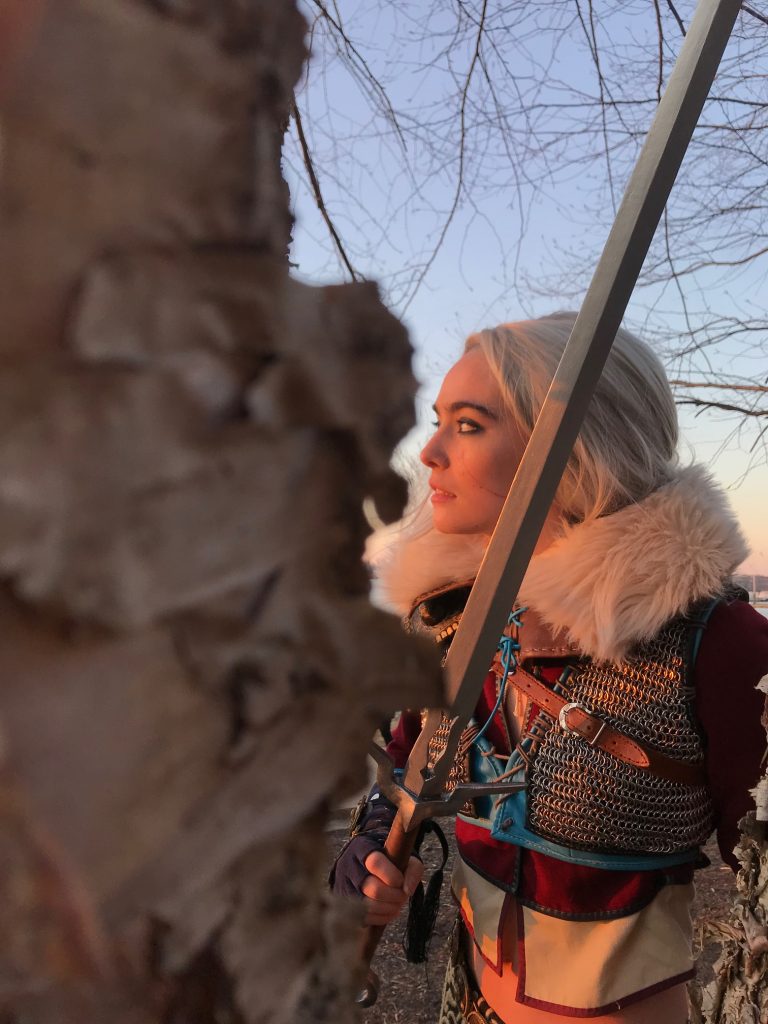
The other bit of Ciri I was really excited to tackle was the chainmail vest. Much like embroidery, linking thousands of rings by hand is the kind of meditative project that you can fall into for days at a time. I made things a little complicated for myself by choosing steel rings, which are much heavier and harder to open/close than aluminum, but overall I was pleasantly surprised at how quickly it came together. Even with some goofs along the way, the whole multi-layered contraption came together in just under a hundred hours.
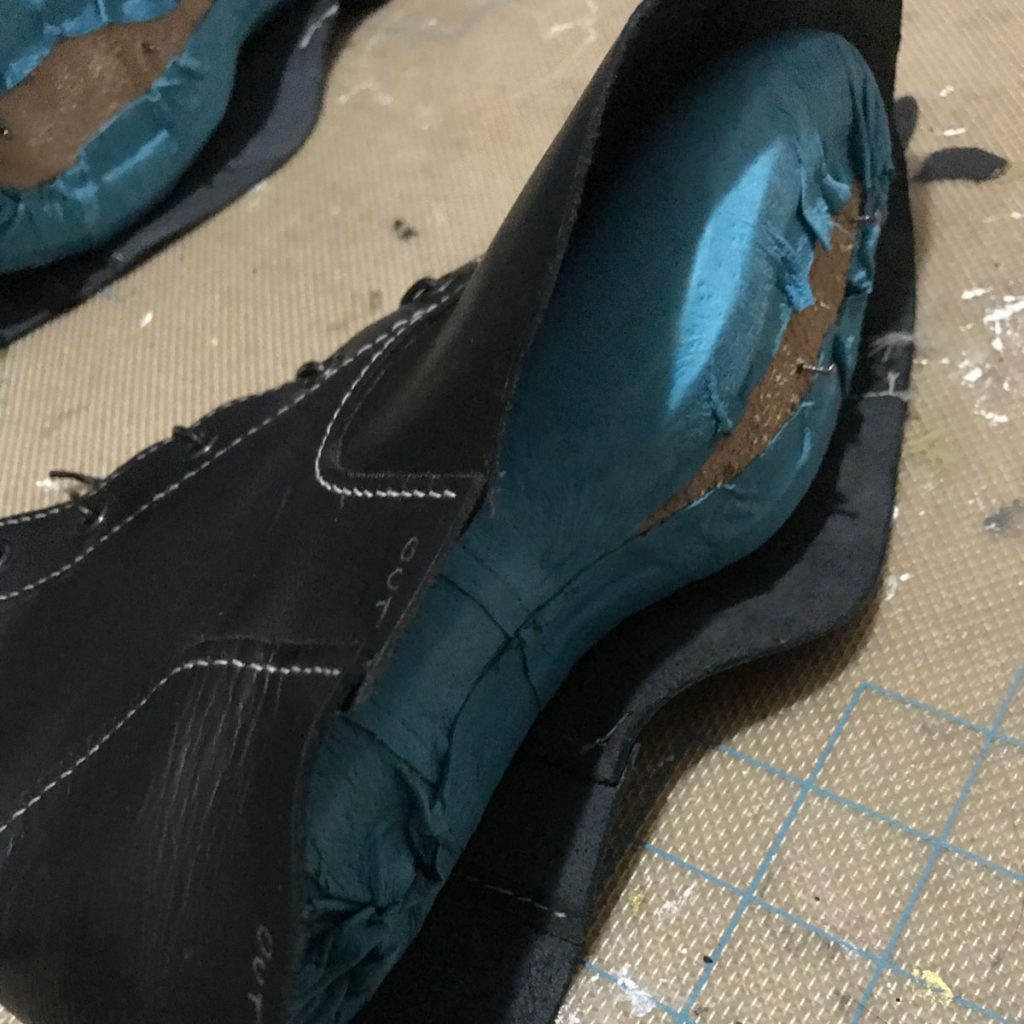
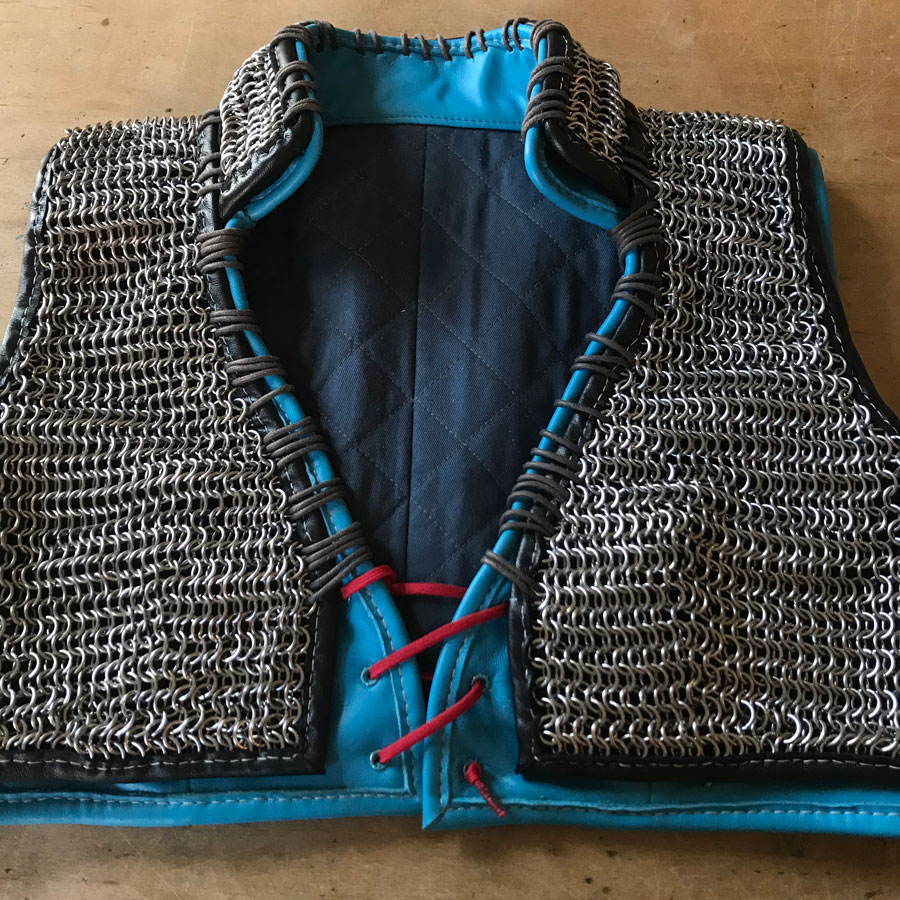
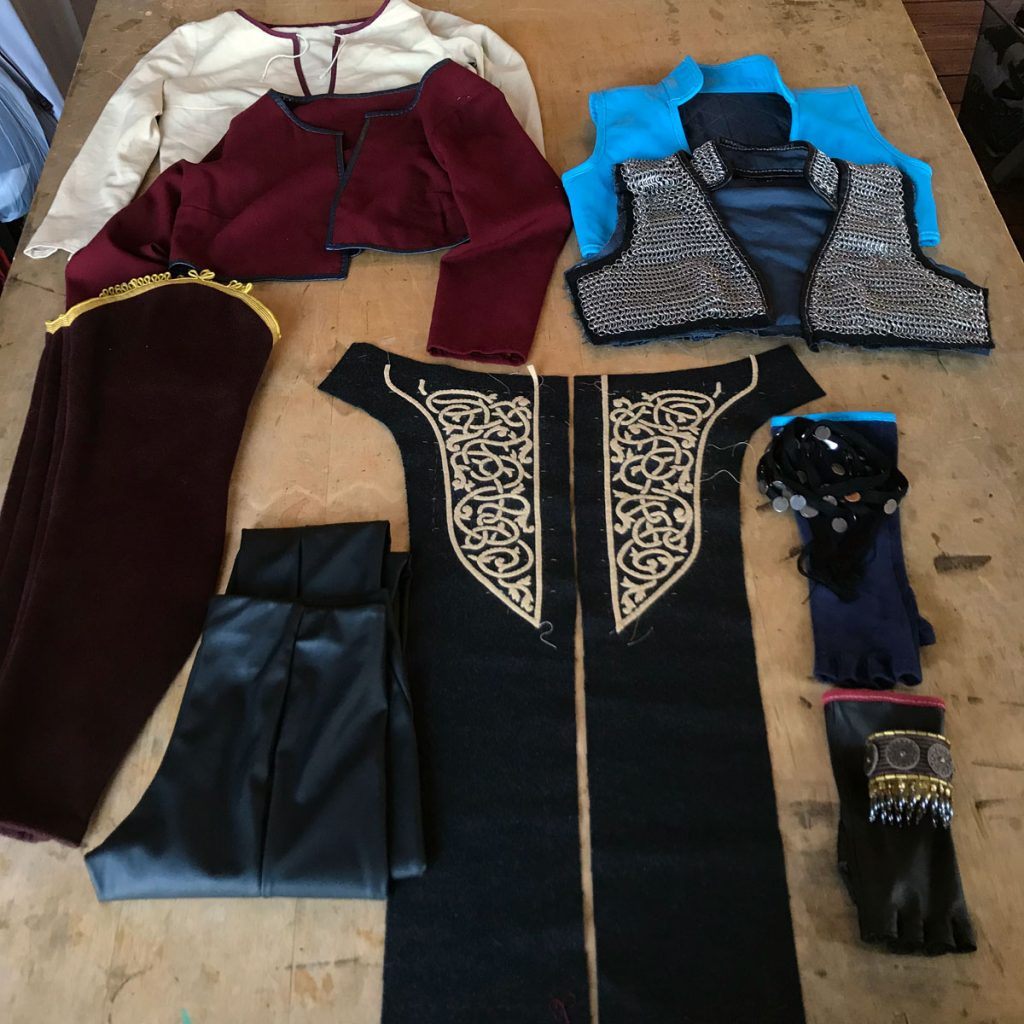
One important point to remember about a piece like this is that each individual layer of the vest adds a significant amount of bulk. The layers have to be constructed in order, from the inside out, because each additional layer needs to be fitted on top of the previous. That meant starting with the blue leather vest, and specifically with the lining for that vest. (The finished vest is six layers, ignoring the bindings: twill lining, cotton batting, aqua lambskin, more twill, wool melton, and steel mail.)
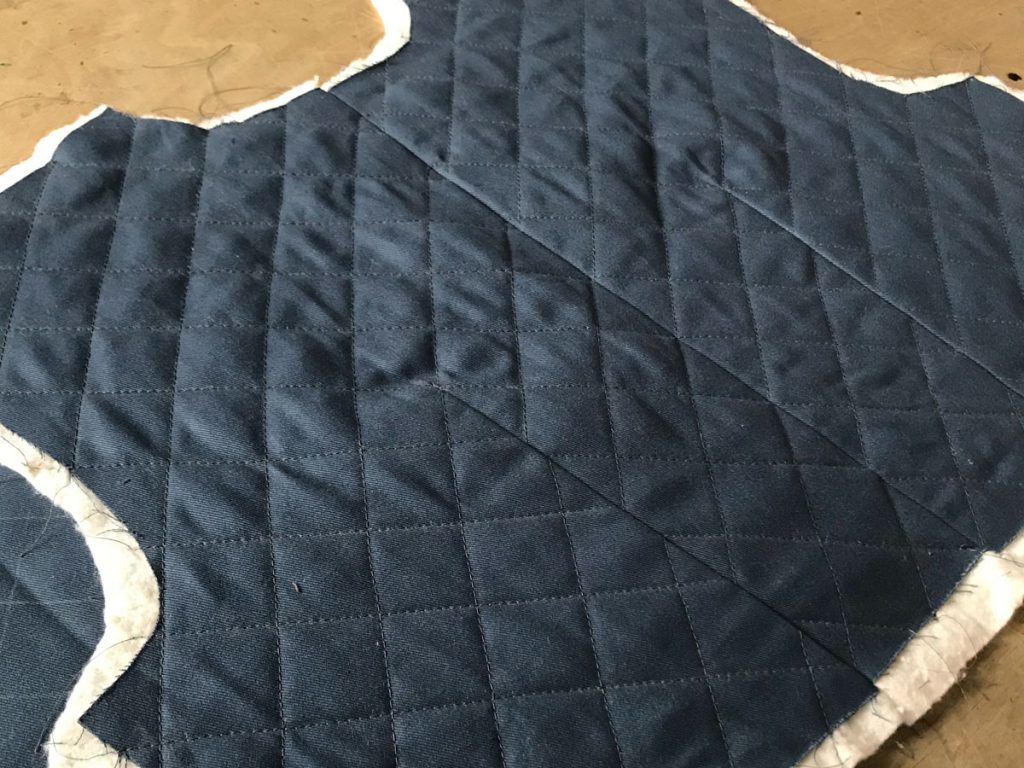
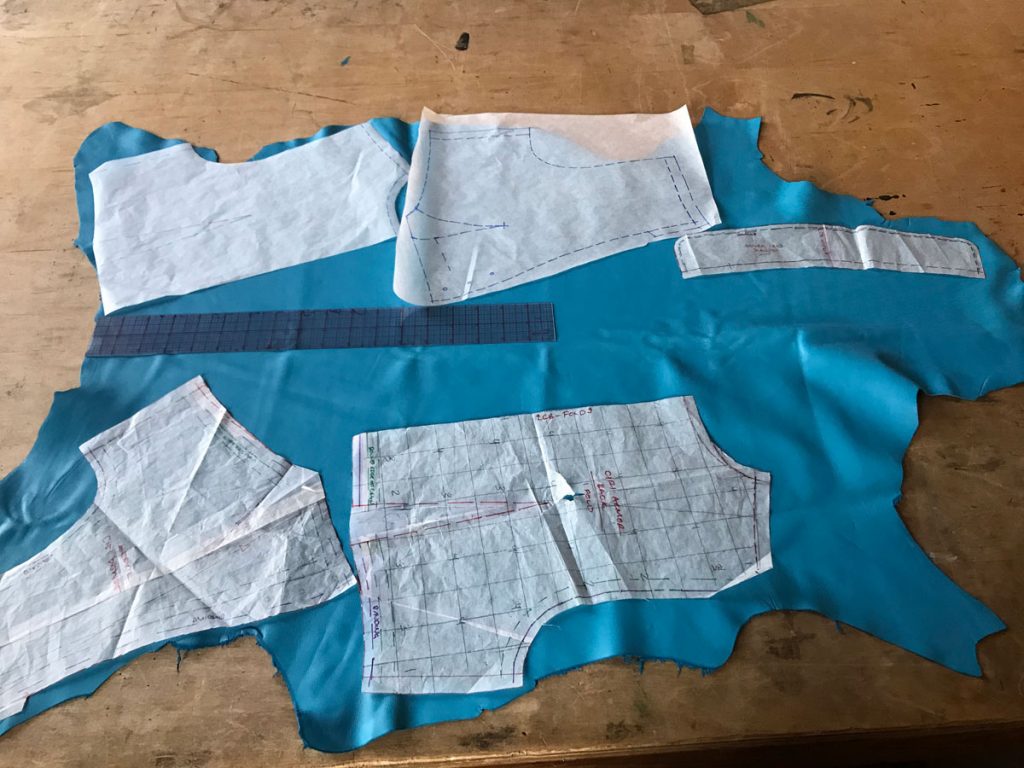
I started by drafting the pattern, again starting with my personal torso block, but tweaked for a snug fit around the ribcage so it would pull the looser shirt layers in and hold them in place. I wanted to give myself a little padding in addition to the visible leather layers, which would help to cushion the weight of the mail in addition to adding a dash of verisimilitude, so I decided to quilt the cotton twill lining to a thin cotton batting. I added a bit of extra allowance around the edges of the pattern pieces in case the quilting pulled them in, then cut them from cotton batting and twill and quilted them together, making sure to match the quilting lines along the darts, sides, and center back seam.
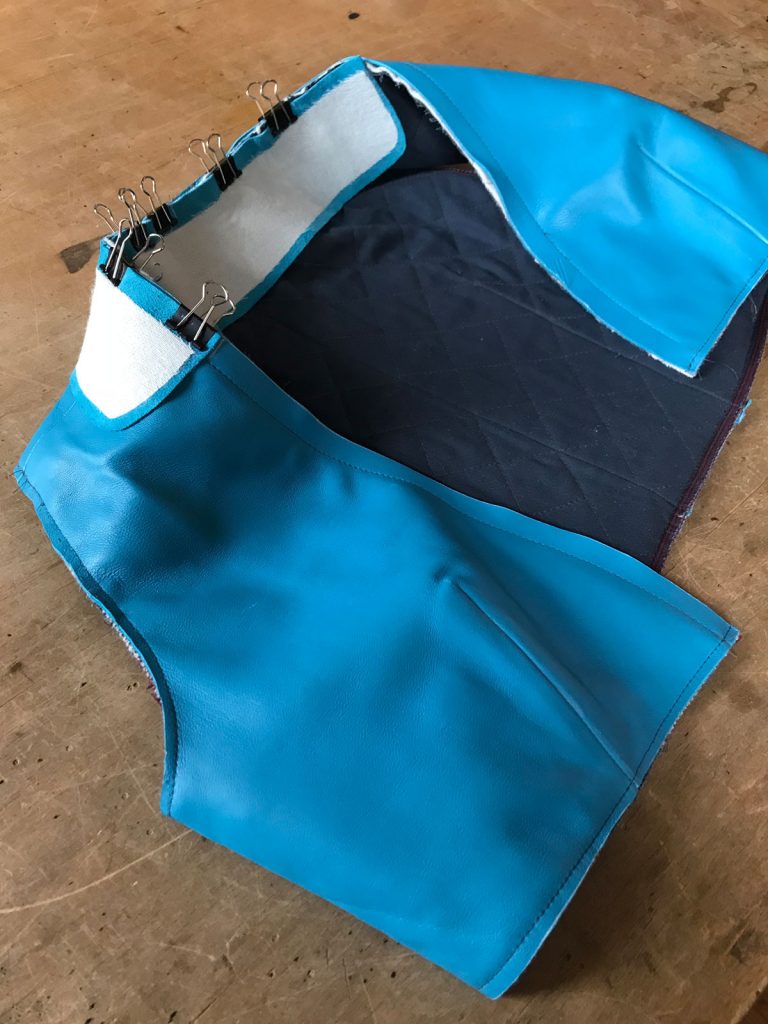
I copied my pattern pieces onto oaktag to make them easier to trace onto the leather, and laid them out on the right side of the leather so I could keep an eye out for flaws. I interfaced the collar with a medium-weight fusible to give it more heft, which is sometimes a little dicey since leather doesn’t like high heat but worked out fine in this case. I was also a little worried that my domestic sewing machine wouldn’t handle the leather bulk, but it’s a tough little mechanical beastie and I didn’t have any problems with assembly or even attaching the collar.
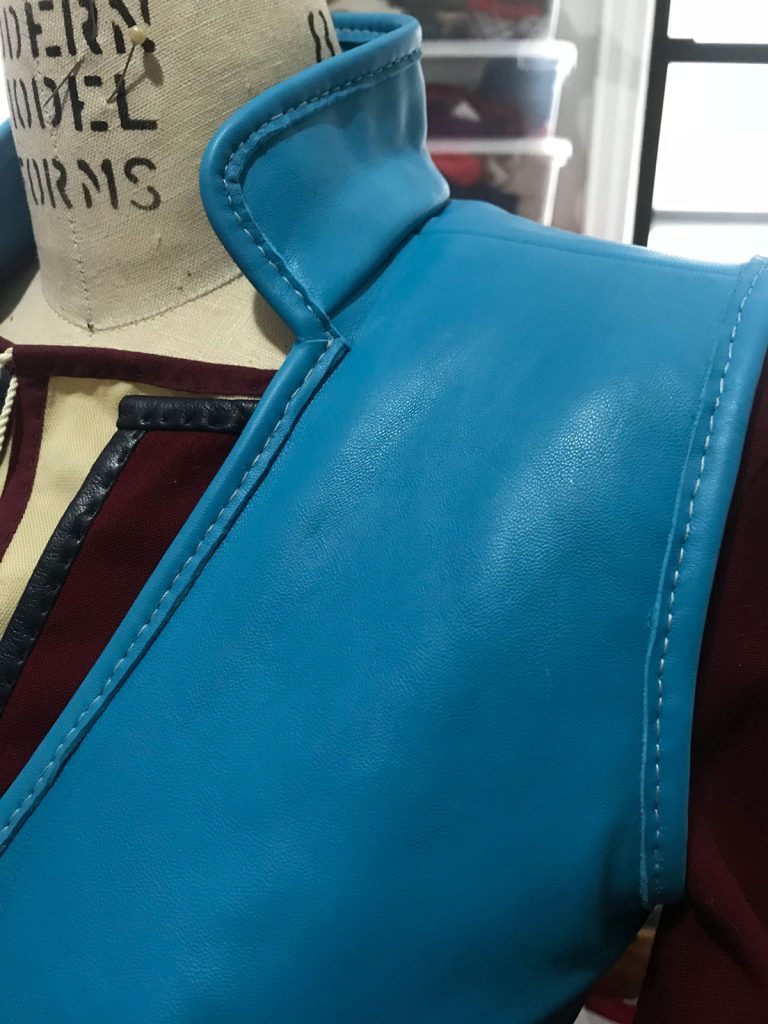
After assembling the leather shell with the lining, I bound over the edge with more of the blue leather. I cut the strips slightly wider than needed, glued them on with the excess to the inside, and used gel pen and marking wheel to mark out the hand stitching. Then I saddle stitched by hand through all the layers and trimmed away the excess.
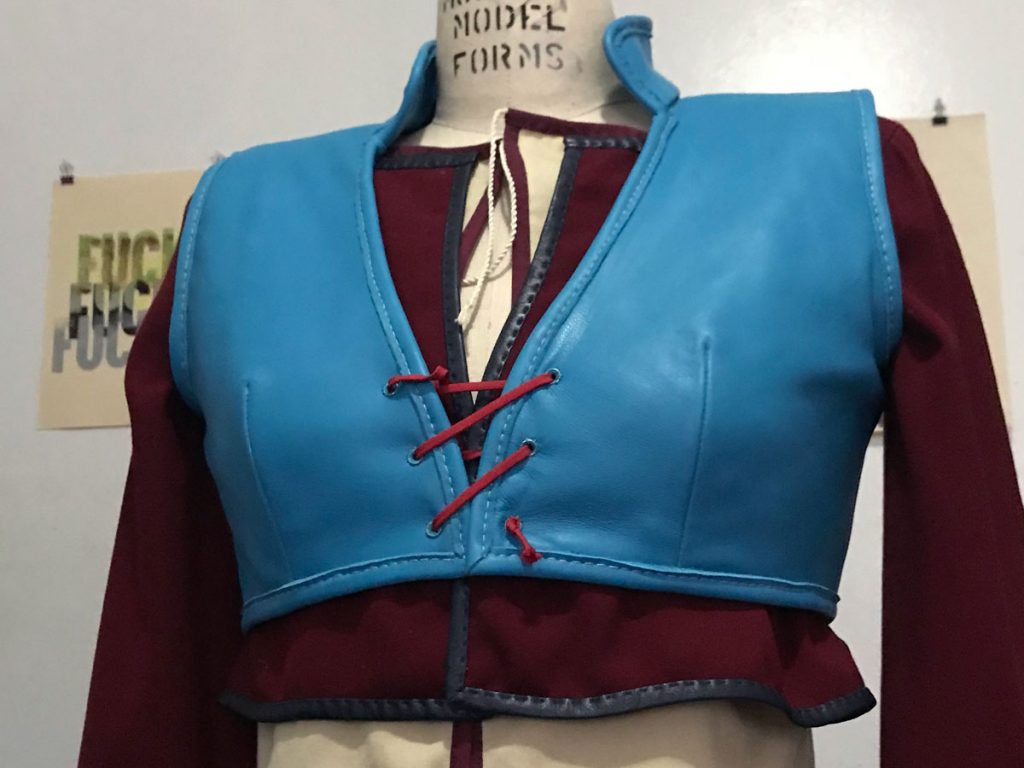
For the front closure, I poked holes with an awl and did hand-sewn eyelets with a jump ring in each for reinforcement. The red cord in the picture is a placeholder, which I eventually swapped out for an old shoelace to get that authentically weathered look.
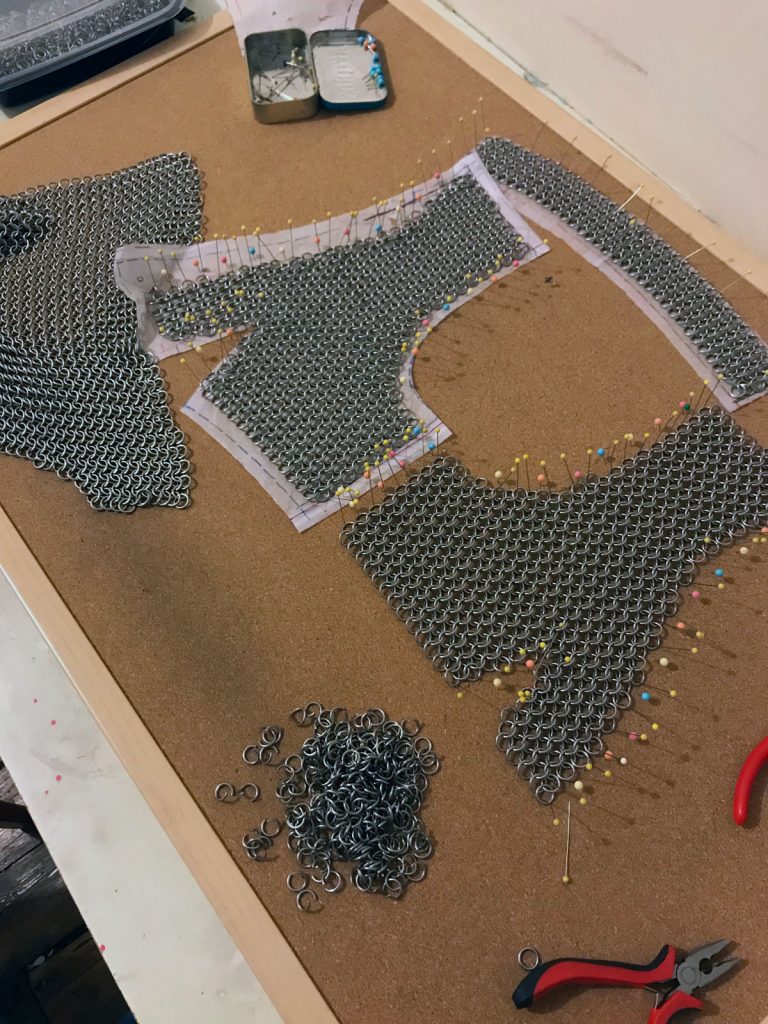
The mail vest was created using a basic European 4-in-1 weave, which seemed to be the best match for the art, with the small refinement of darts to give it a closer fit under the bust. I drew a grid on the leather vest pattern to estimate the area for my ring order, and ended up using about 4000 steel rings in 16ga 5/16″ diameter. I pinned my pattern pieces to a corkboard and assembled the mail on top of them, using pins to keep everything lined up and keep the mail from slithering around, then created the other side as an exact mirror image by counting rings in each row. For me it was easiest to speed-weave horizontal chains of three rows each, then link them up to the rest of the vest once I’d reached the full width. I did the front and back separately, following the pattern pieces, then linked up the darts and shoulders.
At this point, I had something that looked like a vest but had secretly encountered my big goof. The width I’d calculated for the back was actually a bit too narrow once it was layered over the bulky leather vest, so it was stretched against gravity across the back of the shoulders. That caused the rings to open up and create a visible distortion in the weave. The only solution was to unlink the entire center back and add more width, so I spent several days adjusting that and then tinkering with the overall length and edge shapes to get it to match up with the vest pattern.
The next step was to secure the mail layer to its backing. I just needed something dark colored and relatively sturdy, so I used more of the same wool coating I used for the skirt panels. Because of the significant weight of the mail (the finished vest weighs about five pounds,) the backing layer required some engineering for stability. I interfaced the neckline and edges with a fusible weft insertion and padstitched twill tape along the seamlines.
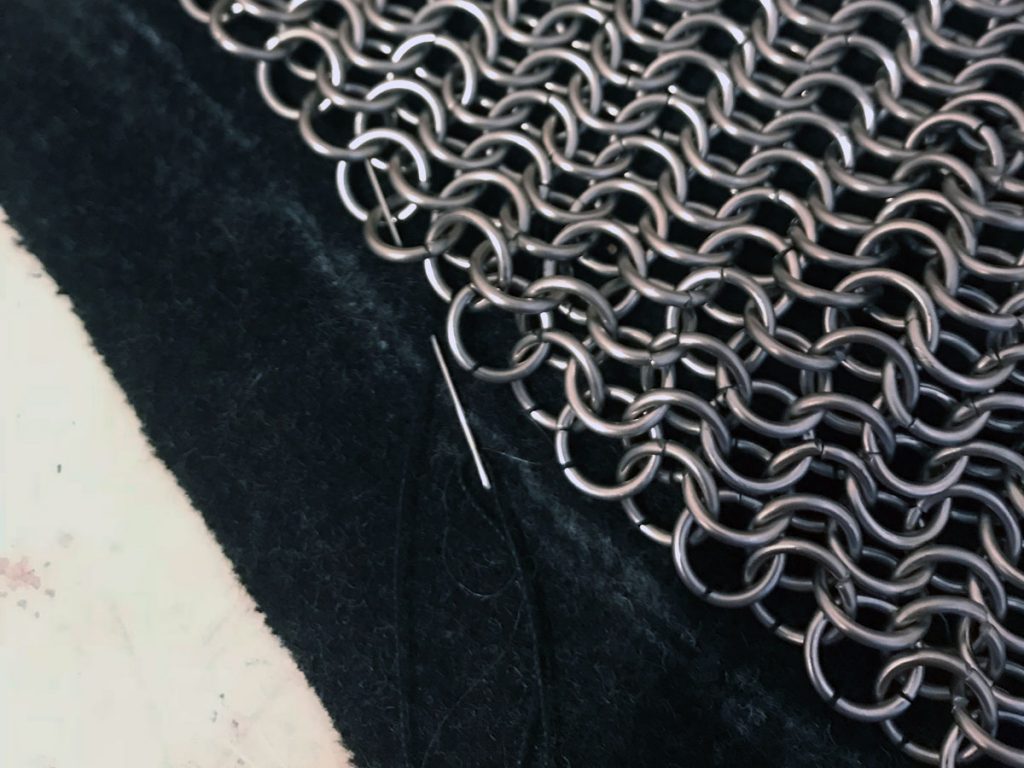
Then I sewed on the mail, catching each ring with heavy thread and making sure that the rings were completely closed so they wouldn’t slip out. I did some additional finessing of the mail width and length, especially in the back, as too much length or width would make it sag and too little would cause the unsightly stretched look. I didn’t trim away the excess wool until the rings were fully secured and I’d checked the proportions over the blue vest one last time. Once everything was reasonably solid, I lined the wool layer with another layer of cotton twill and bound the edges in black leather using the same method I used for the blue vest. Here it turned out to be a very good thing I was stitching the bindings by hand, as I was able to stitch through the individual rings and further reinforce the mail edge.
The chainmail for the vest is joined at the shoulders, then bound all the way around the edges, and the underarm seams and collar are laced together with cord. As I started to assemble the vest I discovered another error, which was that I had neglected to account for the material thickness in determining the second collar length. Not only did the chainmail vest have to be bigger to fit over the blue vest, but the collar had to be longer so that it would fit nicely around the outside of the blue collar. I ended up having to dismantle my first collar (which I’d already fully assembled and bound) and extend it a good inch before it looked right.
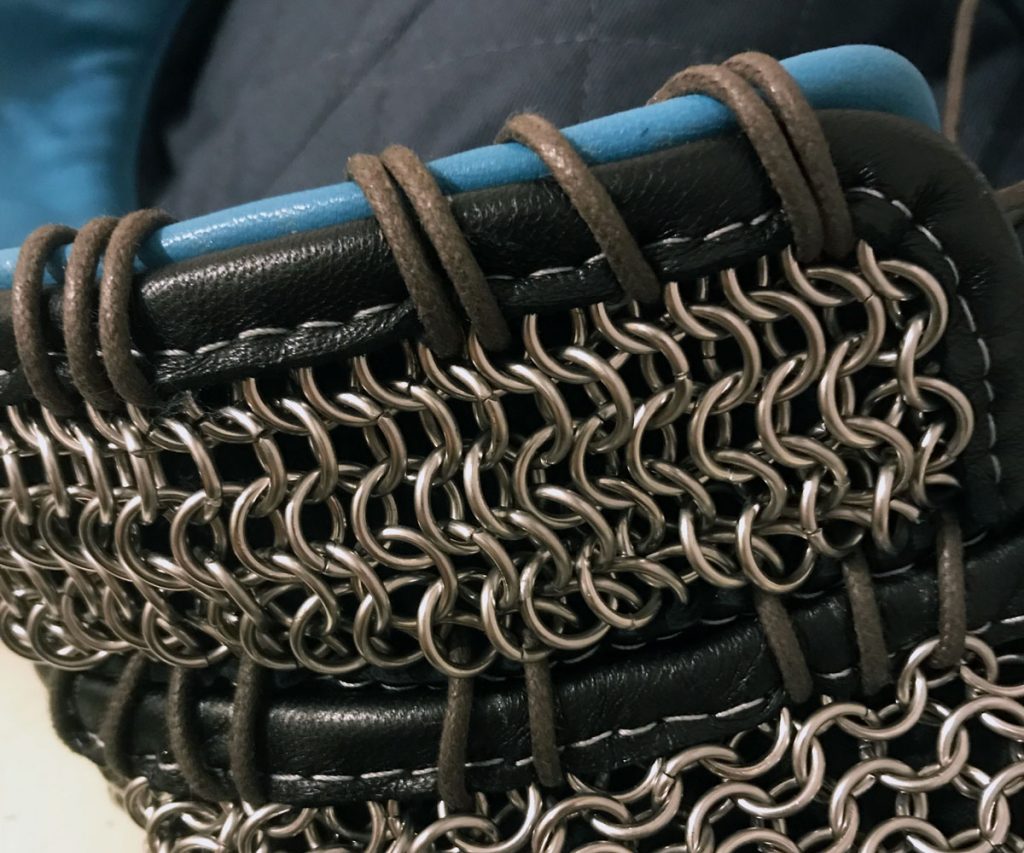
Finally, I punched holes with an awl and laced the two layers together with waxed cotton cord. The cord was too thick for any needle I own, so I improvised a bodkin with a scrap of brass tubing (cut at an angle to form the point, then crimped onto the end of the cord with a pair of pliers.)
]]>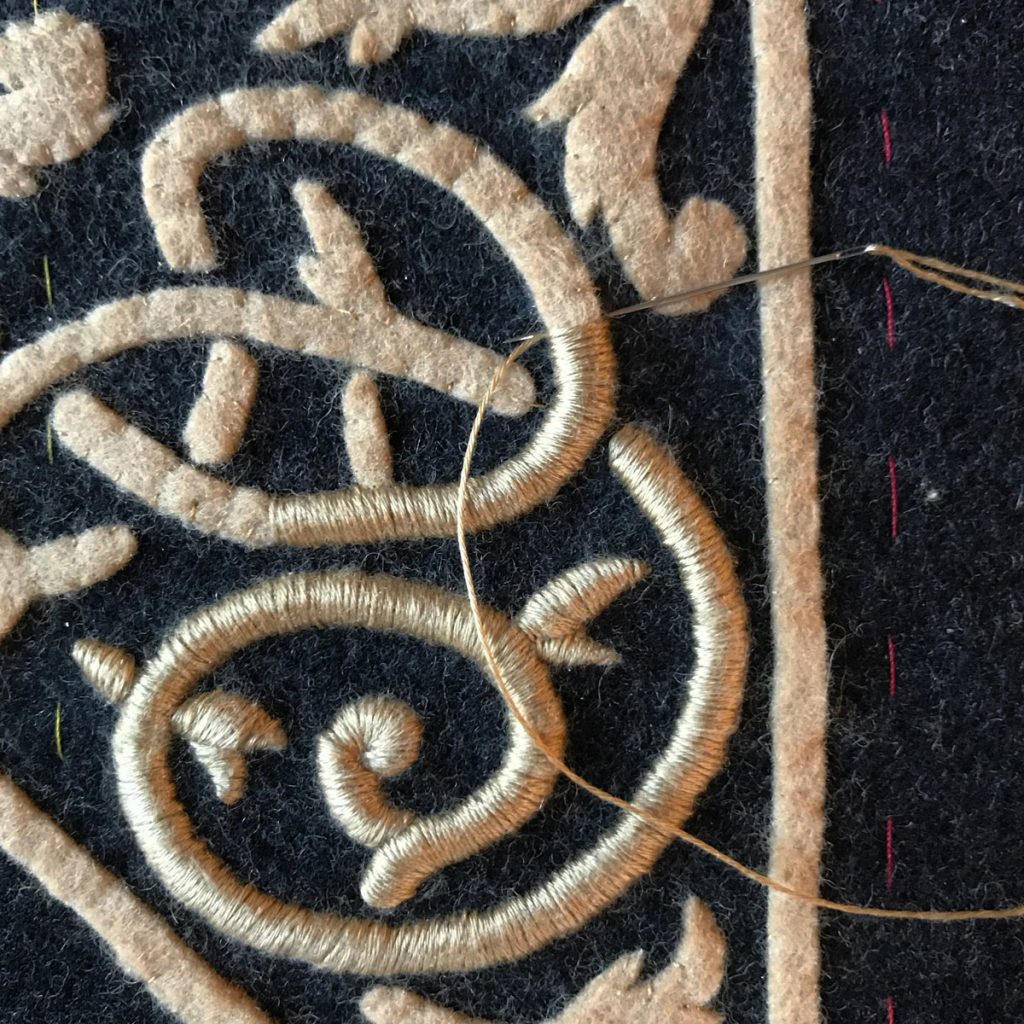
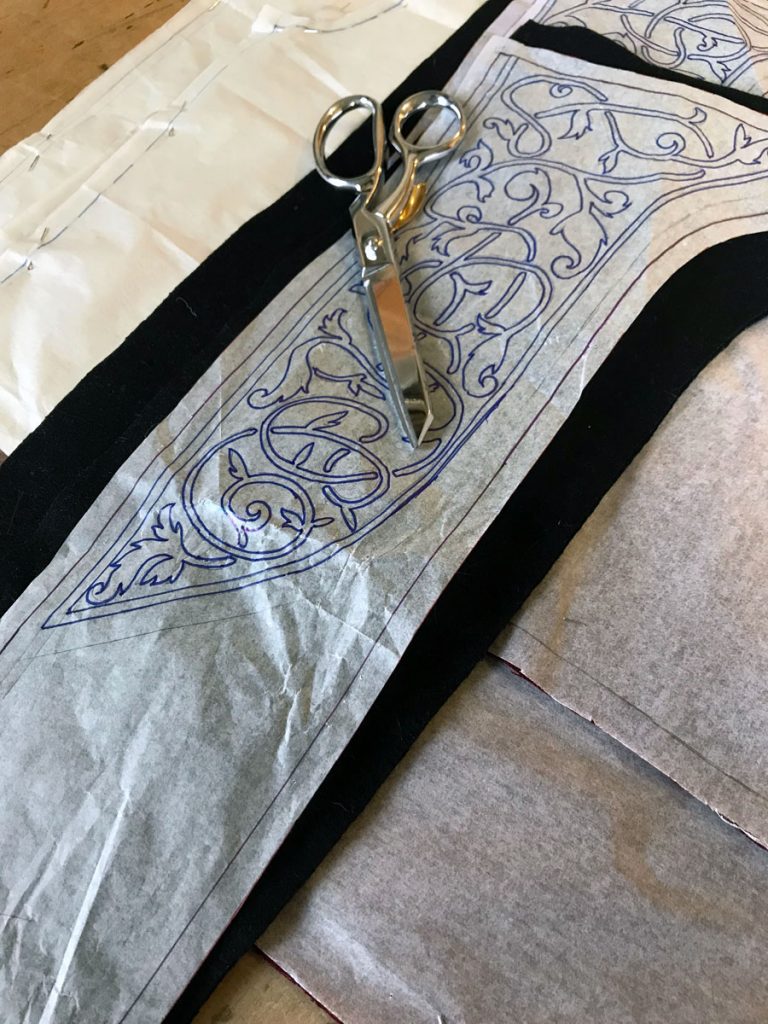
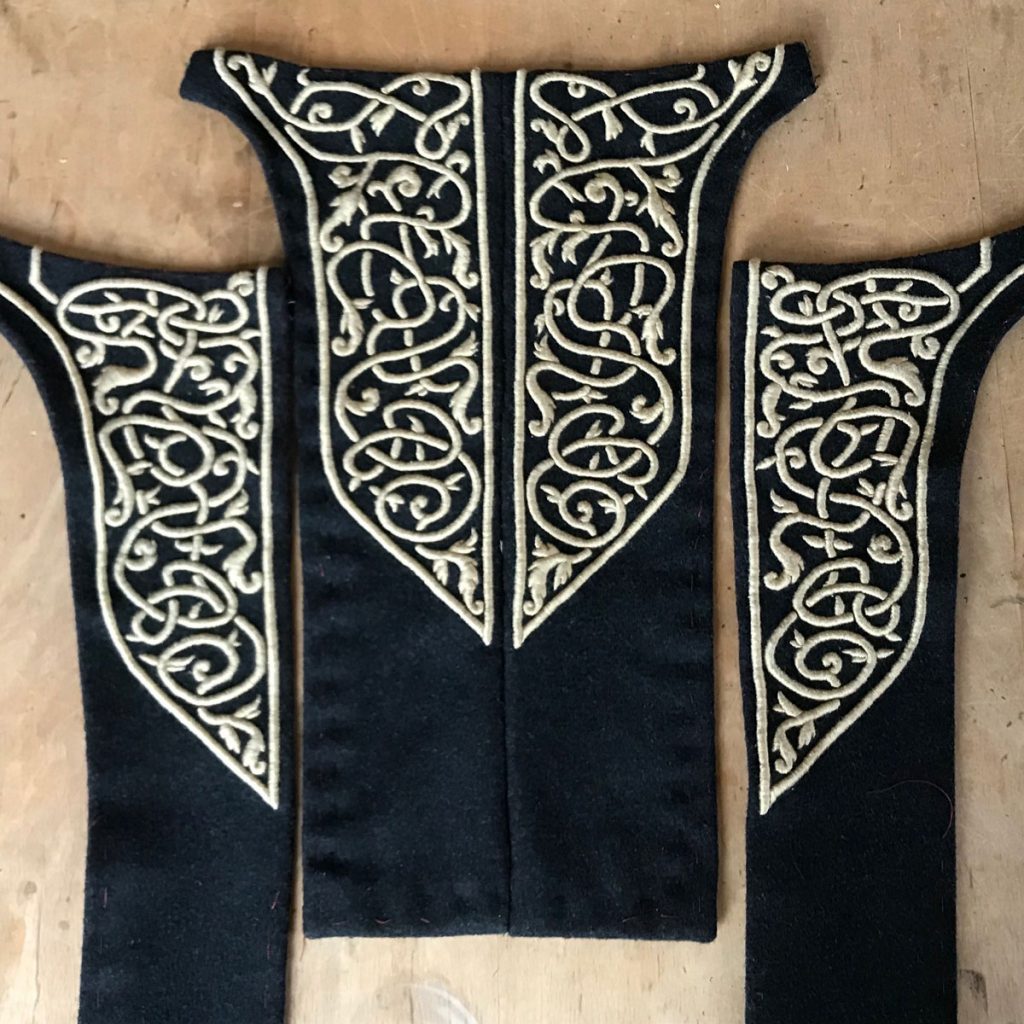
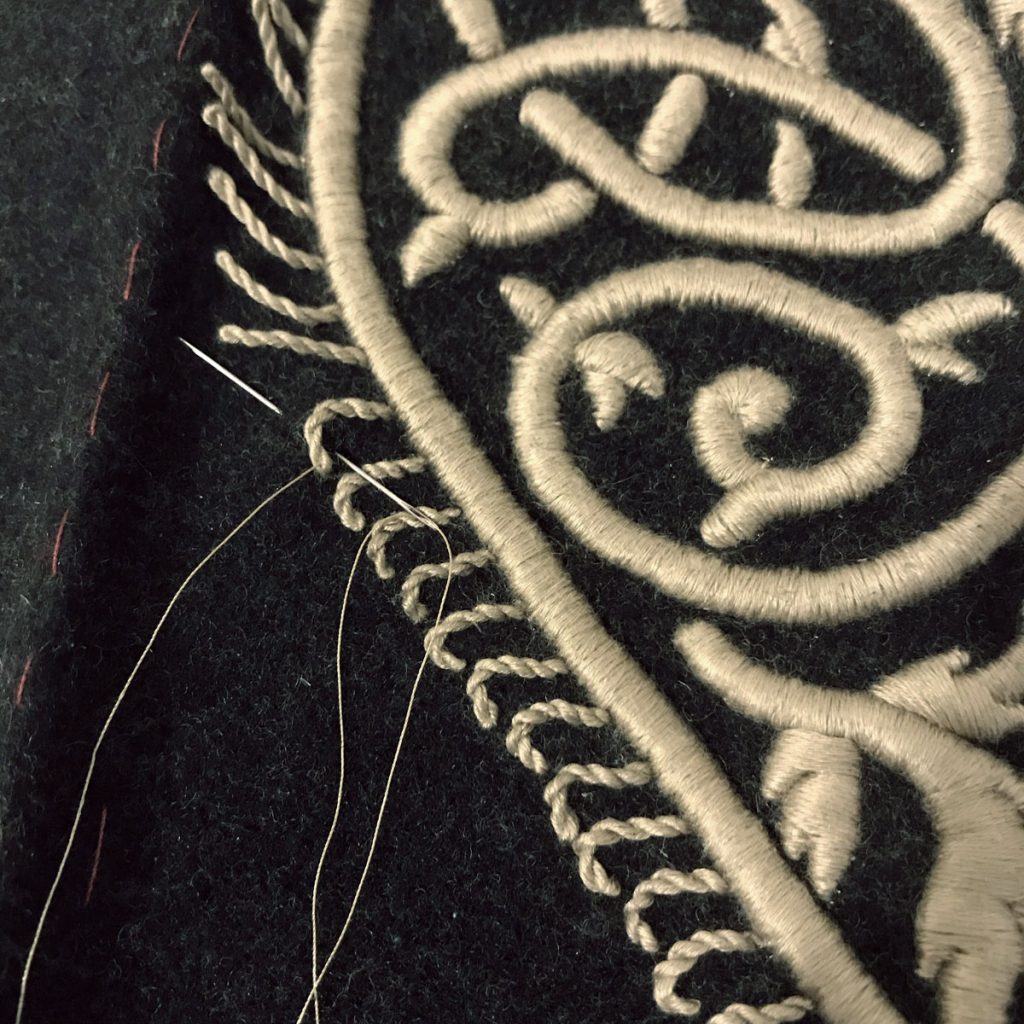
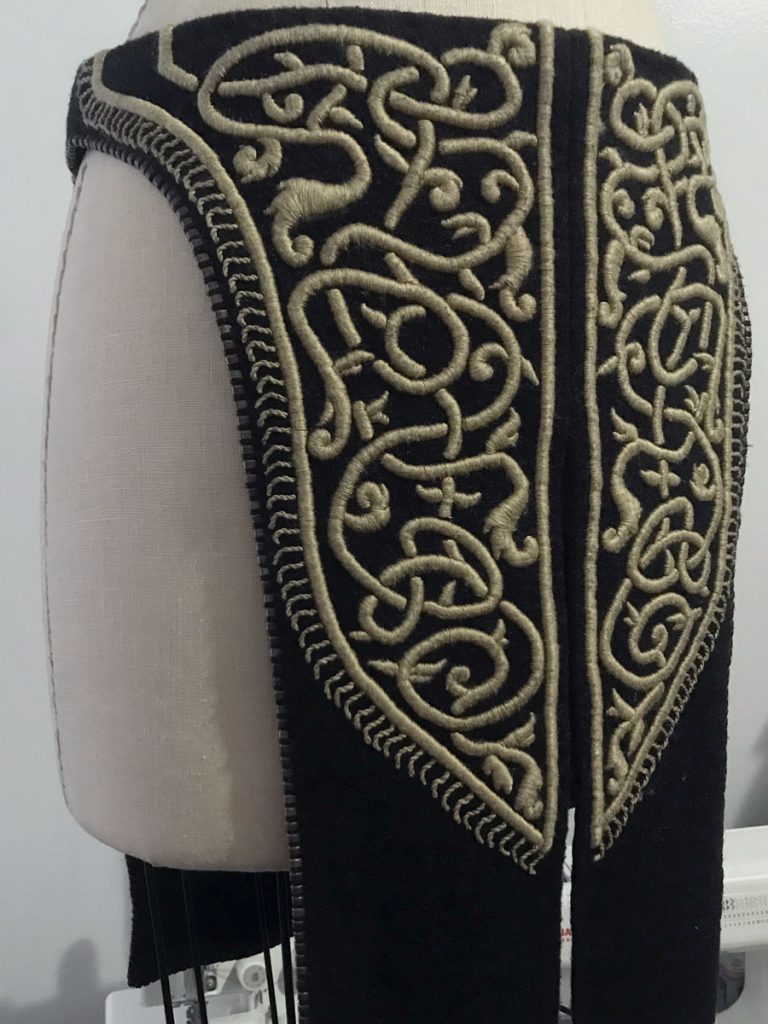
By far the longest part of the Ciri build was the hand embroidery on the skirt panels, which used about 500 yards of embroidery thread and took more than 250 hours to complete. It was also one of the main things that drew me to this particular project, so I pretty much got what I came for with that.
The base fabric for the skirt is wool-blend melton I’d had sitting around for years. I did pretty well at using fabrics I already had lying around for this project, although the leather, embroidery thread, and worbla more than made up for any sensible, economical choices I might have made here.
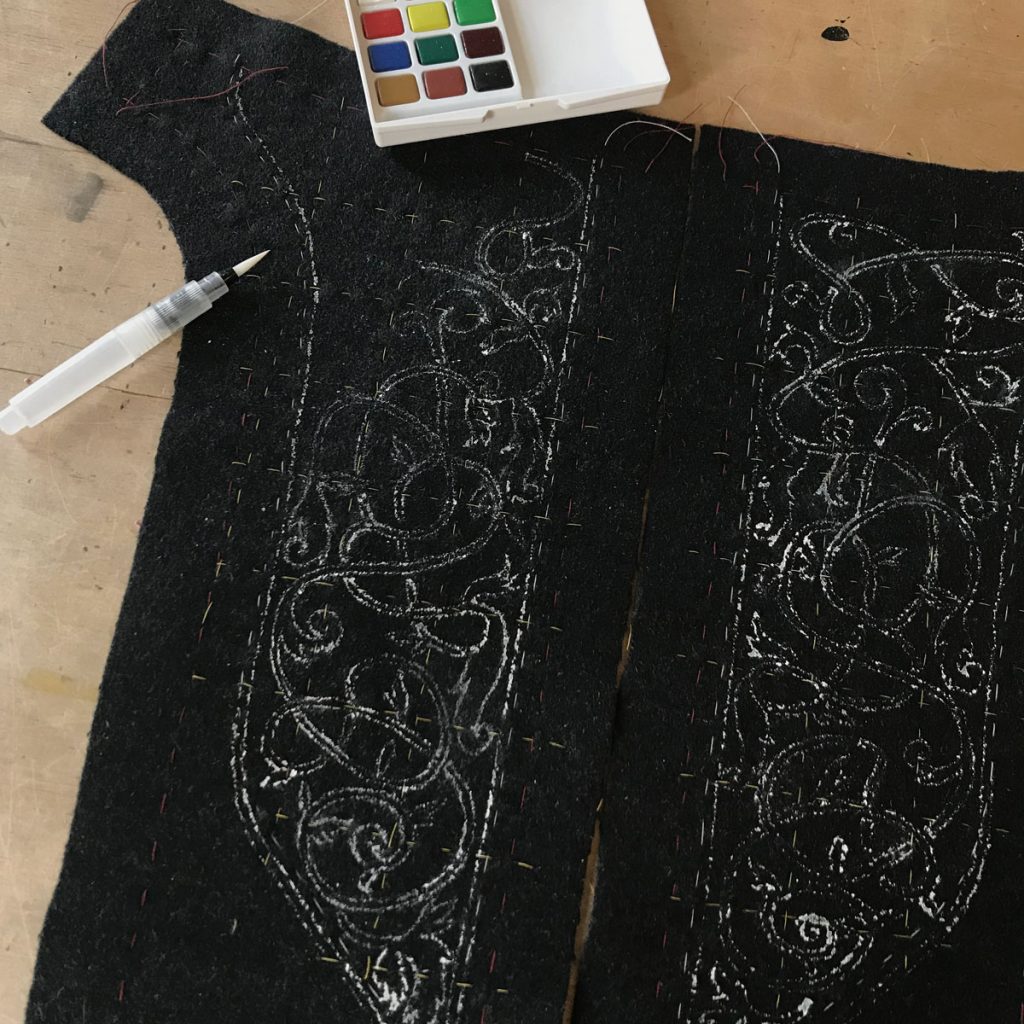
The napped surface of the fabric proved difficult to mark – too dark for ink or pencil, didn’t like gel pens, and shook off colored pencil and chalk like they’d never been. So finally I basted in a reference grid and freehanded the design with watercolor (a tip I picked up from embroiderer Mary Corbet.) This turned out to be an ideal method: it floated on the surface of the nap and didn’t soak in too much, didn’t budge with handling, but wiped away beautifully with a little water (I did most of my cleanup with a wet brush or cotton swab and a tissue to absorb the excess).
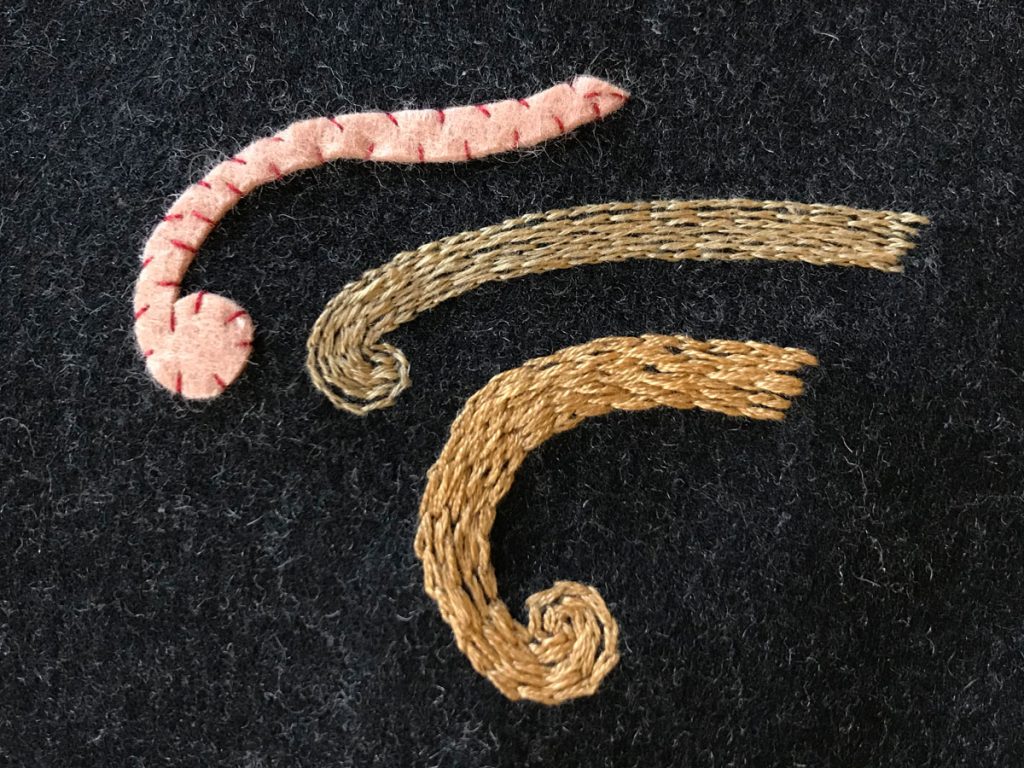
I tested a couple of different padding methods, but I liked the extra loft I got from wool felt. This is a more conventional padding method for goldwork than for regular satin stitching, but given the chunky base fabric I liked the way it rounded out with the stitches over it. It was also much faster than the stitched padding methods I tried, even though each individual piece had to be cut and whipstitched down by hand. The only drawback was that I had to be a little careful about the rounded ends of the padding pieces, so that the stitches wouldn’t slip off and leave gaps.
I also tested several threads for the satin stitch and chose cotton floche for the subtle sheen, fine weight, and stitch quality. It comes in gigantic 150-yard hanks, quite economical for a giant project like this one, and the smaller strand doesn’t need to be split before using. I wish it came in more colors, but it’s definitely going to be a favorite going forward.
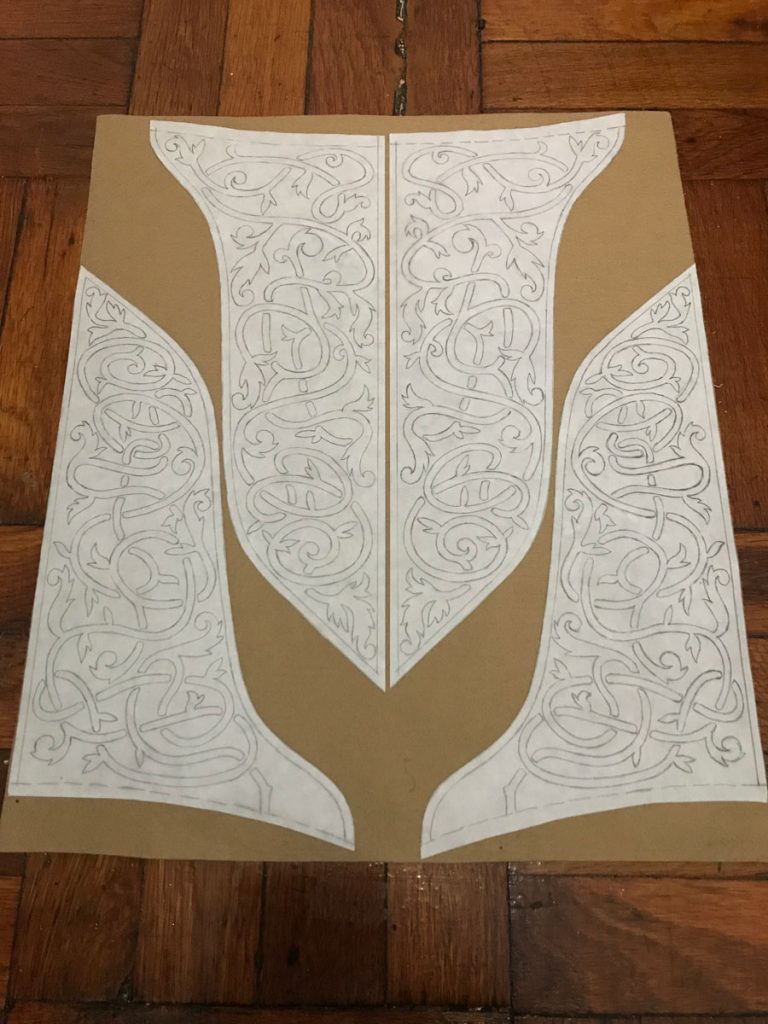
I traced my embroidery pattern onto freezer paper and stuck it to the felt with a warm iron, then cut out the pieces with the paper still attached. Not great for my scissors, but much easier than trying to pin all those fiddly bits and it also made it easier to keep track of which piece went where.
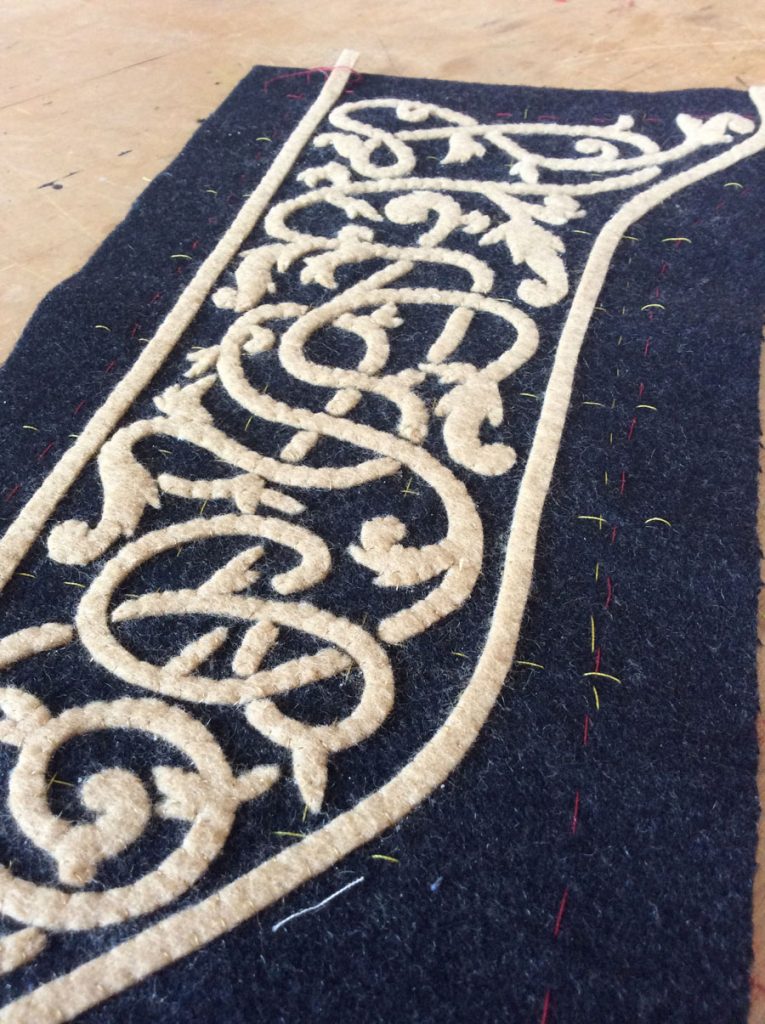
I sewed each piece down with a small whipstitch in fine thread. This was the point where it started to look like a real thing, which was exciting, but of course I still had a couple hundred hours of satin stitching to go.
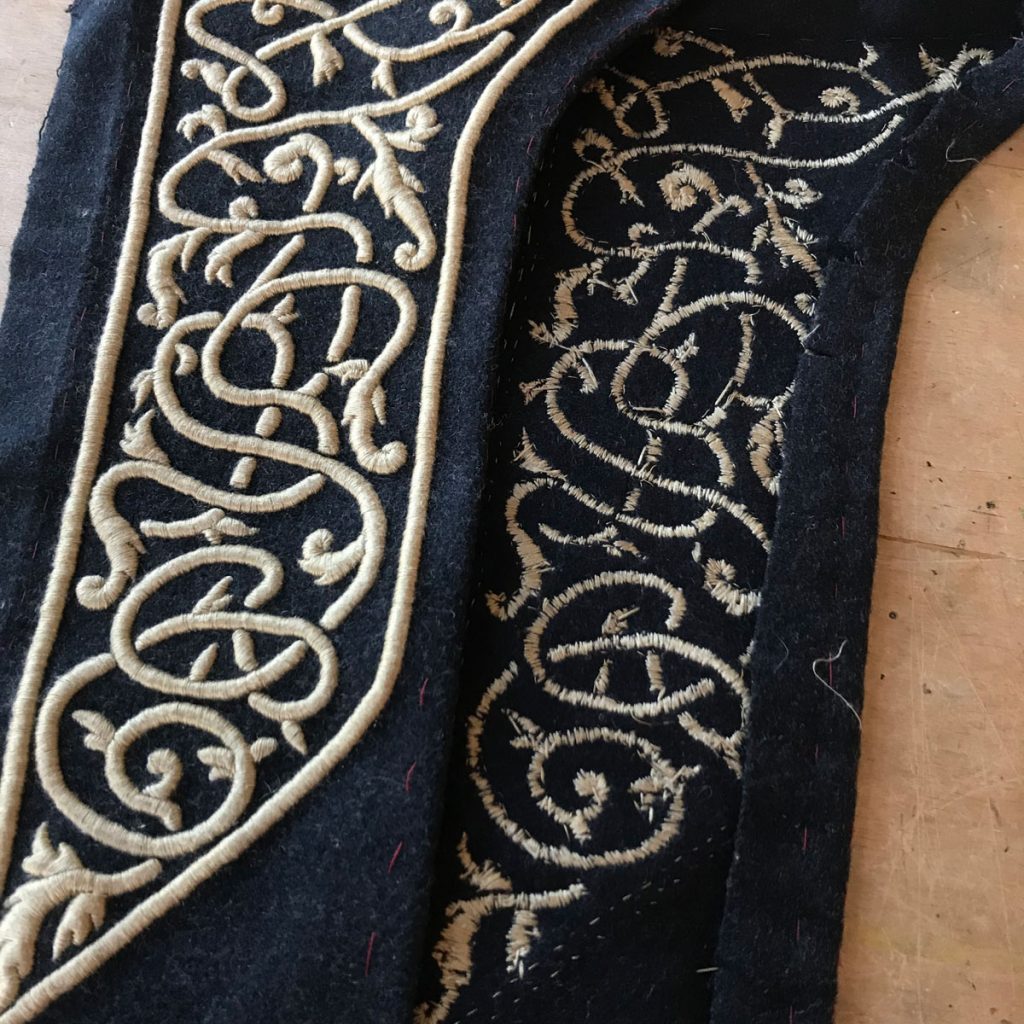
I started the satin stitching on the back of the skirt, which was both good and bad. It let me figure out the technique and stitching rhythm on a less visible part of the costume, but it also meant that the front and most visible part of the skirt was still unfinished as of the costume’s debut at NYCC 2018.
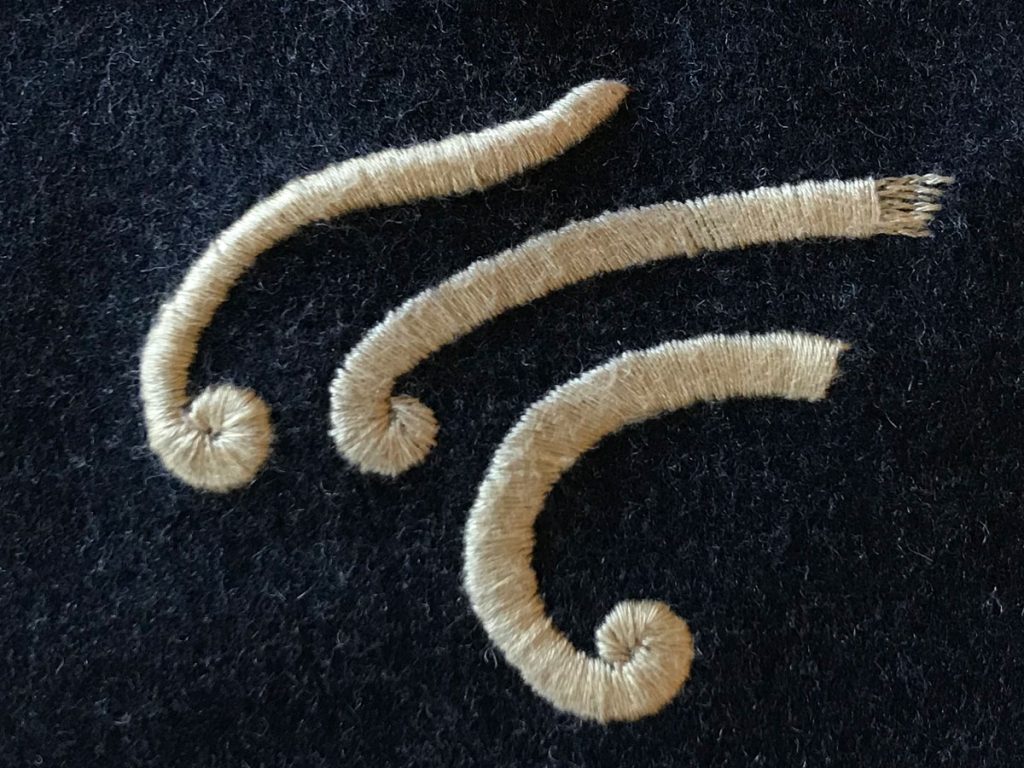
After the costume’s first outing, I took the skirt apart again to finish off the embroidery. The skirt in the art has a curious curly border design that didn’t match any stitch I’m familiar with. Given the amount of padding on the satin stitching, I knew I wanted something substantial so that the border wouldn’t look spindly in comparison.
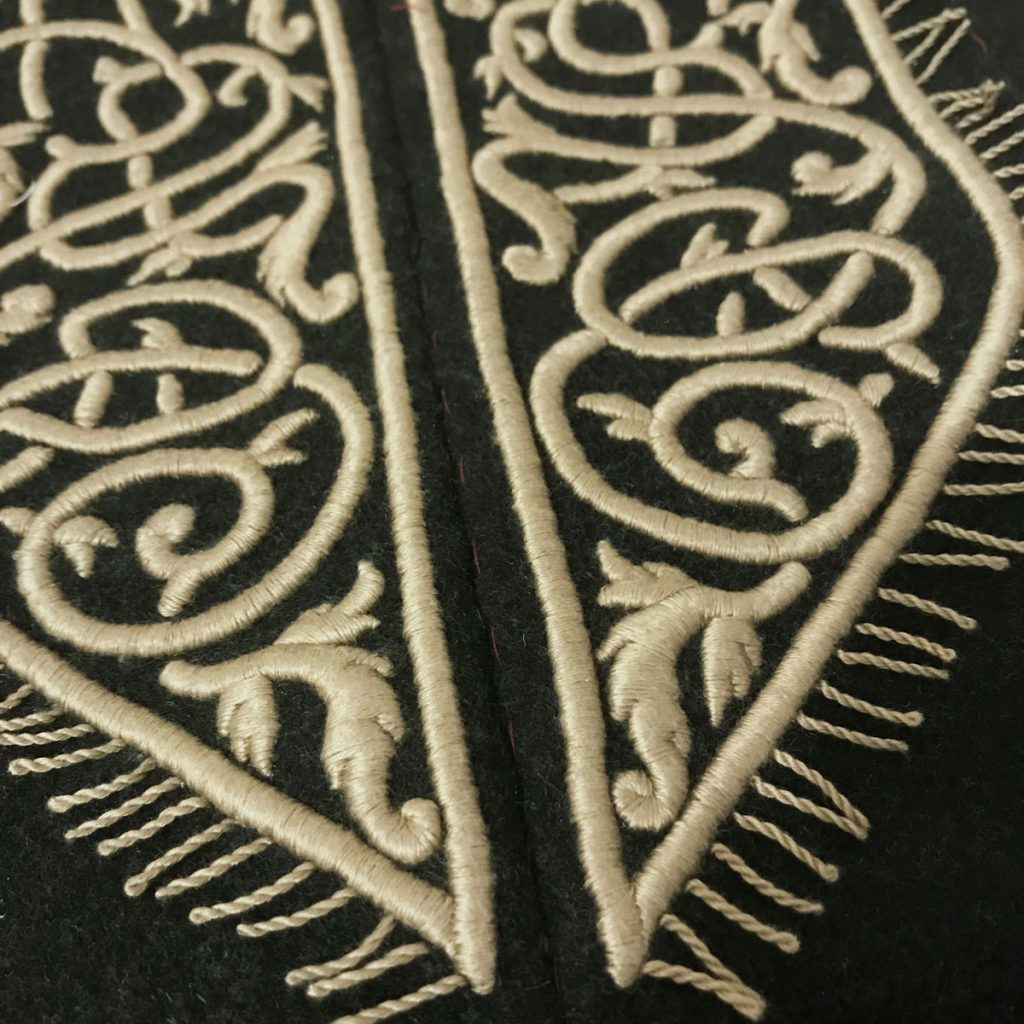
What I came up with was a twisted fringe stitch, using a quadruple strand of the same embroidery thread twisted until it doubled back on itself. I stitched the fringe at roughly 1/4″ intervals around the border, then couched each strand down in the curl shape with fine thread.
This may not be my sole invention, but it was not a technique I’d seen before employing it here! So there’s my gift to future Ciri cosplayers, I promise it goes faster than the satin stitching did.
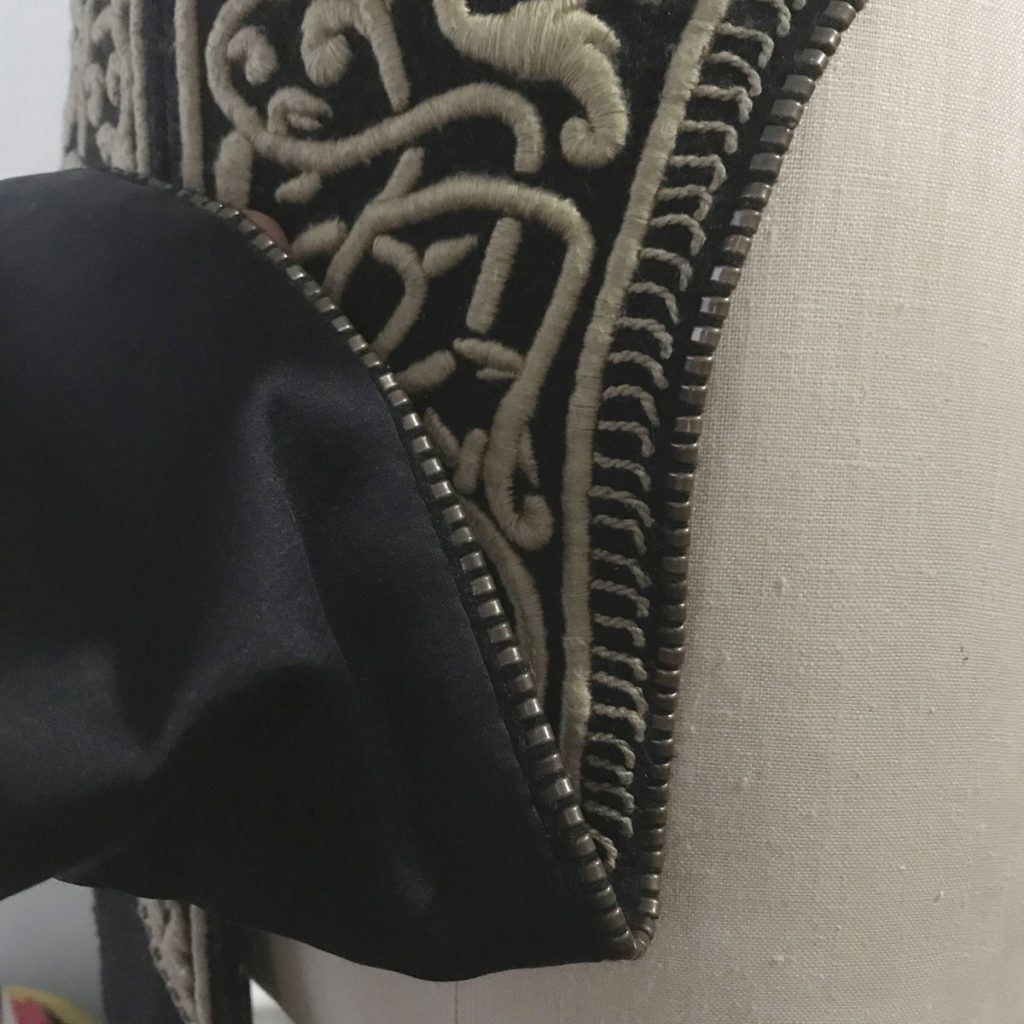
When all embroidery was complete, I assembled the panels and basted in the hem around the edges, then sewed in the cotton/rayon satin lining by hand. Finally, the outer edge was finished with several hundred individually applied size 7 zipper stops. (With thanks to Rachel Tobin, whose gift of 500 stops got me out of a jam when my usual supplier was out of stock at the last minute.)
To prevent the stops from rippling the edge as they were applied, I sewed a hand gathering stitch along the folded edge of the fabric and pulled it up as I worked. I realized a bit too late that it would have been clever to do a piped edge, as it would have given the stops a little more meat to hold onto while preventing any distortion, but this worked well enough. Almost exactly a full year after I first started the embroidery, the skirt was done.
]]>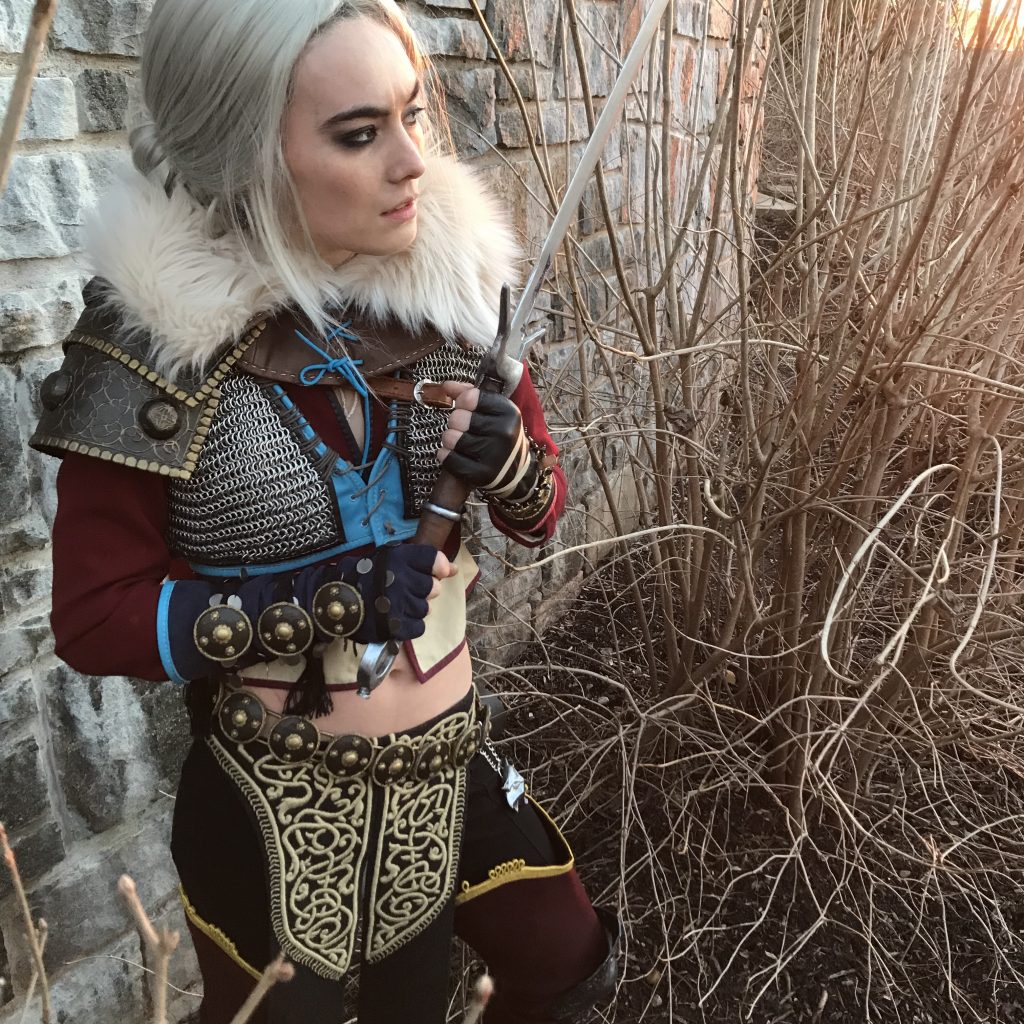
I spent about a year and a half on my first leisurely playthrough of The Witcher 3, which I wrung dry for every single side quest and map icon, and after all that I was still so attached to the characters that I immediately binged through the book series as well. Although I went in expecting to adore the sorceress Yennefer, I found myself even more drawn to Ciri—princess, bandit, interdimensional traveler, sorceress, and witcher, brilliantly independent and incredibly fun to play.
I’ve now been working on my own Ciri costume for a bit more than a year and a half as well, and documented plenty of the process on instagram and elsewhere. But it turns out I have a lot more to say about the whole business than I’ve ever managed to type in an insta caption, and it’d be nice to have it all in the same place, so I’m going to start rounding up all my wip photos and notes to create the definitive recap right here. The plan is to make this even more exhaustive than the build book I put together for competition purposes, and hopefully it’ll also be of some use to other folks who might be interested in making this costume themselves.
I opted to build Ciri’s alternative outfit largely for the range of techniques and materials it called for. I enjoy detailed, meticulous work, so the use of embroidery, chainmail, and trims appealed to me, but I was also excited for an excuse to experiment with some other techniques—tablet weaving for the wrist wrap, detailing worbla with puff paint, sculpting and casting the belt links, making the sword.
I didn’t opt for strictly historical construction or materials, but I aimed to create pieces that would both look and feel appropriate to the world while allowing me to achieve a high level of detail and build quality. Barring the pants and a few trims, I chose natural materials like wool, leather, and cotton for all the clothing. Although steel rings are somewhat more difficult to work with than aluminum, and the weight posed some construction challenges, they lend the mail vest a convincing heft.
I’m still wrapping up a few final details for this build, which I hope to show off in its ultimate form at C2E2 next month. I have to admit I’m itching to be done and move on to the next thing, but first I have to give my beloved bandit princess her due!
]]>
I’m not the most reliable poster at the best of times, but as it happens I’ve had an extra good reason to be Internet Quiet for the last few months. See, this trio of ridiculously talented makers – Lauren, Sharon Rose, and CutiePieSensei – have been working their behinds off to replicate the Captain Marvel movie suit for the latest Marvel Becoming episode. That’s a major project by itself, so when they wanted to add a certain significant jacket to the ensemble I got called in as reinforcements.
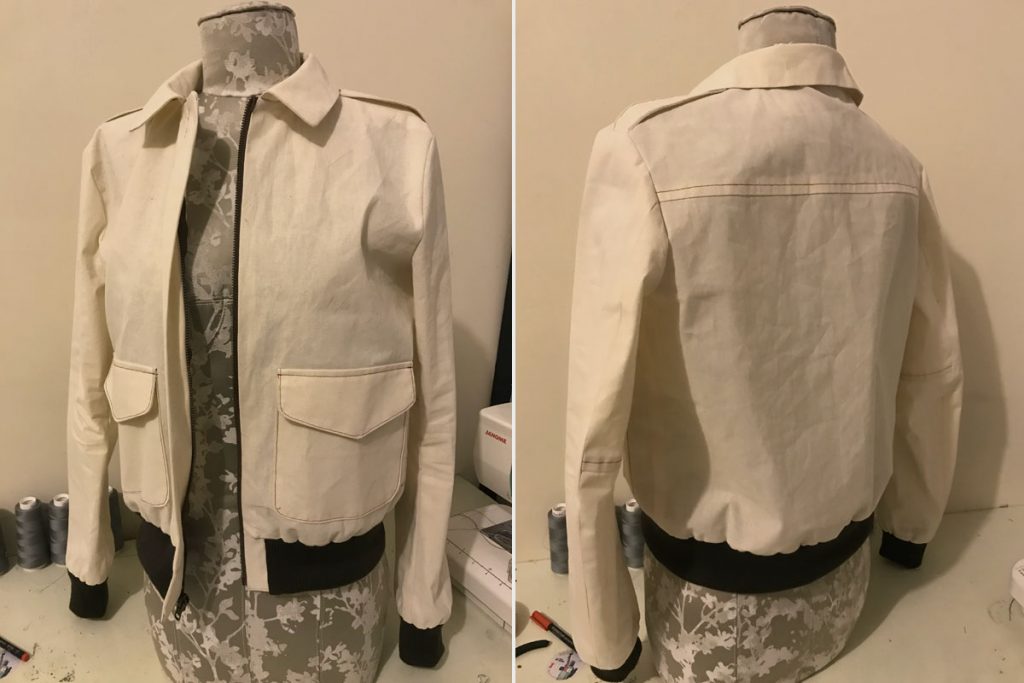
Captain Marvel’s jacket is a pretty accurate rendition of an A-2 flight jacket,* so as I was developing the custom pattern I was able to refer to pictures of actual historical jackets to fill in any gaps in the available references. I did two mock-ups, the first to work out the basic details and proportions and the second as a fitting sample that I sent to CutiePieSensei to try on. With her feedback, I started cutting out the actual jacket.
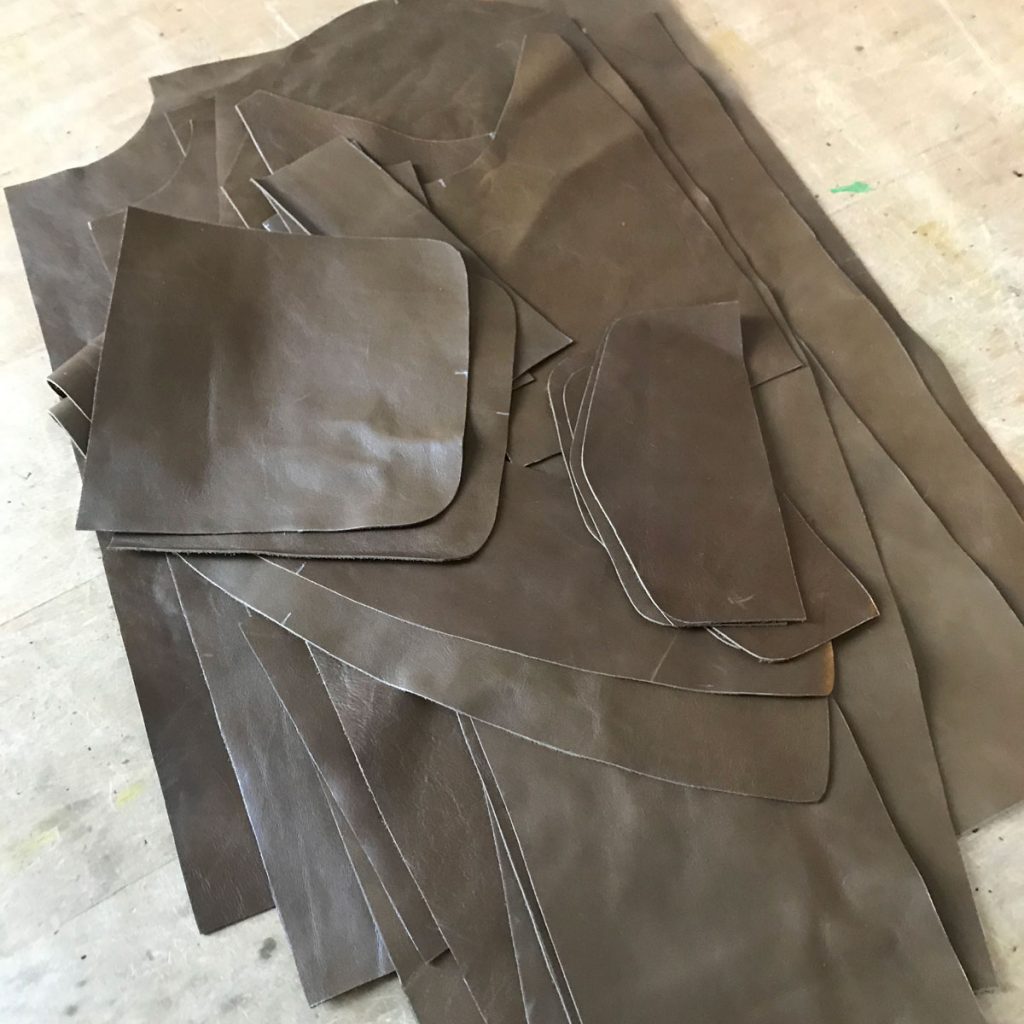
The jacket was cut from 2.5oz cowhide, which was right about at the limit of what my domestic sewing machines could handle in the number of layers required for this jacket. Skipped stitches were the biggest problem I encountered, followed by feeding issues, and I pulled out the whole bag of tricks to make it work (might do a separate post on that later.) The battle was totally worth it though, as the color variations in the leather (with some strategic cutting) gave me a head start on weathering the jacket and giving it some authentic texture.
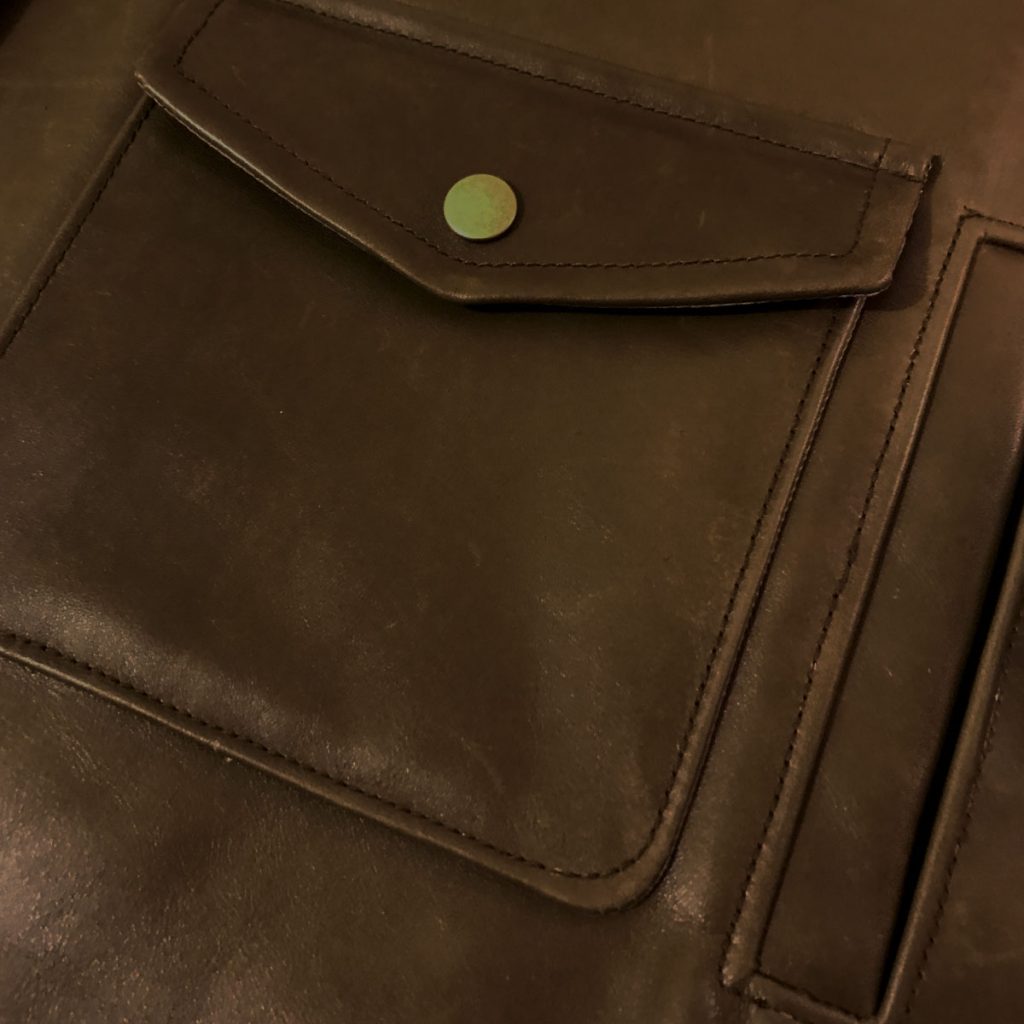
One detail that I loved on the historical jackets is the hand-warmer pocket hidden behind the patch pocket – a subtle but very functional detail that makes the jacket feel more real. This was a bit of a trial in the heavy leather, especially the topstitching through approximately a bazillion layers around the pocket outline, but it’s actually pretty straightforward to do as long as you get the pattern and construction order right. I did the pocket portions of the jacket front first, before beginning to assemble the jacket, so that they’d be easy to maneuver through the machine.
The bag for the welt pocket is cut long enough to extend past the far edge of the patch pocket, then fold back on itself to make the inside layer of the pocket. I sewed a patch of leather to the inside of the pocket bag behind where the opening would be, so that the pocket lining isn’t visible in the gap. I sewed the welt pocket up to the point where the pocket bag would be folded back and closed up, then paused and attached the patch pocket to the outside of the jacket. This way, the patch pocket stitching holds the pocket lining in place and keeps it from bunching up inside the jacket, but doesn’t sew the pocket closed. Once the patch pocket and flap were finished I went back and finished off the hand-warmer pocket.
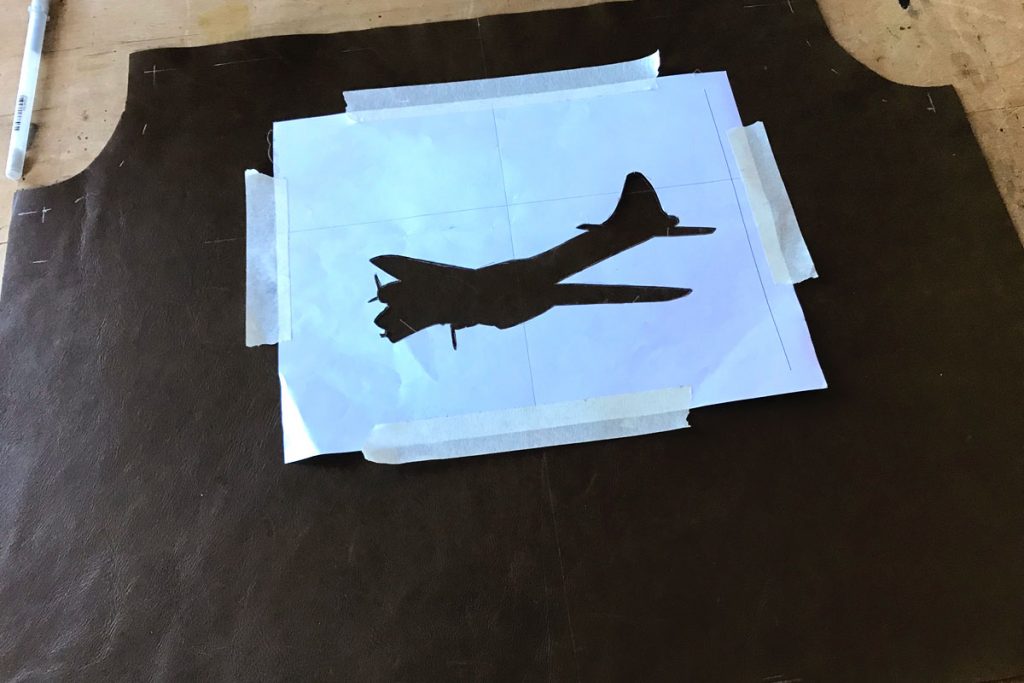
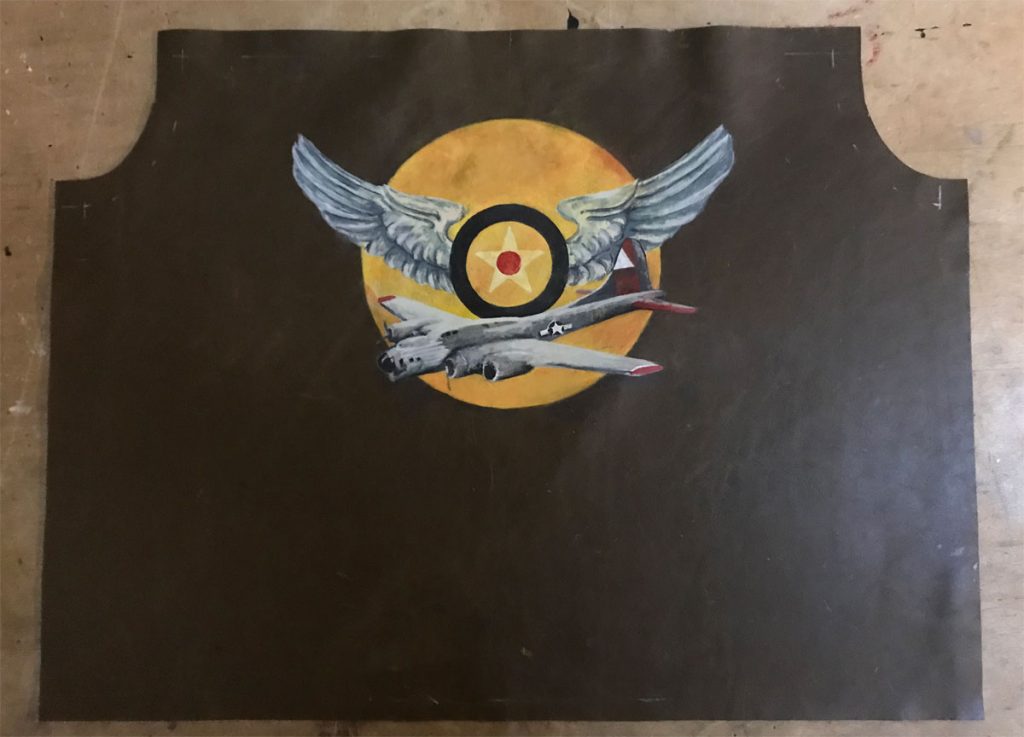
While I was assembling the jacket fronts, I also started painting the jacket back. I drew out the graphic in Illustrator, so I could check placement on the back pattern and resize it as needed. Then I printed out extra copies of the graphic and cut individual stencils for the various elements to copy the shapes onto the jacket back.
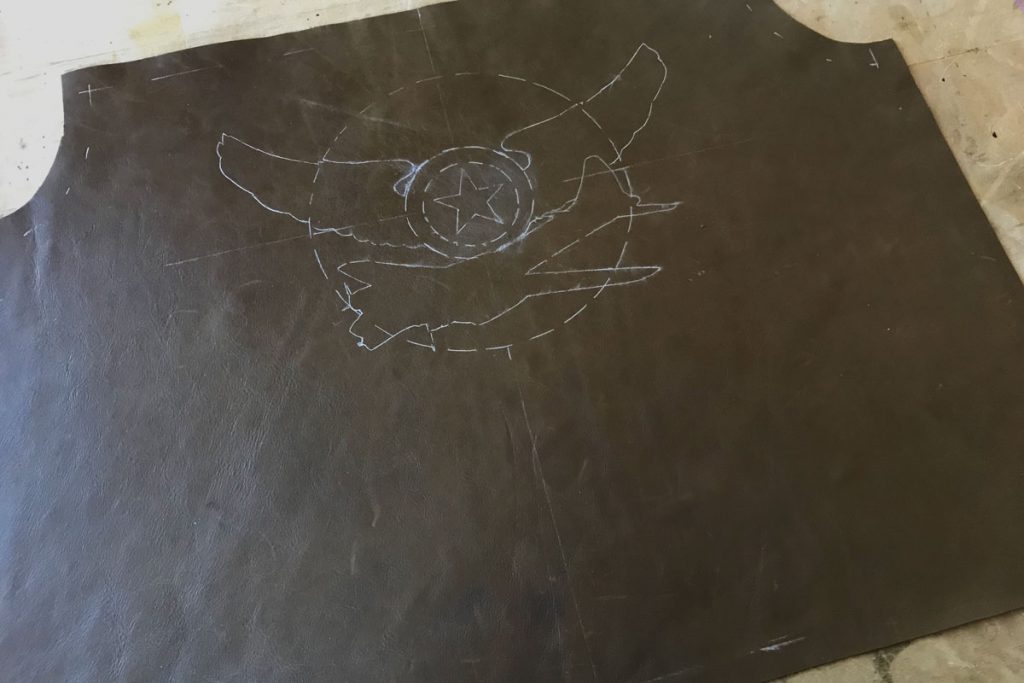
I included registration lines on all the individual stencil pieces, to make sure everything would stay lined up and proportioned correctly. I usually mark leather with a silver gel pen, which doesn’t rub off the leather as I’m working but wipes away with a damp towel when I’m done.

I really wanted to emulate the balance of detail and and painterliness in the original graphic, so I freehanded the rest of the design once I had the basic shapes blocked in. The graphic was painted with Angelus leather paints, which are impressively tough and resilient but sometimes required several coats to get good opacity.
There were still a few very fine details missing after two days of painting, but I’d reached the limit of what I could do with my existing brushes and had to go buy a size zero to finish. In the meantime, I started assembling the rest of the jacket.
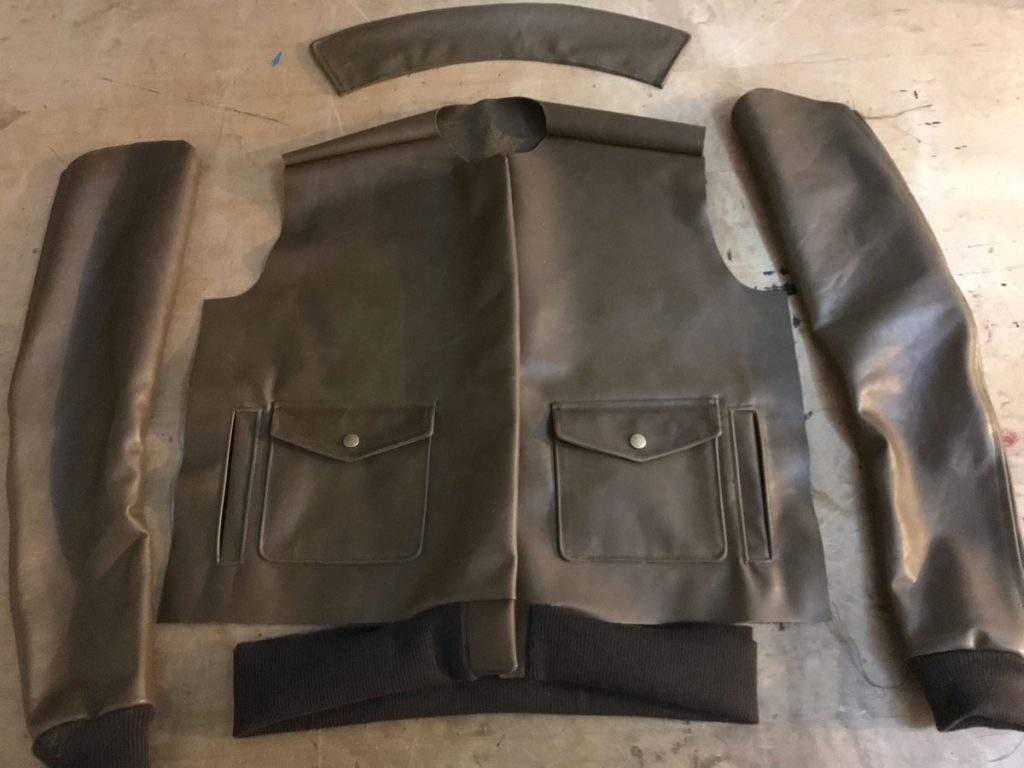
The assembly of the front zipper/tab/ribbing situation is possibly the trickiest part of sewing a jacket like this, so you might want to pick up a pattern if you want to do this and haven’t made one before. The overlap and underlap sides are a little different, but basically the top outside edges of the tabs are attached to the jacket fronts and the zipper inserted first. Then the ribbing is attached to the tabs, and the ribbing/tab assembly folded in half and attached to the lower edge of the jacket. I was able to complete most of the zipper insertion and attach all of this before the back was actually on the jacket, but waited to topstitch anything until the collar and ribbing were on. The sleeves were inserted just before the lining, as they’re a pretty independent unit that can be assembled separately and just add weight while you’re maneuvering the rest of the jacket around if you attach them too early.
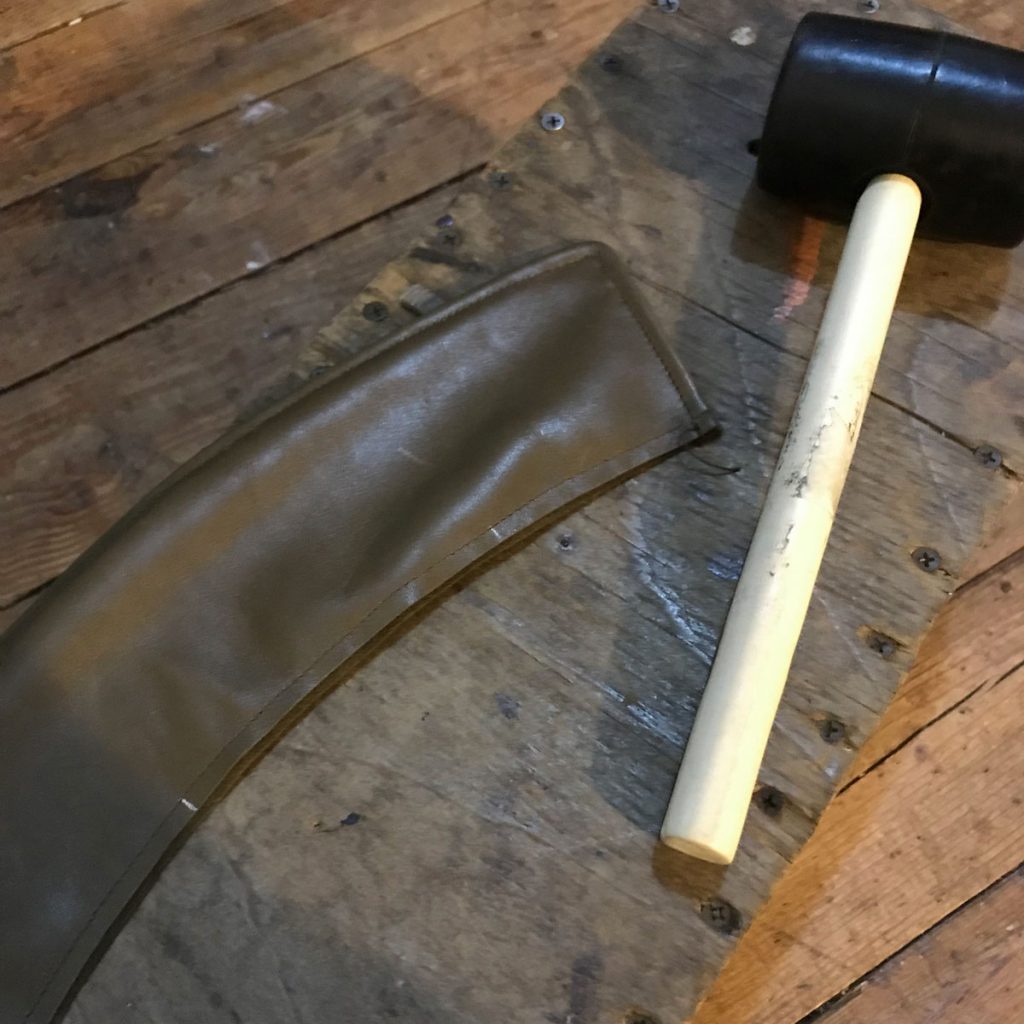
Throughout the construction of this jacket, I had to be pretty ruthless about managing the leather bulk. Sometimes that meant shaving away some thickness behind fold lines or where several layers of seam allowance overlapped; sometimes that meant walloping a fold with a mallet to get a nice crease. As long as you’re careful not to remove too much thickness and weaken the leather, or whack hard enough to break the stitches, it’s really helpful for getting nice crisp seams and edges.
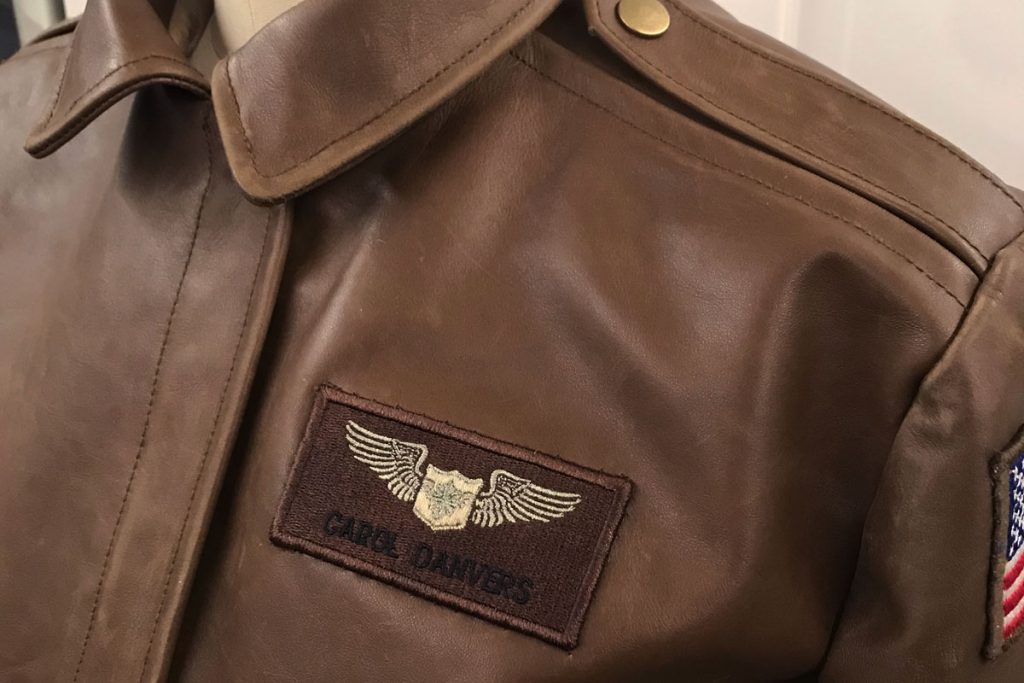
The last finishing touch was the embroidered patches on the sleeve and jacket front. I admit I bought the flag patch; Carol would have done the same. For the nametag patch, I had to learn something new. I drew up a customized interpretation of the pilot wing symbol, with a bitty Captain Marvel emblem in the center. I digitized it myself, (my first digitizing project ever) and it was stitched up on Pitchfork Cosplay’s embroidery machine with lots of handholding from Team Pitchfork. (The finished jacket pictures were also taken on Pitchfork’s dress form.)
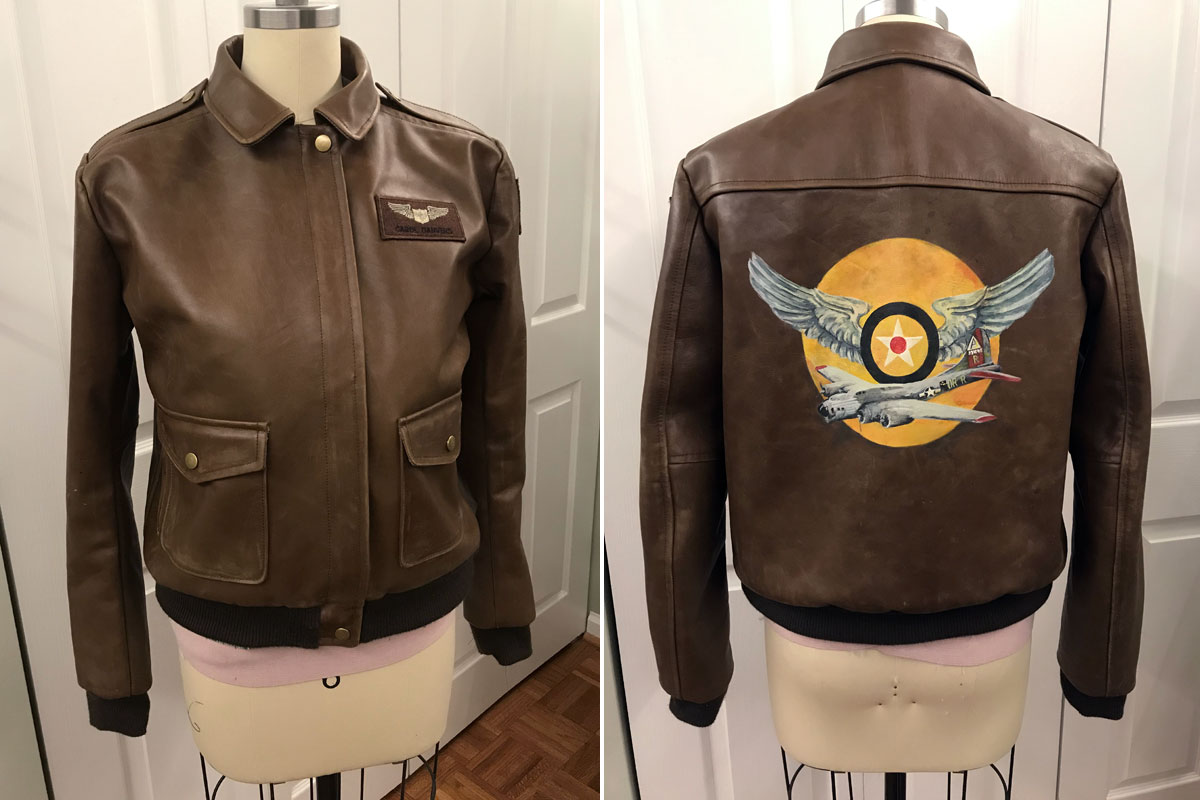
I’m pretty darn pleased with the final jacket, though now that I’ve seen the movie I notice I missed a few details (leather facing instead of lining all the way to the zipper; ketchup stain.) It fits a little funny on the dress form since it was cut to fit over the Captain Marvel suit and armor, so you’ll just have to check out the video to see it in action! I’m immensely grateful to the Marvel Becoming team for including me in this project, and just floored by the accomplishment of my fellow makers. Well done, Carol Corps!
*N.B., with apologies to any real A-2 enthusiasts who may find this post – I’m only interested in military fashion to the extent that it makes me feel like a William Gibson character, so my goal with the research was strictly to be true to Captain Marvel’s origin.
]]>