 I was all over the new Spider-Woman costume when it was unveiled a couple months back. The outfit is functional and interesting, with cool patternmaking and embellishment details, so it checked a lot of boxes for me, plus spiders are kind of a thing. I started playing with it right away, but between gift sewing and work stuff I didn’t have a chance to work on it much until this week. Delicious crunchy patternmaking ahead!
I based the jacket on one of my personal pattern blocks, aiming for pretty minimal ease to get the streamlined look in the art. I used a cotton twill with a bit of give for the muslin, and might go with stretch wovens for the real version. (I think the jacket is actually supposed to be leather, but I’m going to aim for a wearable version in regular fabric before I shell out the $$$.) Here’s the block I started with:
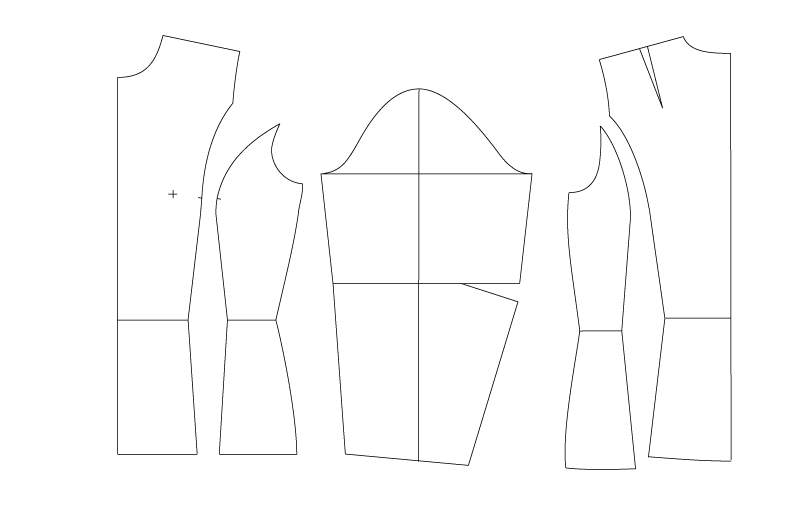
Princess-seamed jacket block with one-piece darted sleeve (no seam allowances)
The first step in turning this into the jacket is drafting the raglan sleeves. Now, the references conflict a bit on exactly how the sleeves are put together. If you look at the close-up view here, it looks like the raglan sleeves stop about an inch short of the neck opening. If you look at the view here, it looks like they actually intersect the neck opening. I went with the first version, because it’s a little unusual and I like a challenge, but if you wanted to use a commercial pattern instead of drafting your own raglan sleeves (understandable) the latter would be much easier to find.
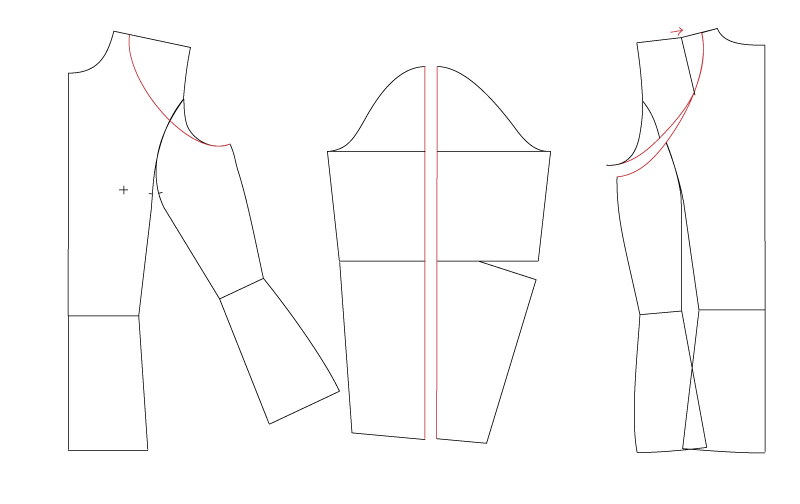
First step in drafting the modified raglan sleeves
The first step is to line up the top of the princess seams and draw in the lines of the raglan sleeve The shape is pretty much a judgment thing, but note that I’ve drawn the back seam to intersect the tip of the back shoulder dart so I can rotate it closed. I also drew both front and back seams to intersect the shoulder seam at right angles.The sleeve is temporarily split into front and back pieces, right down the middle.
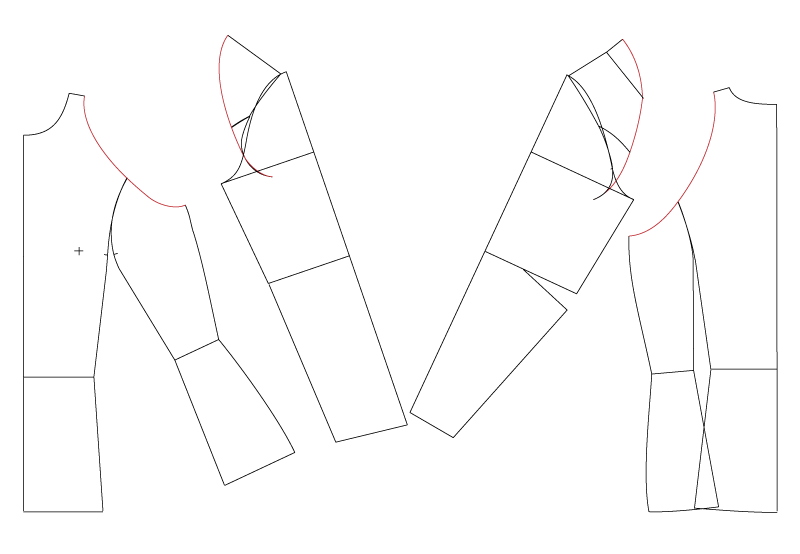
Second step for the modified raglan sleeves
Next, line the sleeves up with the armhole opening. The sleeve cap has a little bit of ease in it, so that sticks out at the top. The sleeve and armhole cross near the inflection point of the sleeve cap, and the length below this point should be the same on both.
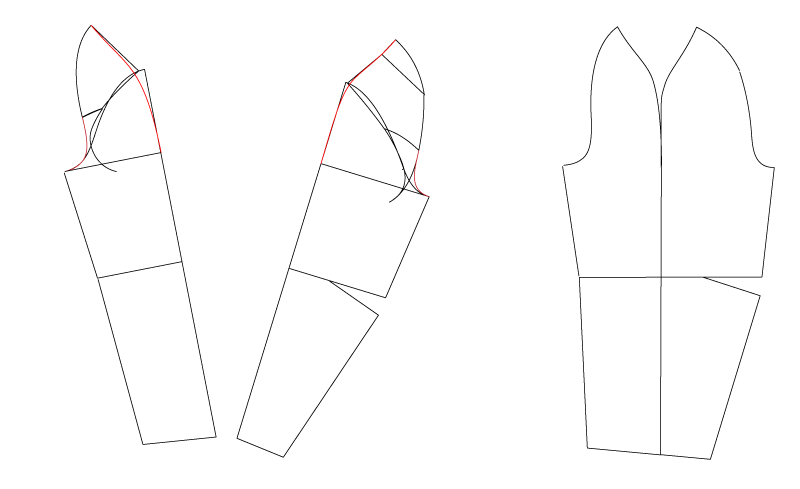
Finishing the modified raglan sleeve draft
Redraw the underarm curve, blending the raglan seam into the base of the sleeve cap. It’s a good idea to compare this to the matching seam on the bodice pieces, to make sure they’ve ended up the same length. You don’t want a lot of excess ease in the seam here or it’ll look puffy. Draw in a smooth curve for the shoulder, but note that you might need to fiddle with the shape to get a nice fit. Definitely plan on a muslin or two here. When it’s good, rejoin the sleeve pieces into a single sleeve with shoulder and elbow darts.
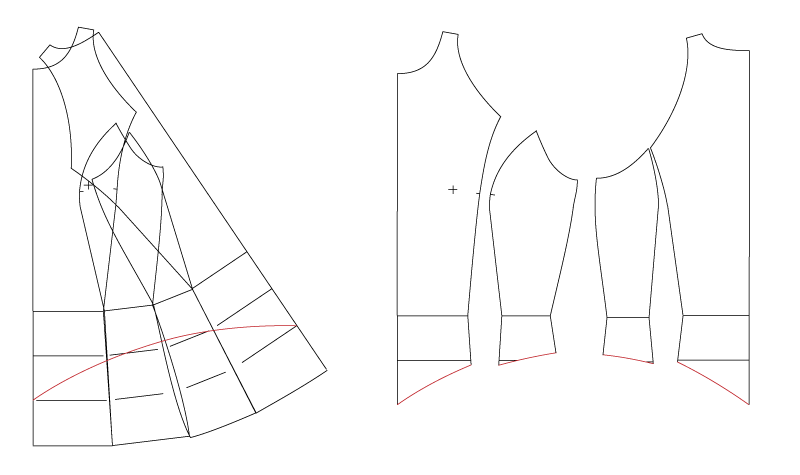
Drawing in the hem shape
The next step is to draw in the shape of the hem. This is another place where the references disagree – some of them have a straight lower edge, while others come to a point in front and back. I waffled on this, but I ended up going with a point because it seems a little more superhero-ish and less like ordinary streetwear. Then I lined up all the front and back panels in order, matching up the seams below the waist. I felt safe overlapping the curves a little at the hip because most of my hip width is below where the jacket will end, but it’s no big deal to leave a little more room there if needed.
I divided the distance from waist to hip into thirds to give me guides for shaping the hem. The lowest point is at about the 2/3 mark, and the highest point at the side is just above 1/3. I pulled some of my references into illustrator to measure the angle, and determined that the hem comes up at about a 30º angle from the center front and back. I also made sure that the curve would be perpendicular to the side seam. After drawing in the hemline, I separated the pieces again.

Basic pieces for the jacket
At this point, the main pieces are done and you can sew up a muslin to check the fit. I also sketched the placement for the front pockets. The underlap side doesn’t allow for a very deep pocket, but it’s such a close-fitting jacket that not much would fit in there. I only ever seem to use pockets for sticking my hands in and looking awkward anyway.
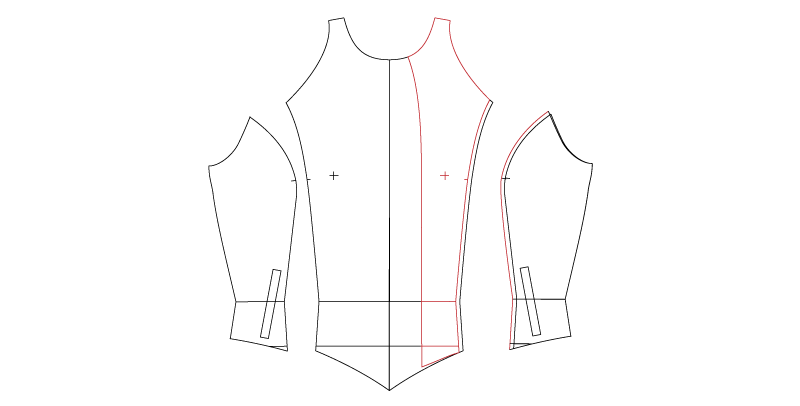
Creating the zipper shield and left front
Pictures of the jacket open show that it closes with a zipper along the left front princess seam, then with snaps along the raglan edge. I wanted the zipper to be completely hidden under the overlap when closed, so I created a separate left side front piece with the princess seam offset by 1/4″. When I cut the actual jacket, I’ll either add a small facing on the overlap edge or just cut it with an extra wide seam allowance so I can do a generous lapped zipper. (On the first muslin I extended the overlap piece instead of moving the princess seam, but I don’t like how it makes the insignia asymmetrical so I’m going to try it this way for the next one.)
The left side front attaches to the zipper shield, so I accounted for the shifted princess seam when creating that pattern piece. I also shortened the bottom point slightly so it wouldn’t peep out when the jacket is closed.
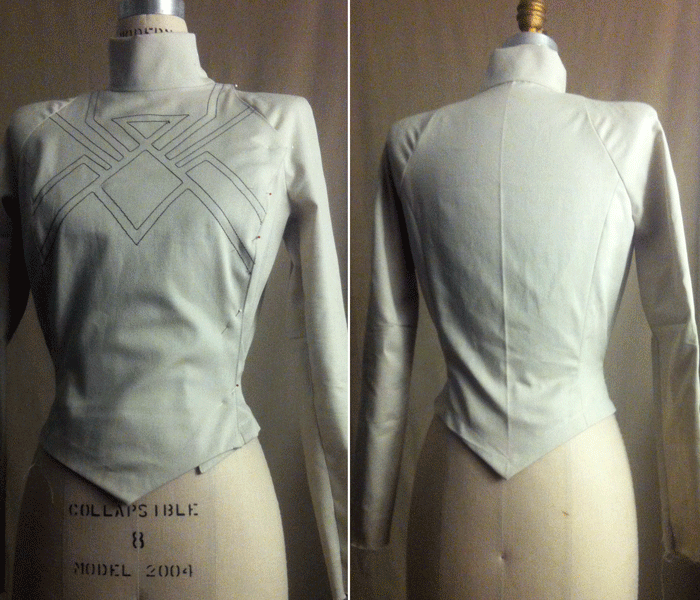
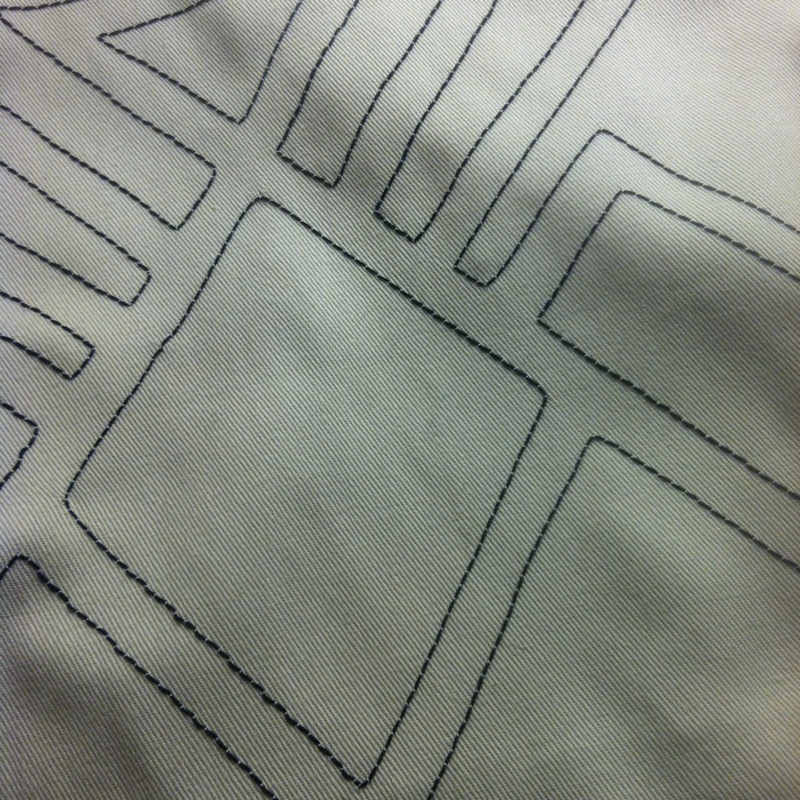
First trial of the Spider-Woman jacket pattern, in cotton twill
Here’s my muslin with the zipper shield attached (but no zipper inserted, thus the pins.) An impatient muslin-maker, I skipped the pockets and only lined the front. You may notice the zipper shield sticks out a bit in spite of my modification, but that’s just because the dress form and I disagree on the topic of hips. The fabric is a cotton twill I had lying around, probably something I got in a scrap sale at work. It’s got some nasty creases that didn’t want to press out, but of course in a muslin it doesn’t matter.
Before I attached the front piece I traced the spider insignia onto the back of the fabric, then stitched over it with a beefy black topstitching thread in the bobbin. I’ll applique the final design, which should be pretty simple since it’s all nice straight lines, but for the muslin I just wanted to sketch it out so I could check the proportions. I’m pretty happy with it!
I made a few refinements to the fit after this muslin, mostly in the sleeves. The bicep was a bit too large and the wrist too narrow, so I tweaked accordingly. I took the bodice in a little bit along the front and back raglan seams as there seemed to be a bit of excess fabric in there, raised the underarm seam about 1/2″, and flattened out the shoulder curve about 1/4″. Hoping these modifications will also alleviate some of the wrinkling visible along the raglan seams, otherwise I’ll have to think about how to stabilize them better.
The art shows an extremely close fit in the arms, so I’m actually leaning toward using a heavy knit for the sleeves, at least for the fabric version. Which might require me to take them in even further, but we’ll see how it goes. The neck opening measures 18″ with overlap, and I just made the collar a rectangle, cutting on the cross-grain so it would have a bit more give. The collar on the muslin is 2 1/2″ tall, which looks a little too big to me, so I’ll probably knock that down to 2 1/4″ or 2″ for the real thing. I’ll update when I do my next version to show how it all works out.
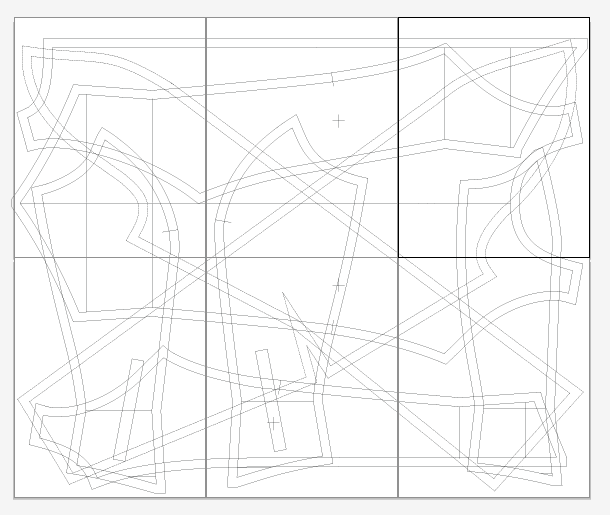
The version of the pattern I use for printing – a mere six sheets of paper. I actually split the sleeve back into two pieces so it would fit on the paper, but I’ll most likely graft them back together when I trace it.
The last step is to add seam allowances and print the pattern out. Printing patterns is the bit I hate about drafting in illustrator, to the point where I sometimes actually prefer drafting manually. I particularly hate wasting 20 or 30 sheets of printer paper, painstakingly trimming the edges, and assembling them into a stiff, unruly paper quilt that’s awkward to use and store. My solution is the mess above – I use only enough sheets to fit my largest piece, overlapping the rest. After printing and assembling the resulting 4-8 sheets, I trace the individual pieces off onto lightweight pattern paper. I’m not sure if this actually saves any time, but I like tracing much more than I like aligning and taping so it works well for me (and feels less wasteful).
Next step is the fabric version with an actual zipper. Hope my fitting tweaks worked out!
Hi Gillian, my daughter is seriously interested in a New Spider Woman biker jacket as a cops lay outfit. I am willing to help her with it since I see it as a daily wearable jacket too. Please keep us informed on your progress with this jacket so we can recreate the biker jacket also. Thanks for working on this project. Mark.
Hi Mark, that’s so cool! I’ve had to put this project on the back burner because of some other things taking up most of my crafting time, but I’m hoping to get back to it soon. Good luck with your daughter’s jacket!
I’m catching up on your blog and had just the other day decided that for my first cosplay construction I wanted to do Spider-Woman, so this is amazing to find! Thanks for the insight into your planning process.
Glad to hear it was helpful! Best of luck with your build, should be a fun one!